Southern New Hampshire University | SNHU-CYB300: System and Communication Security
Manage Certificates
Exercises
- Introduction
- Exercise 1 - Manage Certificate Templates
- Exercise 2 - Manage Certificate Enrolment
- Exercise 3 - Configuring Key Archival
- Summary
Introduction
The Manage Certificates module provides you with the instruction and server hardware to develop your hands on skills in the defined topics.
Learning Outcomes
In this module, you will complete the following exercise:
- Exercise 1 - Manage Certificate Templates
- Exercise 2 - Manage Certificate Enrolment
- Exercise 3 - Configure Key Archival
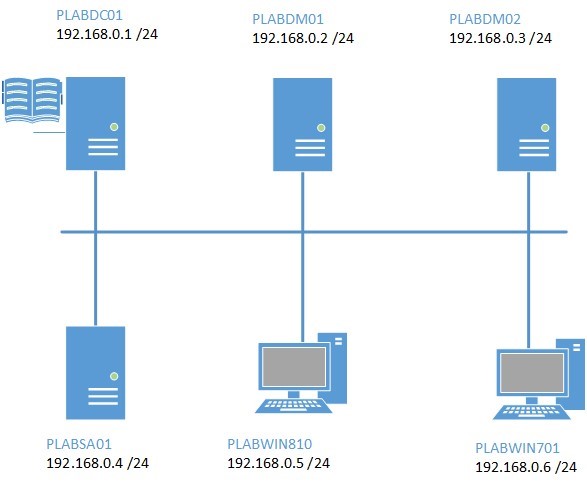
Lab Diagram
During your session, you will have access to the following lab configuration.
- PLABDC01 (Domain Controller)
- PLABDM01 (Domain Member Server)
- PLABWIN810 (Windows 8.1 Workstation)
Depending on the exercises you may or may not use all of the devices, but they are shown here in the layout to get an overall understanding of the topology of the lab.
Help and Support
For more information on using Practice Labs, please see our Help and Support page. You can also raise a technical support ticket from this page.
d2c53300-f951-45a9-9aa4-3d4ecae69e11
Exercise 1 - Manage Certificate Templates
Active Directory Certification Authority services includes set of built-in certificate templates. These templates form the basis of what type of certificates will be available to users, computers and services in a network when any of these entities request for a certificate from the certificate server.
In this exercise, you will configure the different properties of CA Certificate Templates for a user account.
Please refer to your course material or use your preferred search engine to research this topic in more detail.
Task 1- Install Enterprise Root Certificate Service
In this step, you will install AD Certificate Services on PLABDM01.
Step 1
Ensure you have powered on the required devices and connect to PLABDM01.
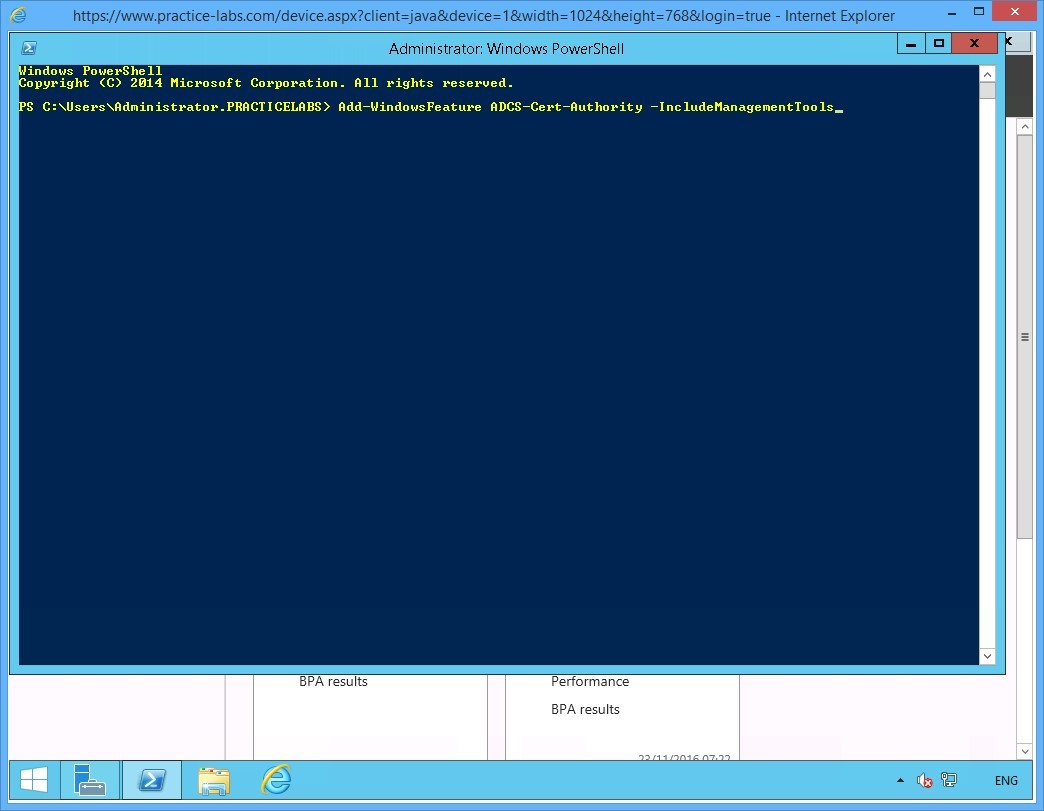
Click the Windows PowerShell icon located in taskbar.
Step 2
Windows PowerShell opens. Please note that Windows PowerShell commandlets or cmdlets are not case-sensitive.
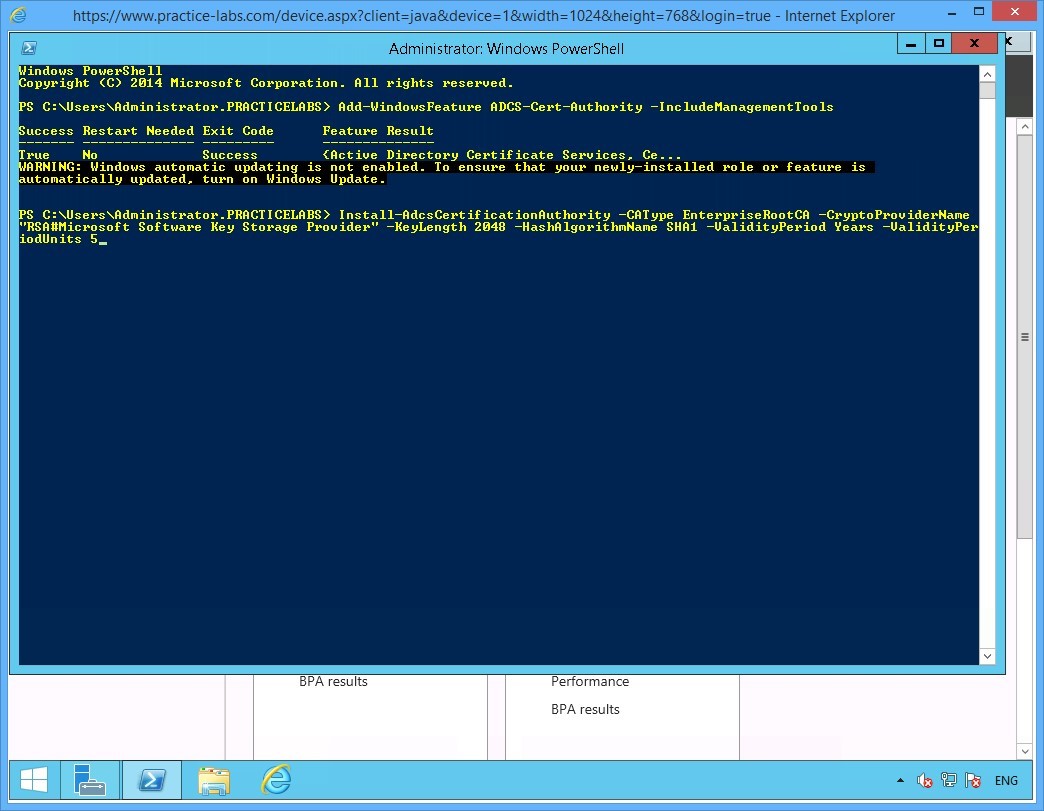
To add the Windows Feature called Active Directory Certificate Services, type:
Add-WindowsFeature ADCS-Cert-Authority -IncludeManagementTools
Press Enter.
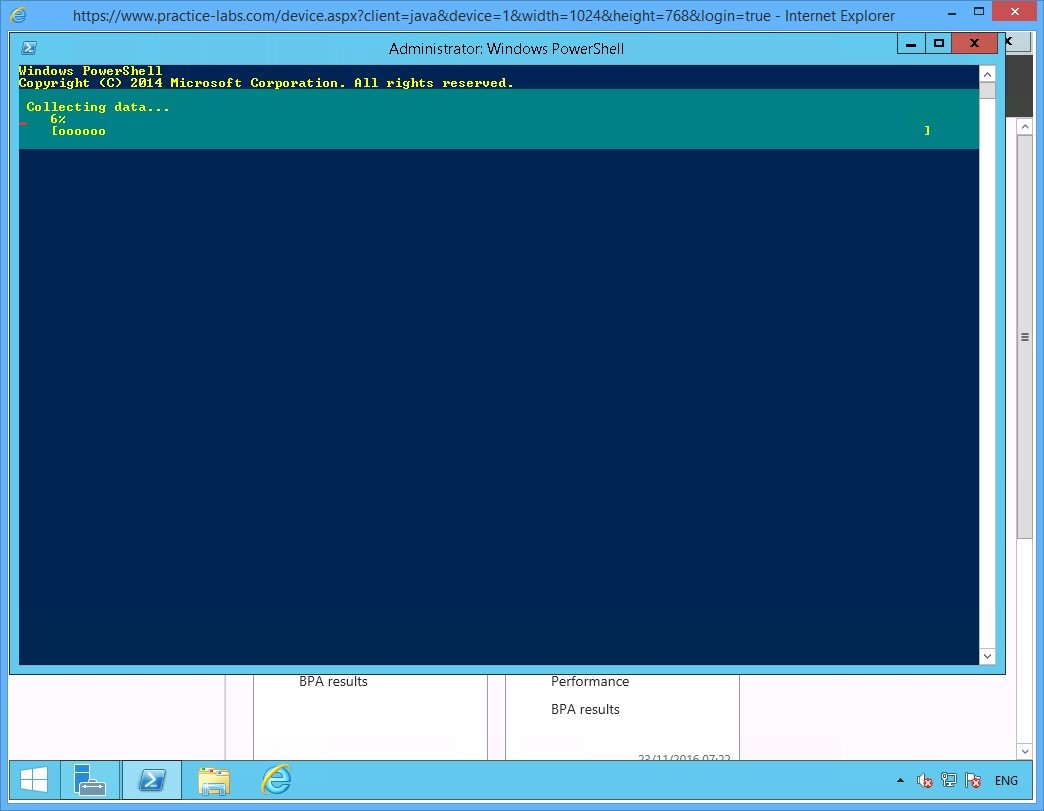
Step 3
Please wait for the addition of the new Windows feature to be completed.
Step 4
Windows PowerShell will notify you if the installation of Active Directory Certificate Services is successfully completed.
In this step, you will set up PLABDM01 to be the root Certificate Authority server that can issue certificate. You will likewise set the parameters of the certificate authority vendor which is Microsoft. Then set the properties for certificate encryption strength or key length, the hashing algorithm to be used and finally the validity period for certificates issued by PLABDM01.
On the next prompt, you will configure the Active Directory Certificate Services on PLABDM01 server.
Now type:
Install-AdcsCertificationAuthority -CAType EnterpriseRootCA -CryptoProviderName "RSA#Microsoft Software Key Storage Provider" -KeyLength 2048 -HashAlgorithmName SHA1 -ValidityPeriod Years -ValidityPeriodUnits 5
Press Enter.
Step 5
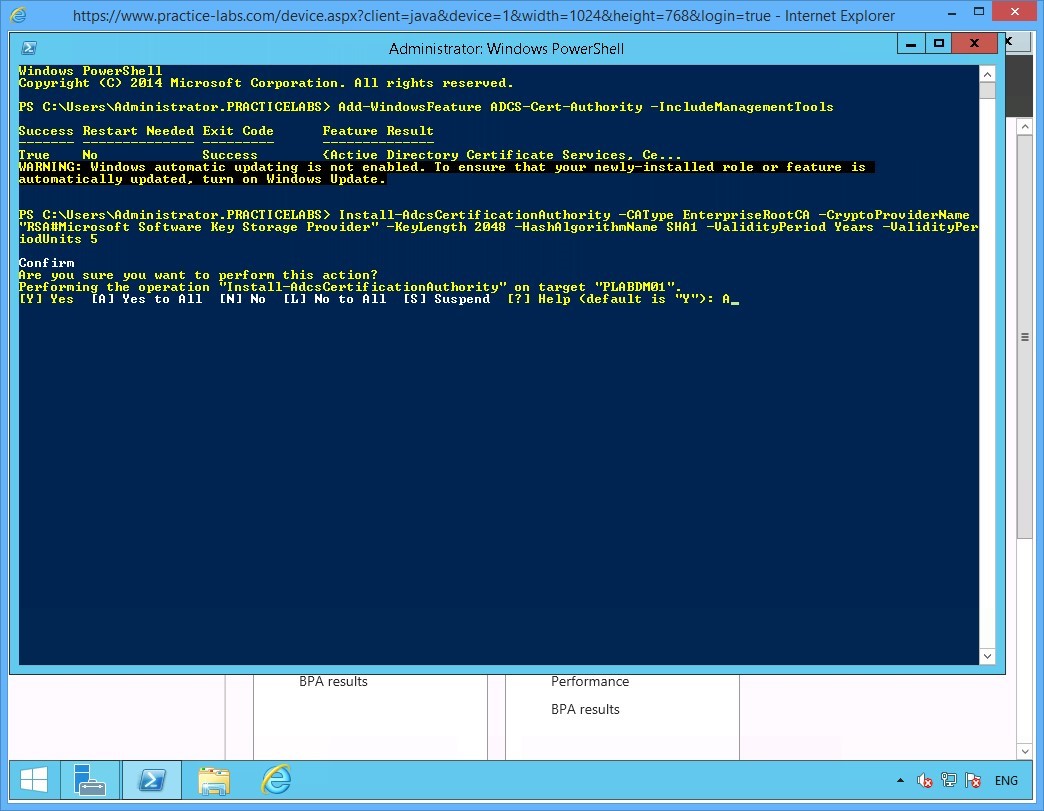
When asked to confirm the parameters of the Certification Authority services, type:
A
Press Enter to confirm the installation.
Step 6
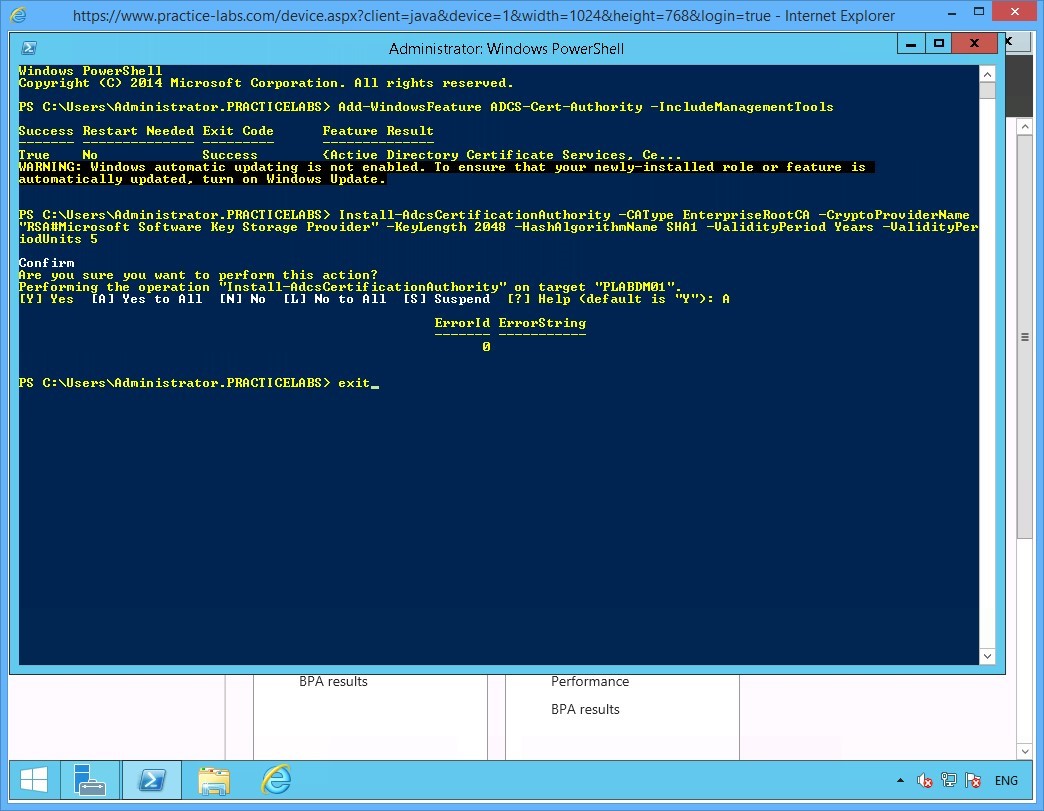
Close PowerShell when command is successfully completed with the installation of Certification Authority.
Type:
exit
Press Enter.
Step 7
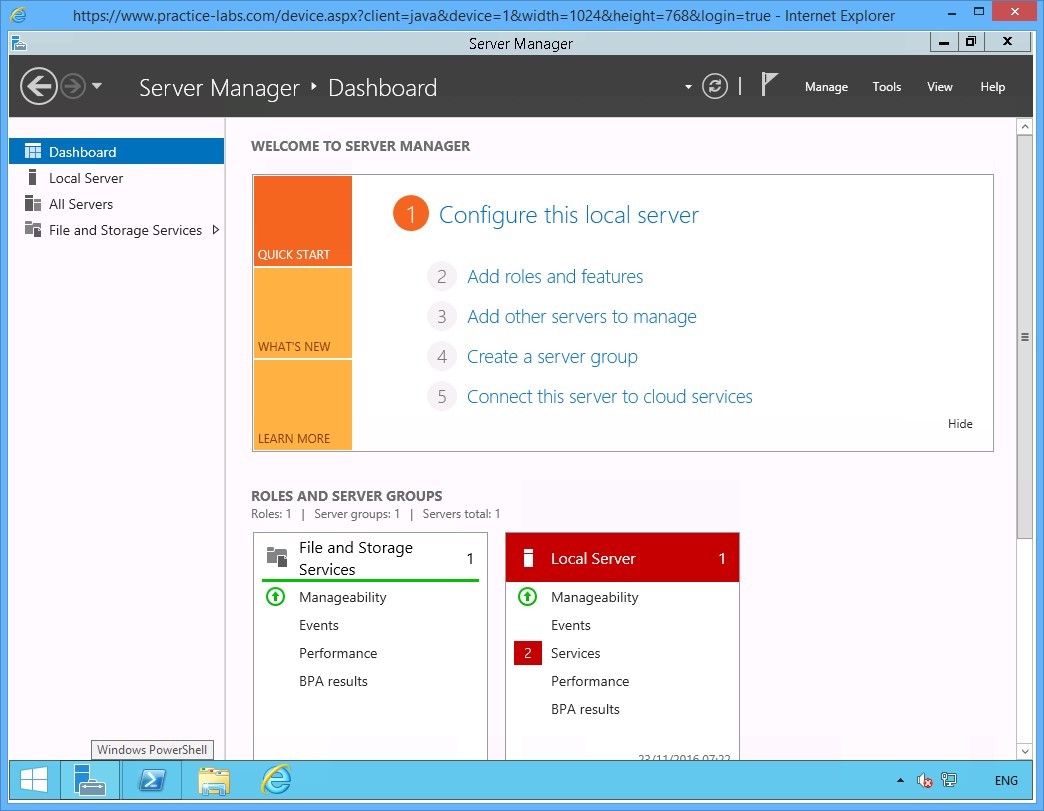
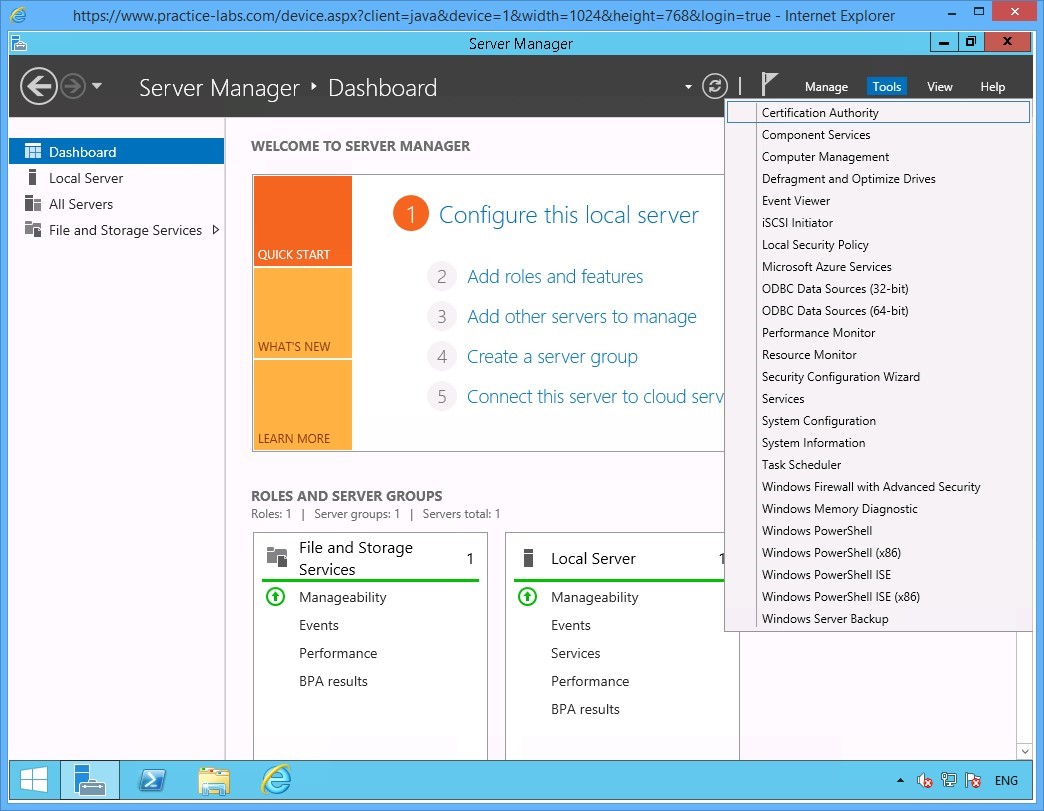
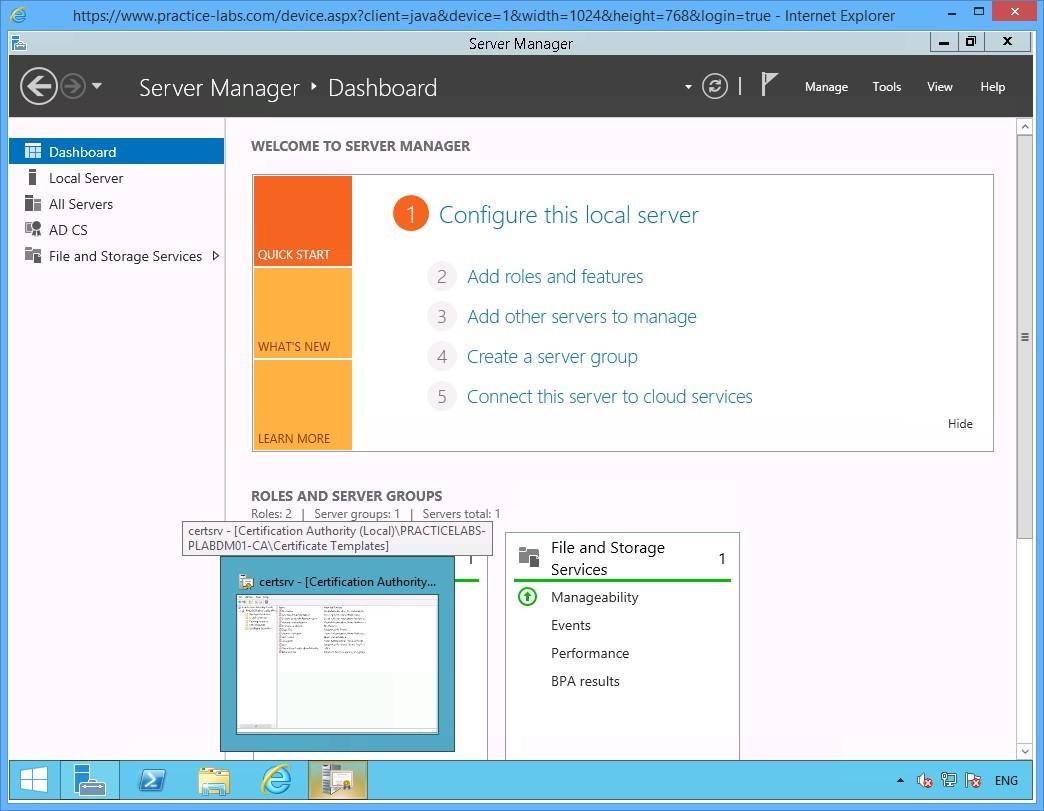
Back on the Server Manager Dashboard window.
Click Tools menu and select Certification Authority.
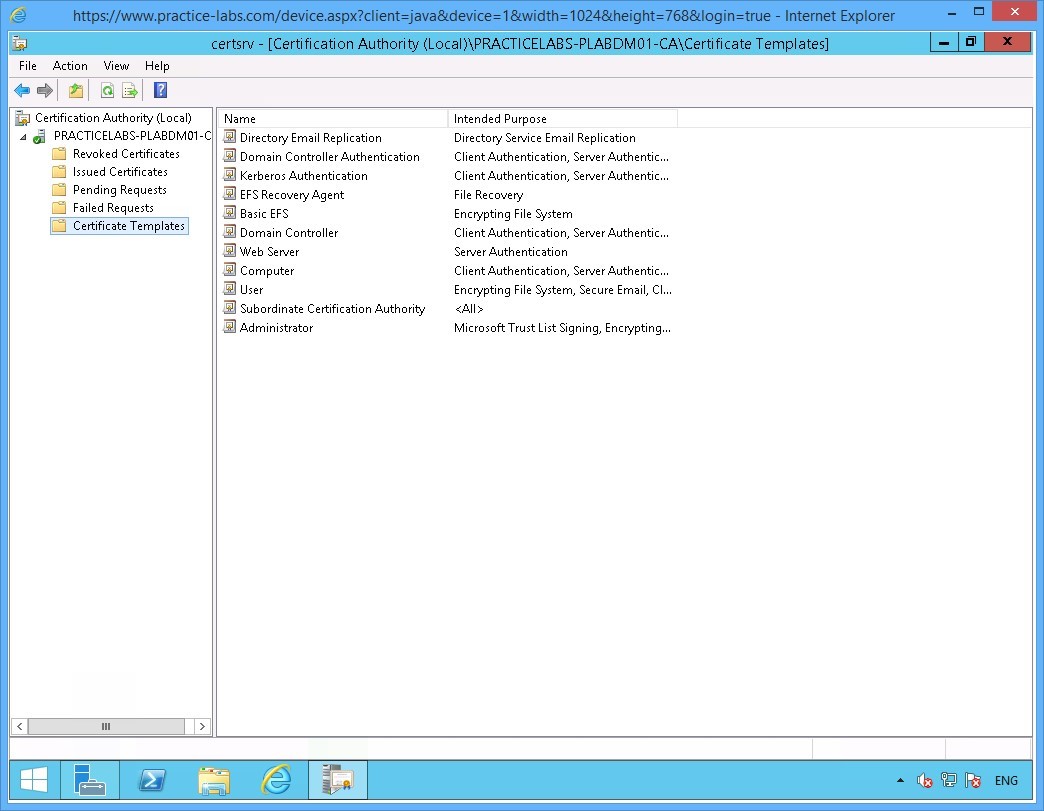
Step 8
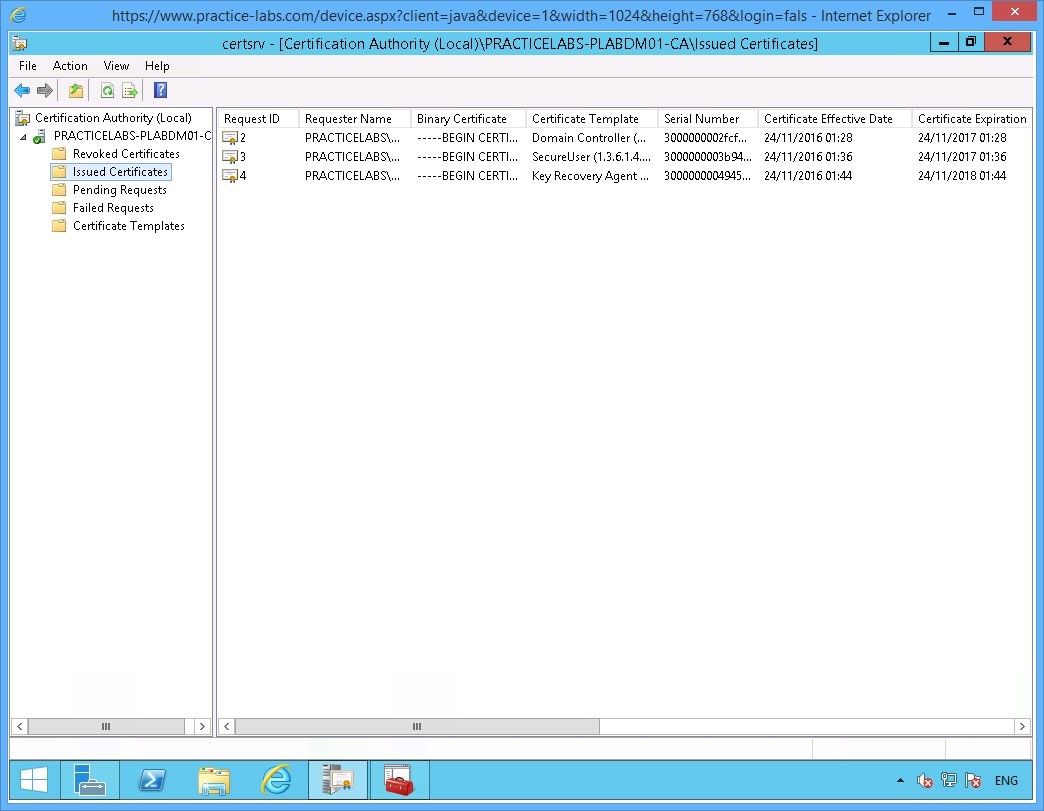
The certsrv - [Certification Authority (Local)] window opens.
Expand PRACTICELABS-PLABDM01-CA node.
Then click Certificate Templates folder.
The details pane of the Certificates Template folder at the right, indicates the type of certificates can be issued by PLABDM01.
Keep Certification Authority open.
Keep the devices you have powered on in their current state and proceed to the next exercise.
Exercise 2 - Manage Certificate Enrolment
For a large organization with hundreds of users, you can streamline the deployment of user certificates with the use of a customized certificate template.
A customized certificate template allows you to set properties and then distribute the certificates to domain users by using Group Policy Objects.
Please refer to your course material or use your preferred search engine to research this topic in more detail.
Task 1 - Configure a Customized Certificate Template
In this step, you will duplicate an existing user certificate template. Then make some changes on the properties of the duplicate user certificate template to create a custom certificate template for auto enrolment.
To set up a customized certificate template, perform the following steps:
Step 1
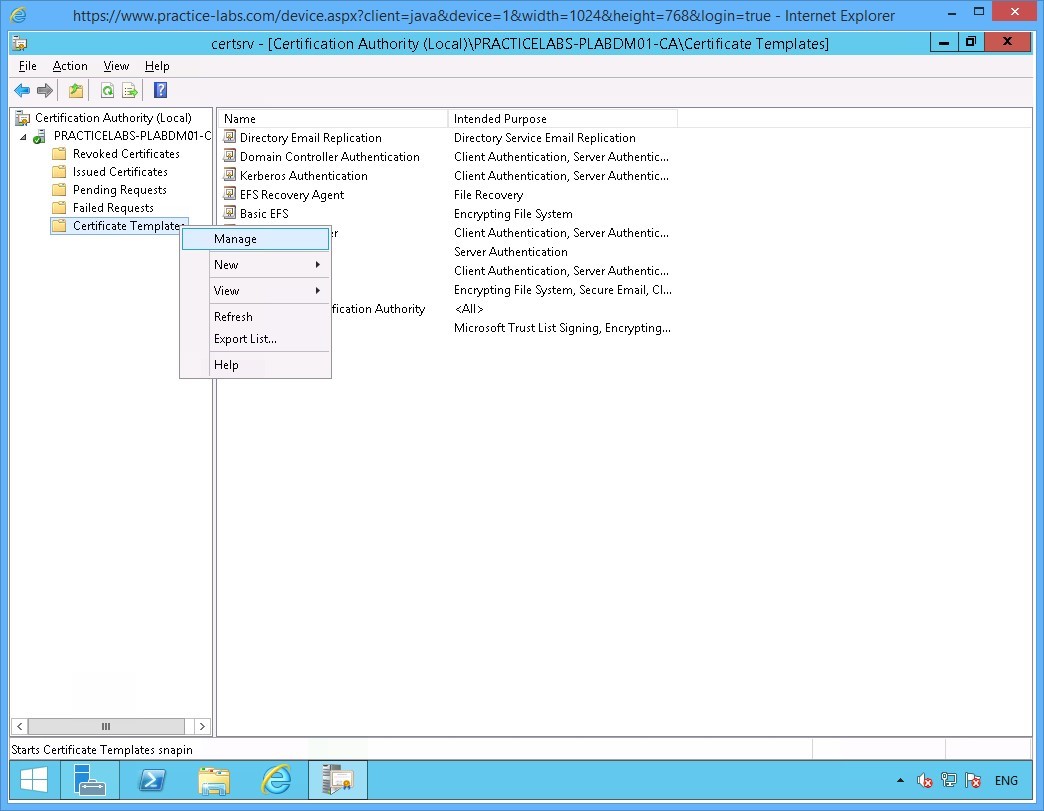
On the PLABDM01 device, the Certification Authority window is open.
Click Certificate Templates folder and right-click on it and select Manage.
Step 2
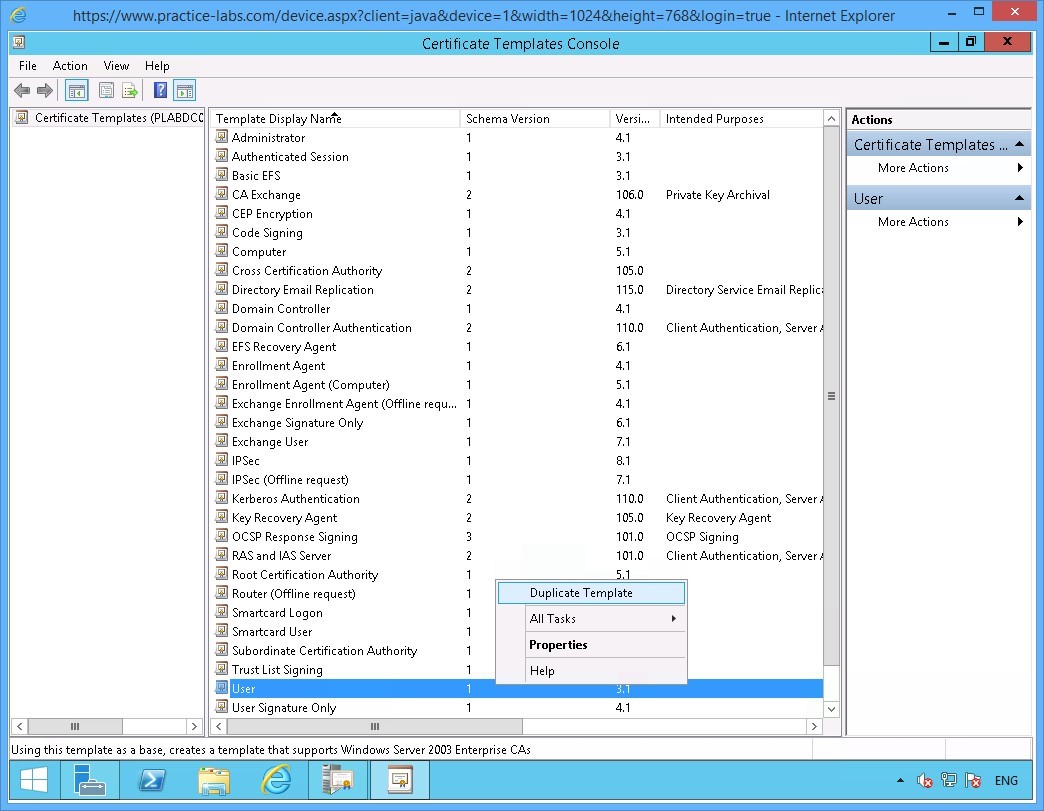
The Certificate Templates Console window opens.
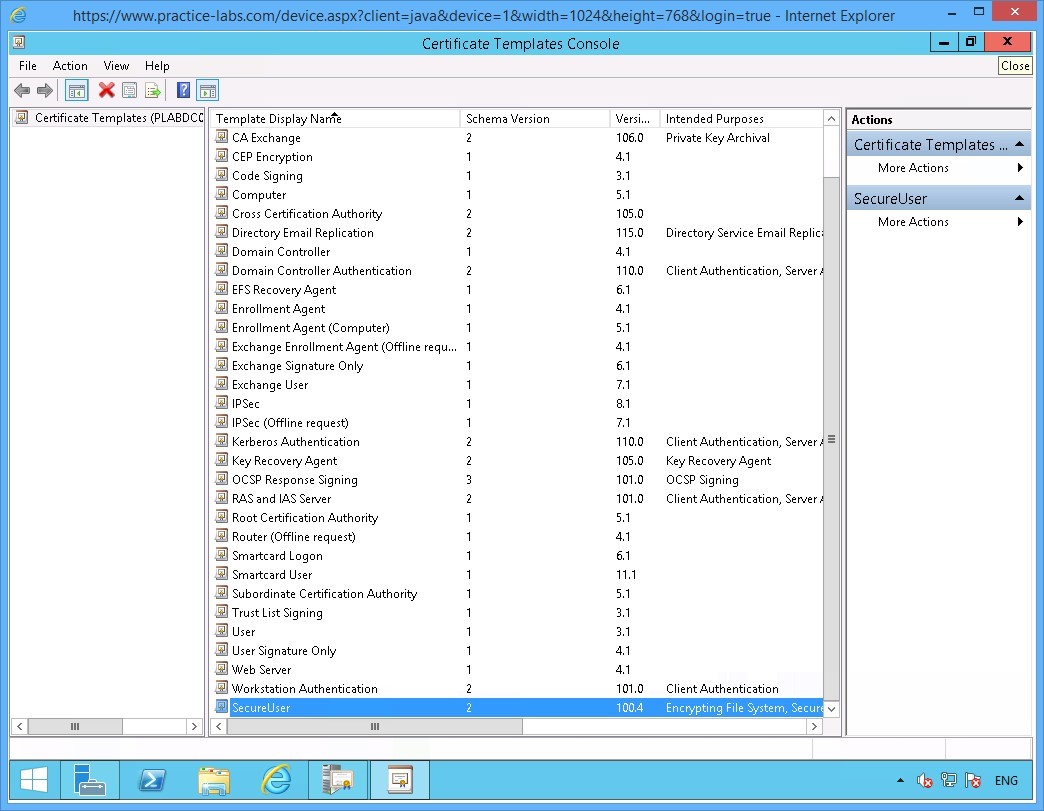
Scroll down the templates list and right-click on User, choose Duplicate Template.
Step 3
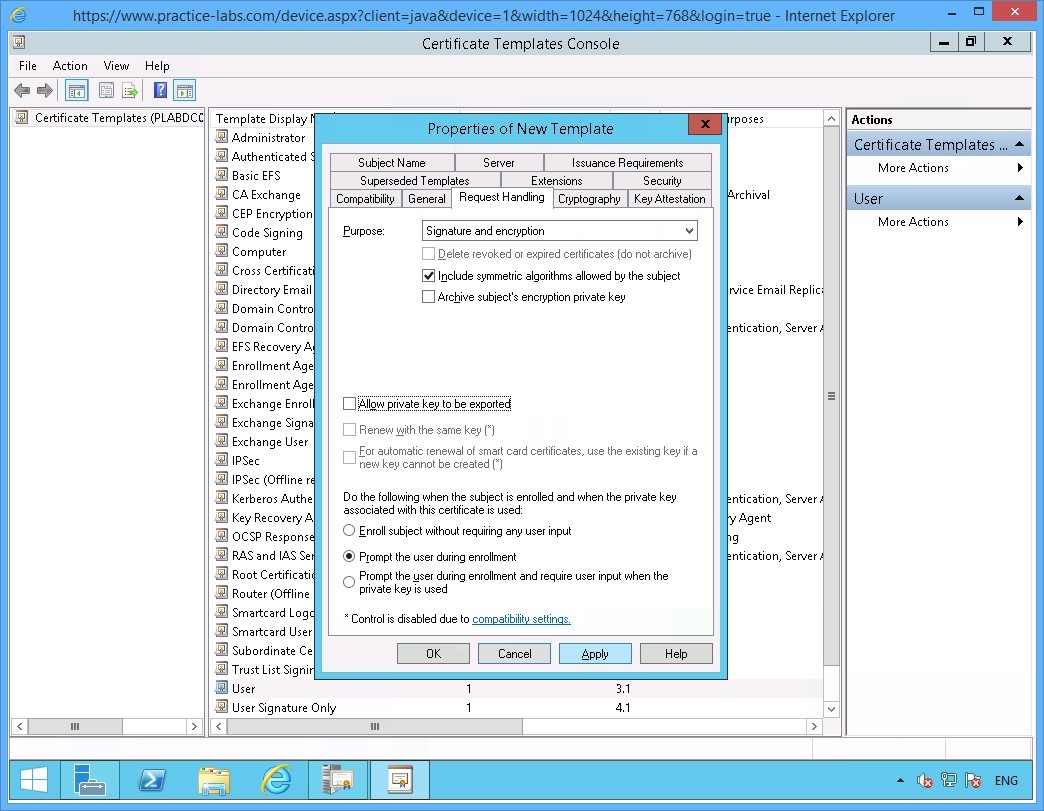
The Properties of New Template window opens.
Click General tab.

Step 4
On the General tab, click in the Template display name text box and type-over the existing text with the following:
SecureUser
Click Apply.
Then click Request Handling tab.

Step 5
On the Request Handling tab, select Prompt the user during enrolment option.
Click Apply.
Note: For the purpose of this lab, we will use this option Prompt the user during enrolment. In an actual deployment, users are not prompted by any message when they are automatically enrolled for a certificate.
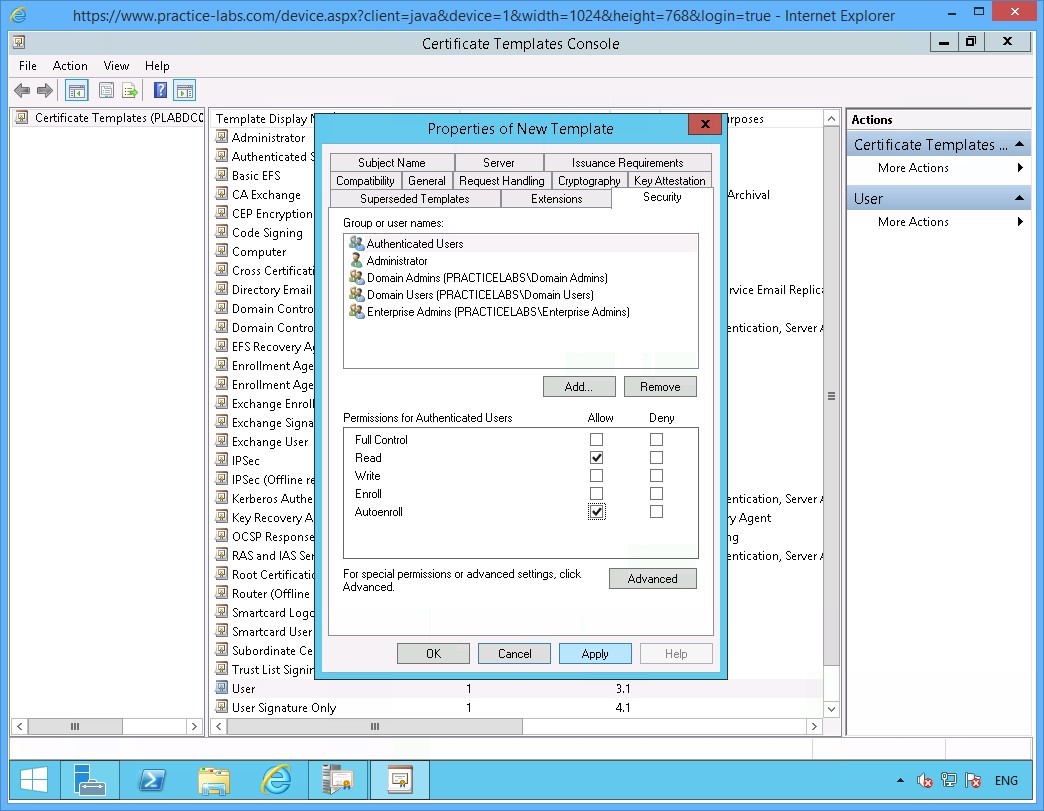
Then click Security tab.
Step 6
On the Security tab, select Authenticated Users group
Under the Permissions for Authenticated Users section, select AutoEnroll check box.
Click Apply.
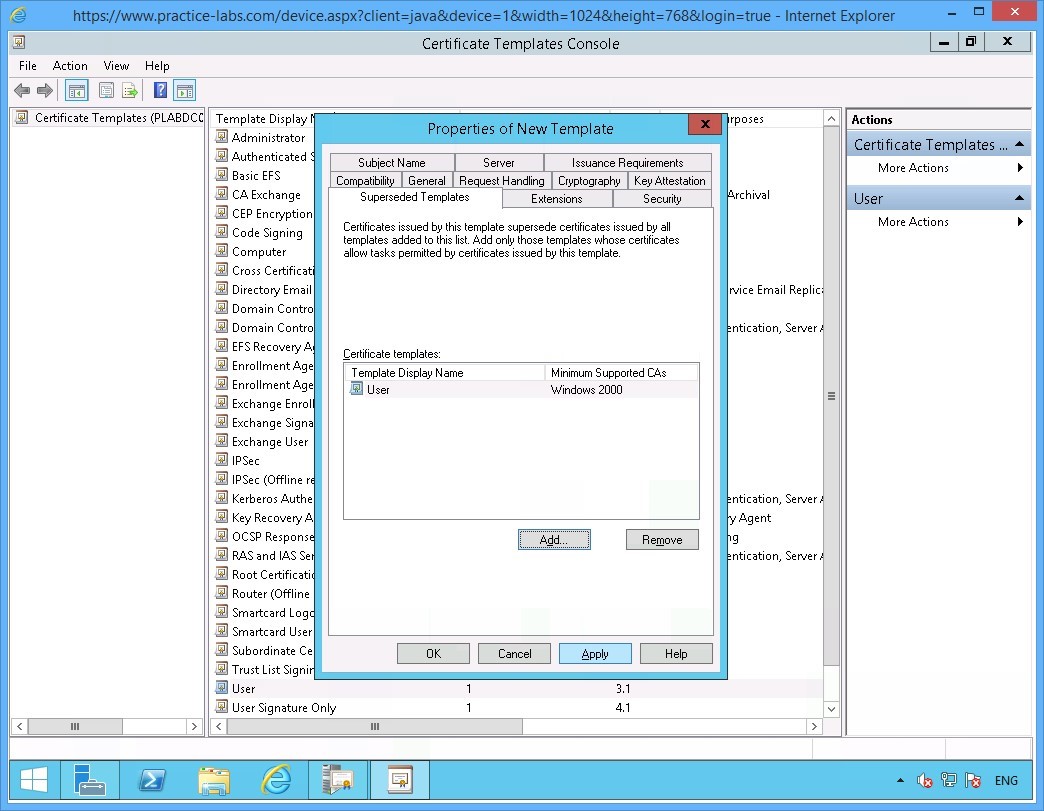
Then select Superseded Templates tab.
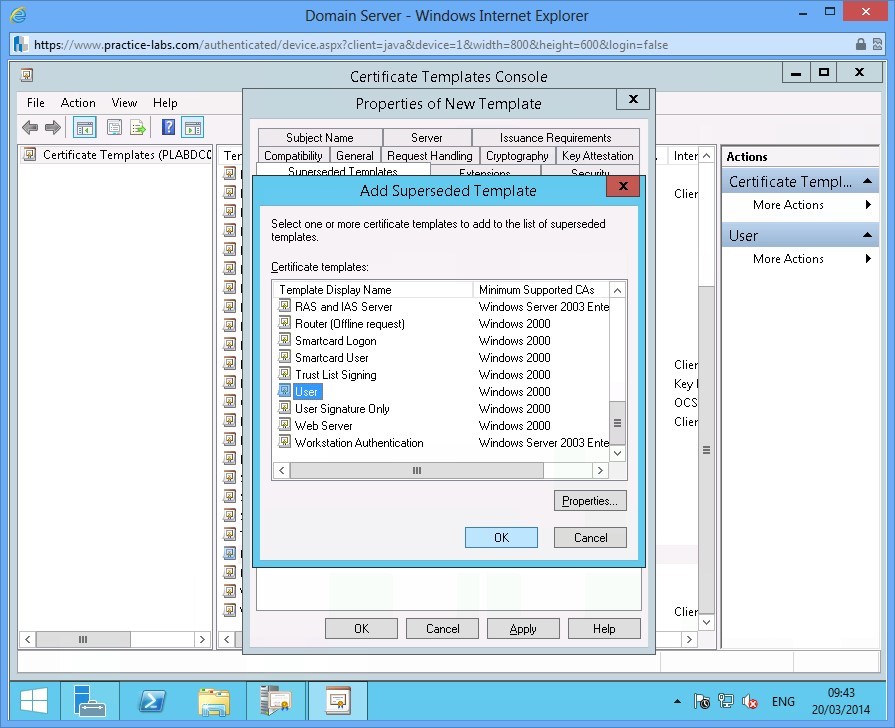
Step 7
On the Superseded Templates tab and click Add.

Step 8
In the Add Superseded Template tab, scroll down the list.
Select User and click OK.
Step 9
Back in the Superseded Templates tab, click Apply.
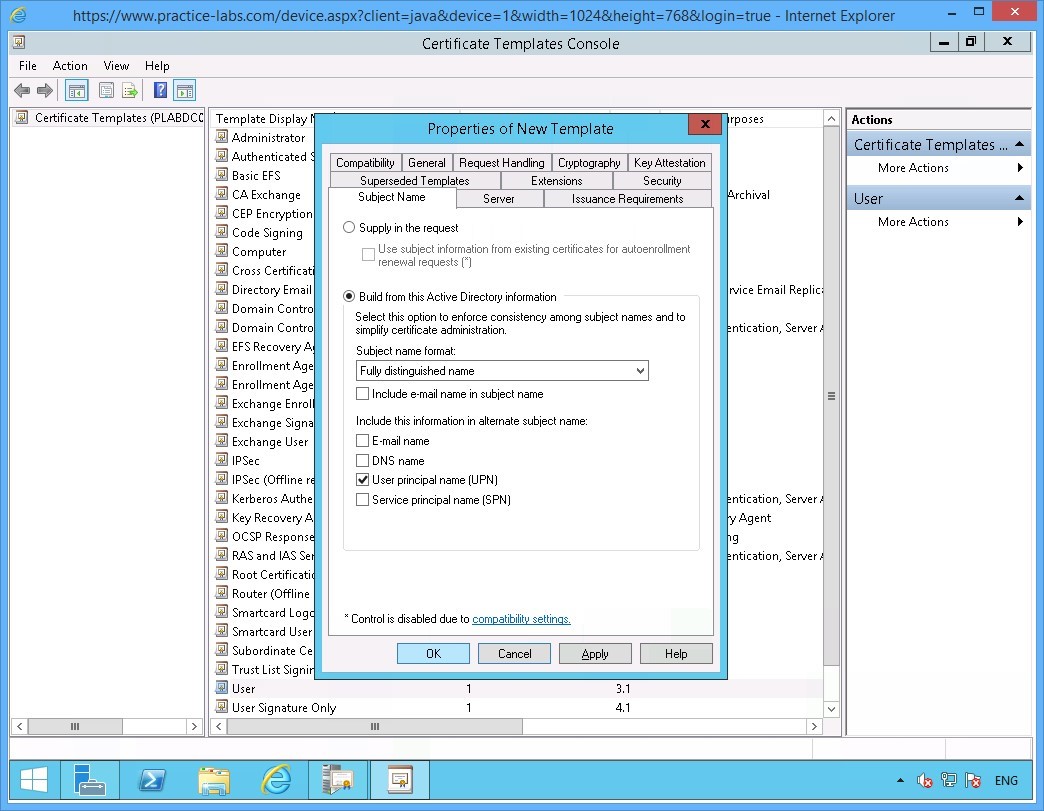
Then select Subject Name tab.
Step 10
On the Subject Name tab, clear the following check boxes:
Include e-mail name in subject name
E-mail name
Click OK.
Note: You cleared the two check boxes as AD users in Practice Labs domain do not have those attributes defined in their accounts.
Step 11
Close Certificate Templates Console window.
Step 12
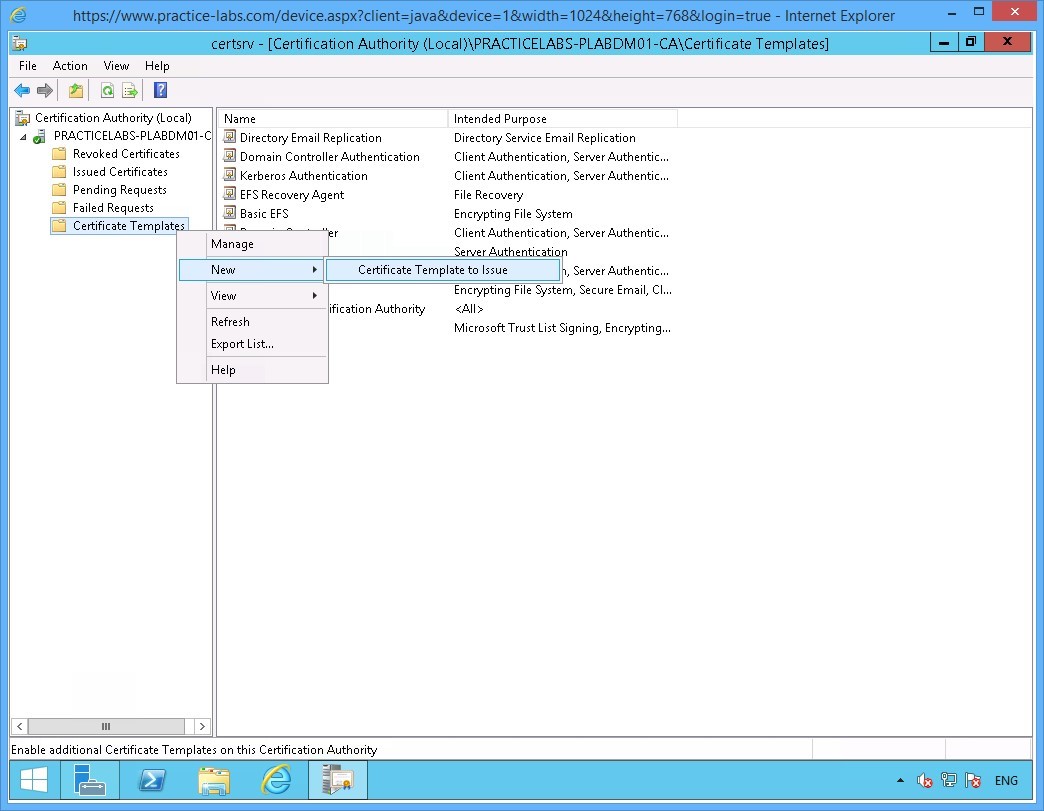
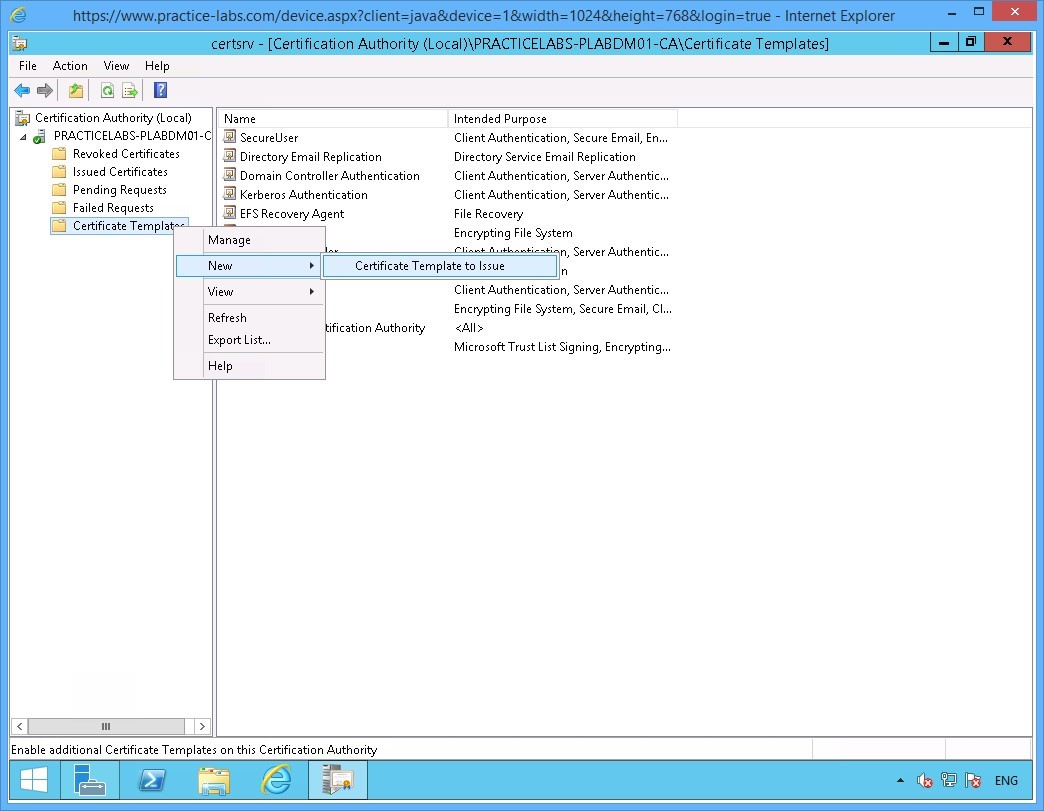
Next step is to include SecureUser certificate template in the list of certificates that can issued by PLABDM01.
You are back on the Certification Authority window.
Right-click on Certificate Templates folder; then choose New > Certificate Template to Issue.
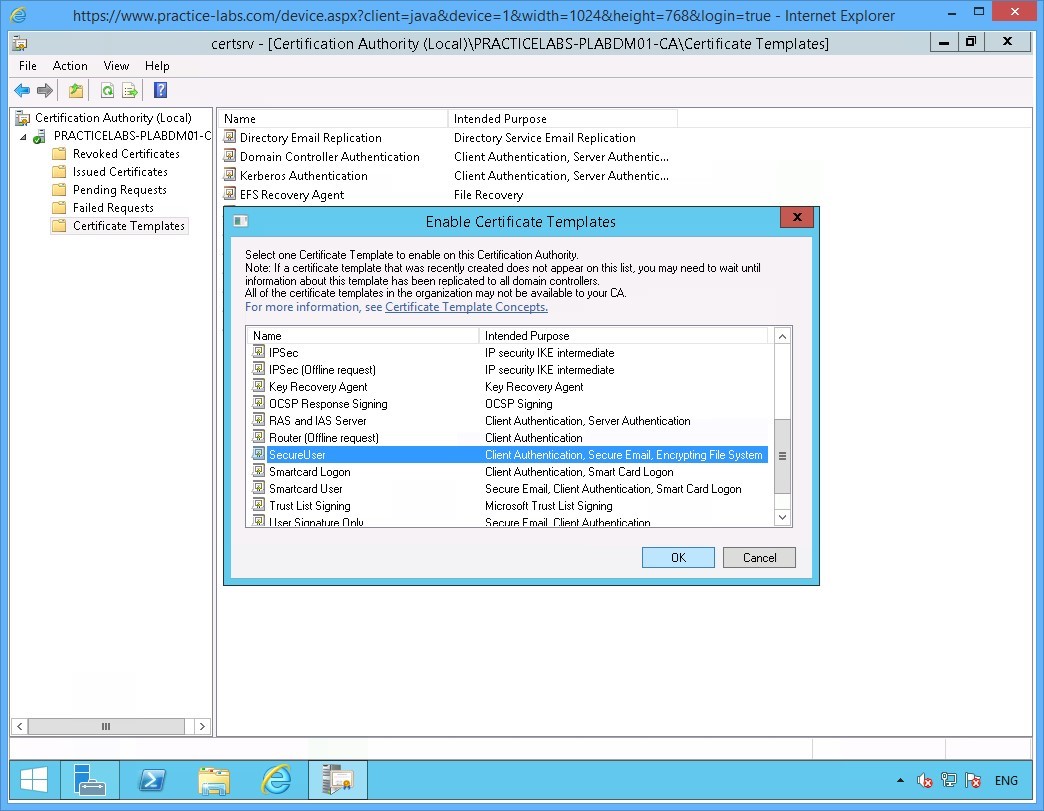
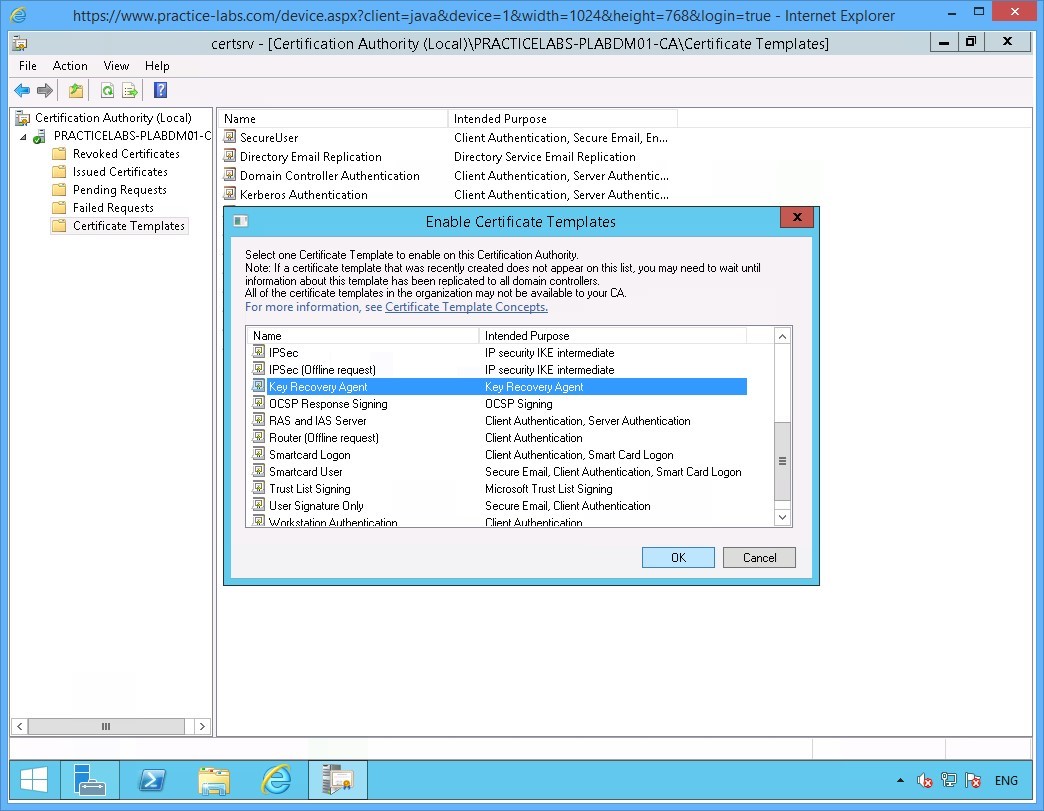
Step 13
On the Enable Certificate Templates window, scroll down the list of templates.
Select SecureUser and click OK.
You have just added SecureUser template as one of the certificate templates that can be issued by PLABDM01 server.
Minimize Certification Authority window as you will need this application in a later task.
Keep all devices powered on in their current state and proceed to the next exercise.
Task 2 - Create Group Policy for Certificate Auto Enrolment
In this task you will create a Group Policy Object to automate the deployment of user certificates to domain network users.
To create a GPO for user certificate auto-enrolment, perform the following steps:
Step 1
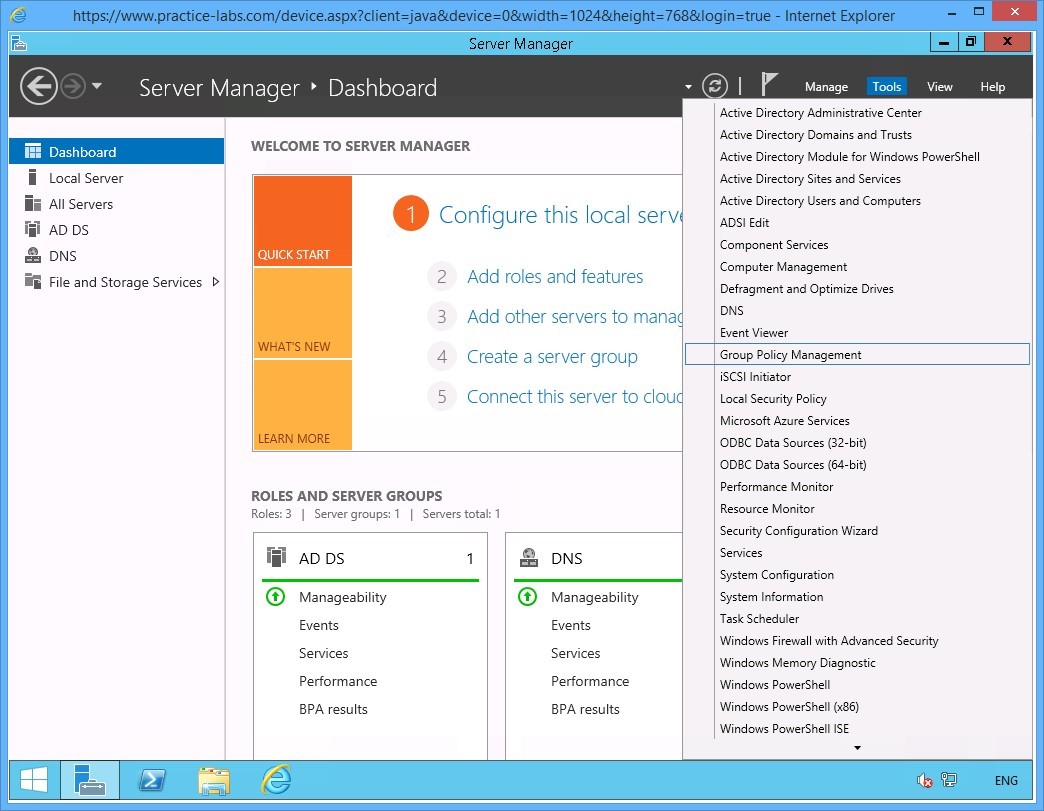
Ensure you have powered on the required devices and connect to PLABDC01.
From the Server Manager Dashboard, click Tools and select Group Policy Management.
Step 2
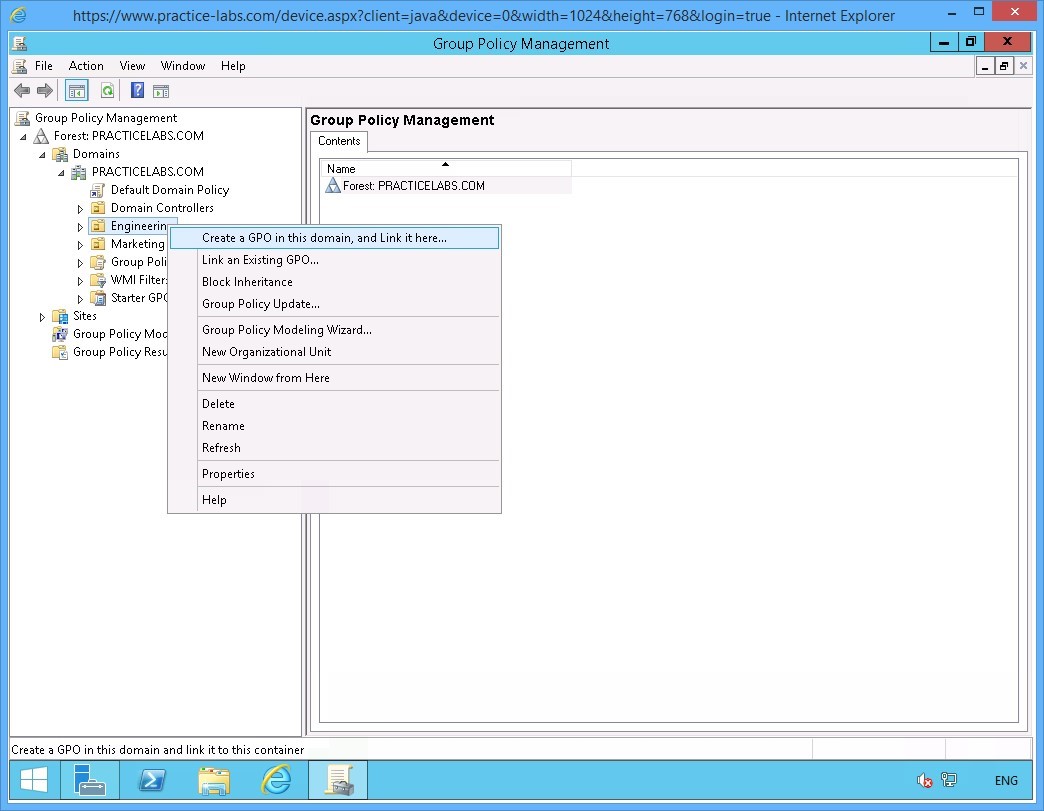
On the Group Policy Management console window, expand Forest: PRACTICELABS.COM > Domains > PRACTICELABS.COM.
Right-click on Engineering OU and select Create a GPO in this domain and link it here…
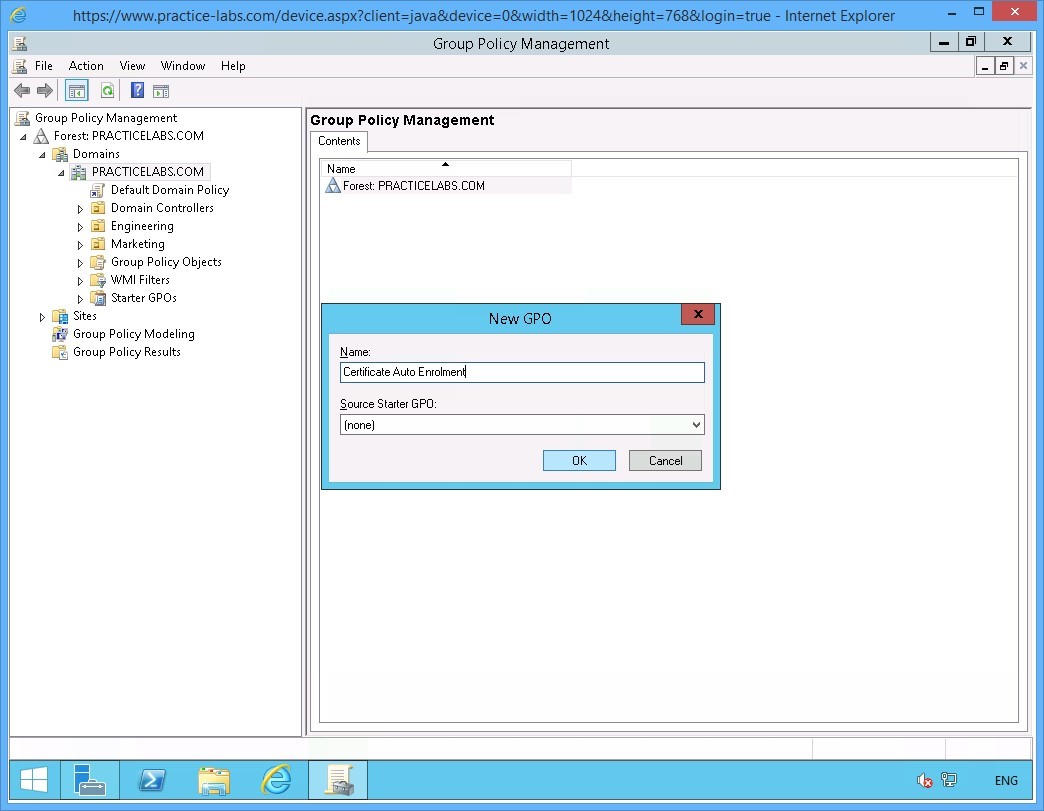
Step 3
On the New GPO dialog box, type:
Certificate Auto Enrolment
Click OK.
Step 4
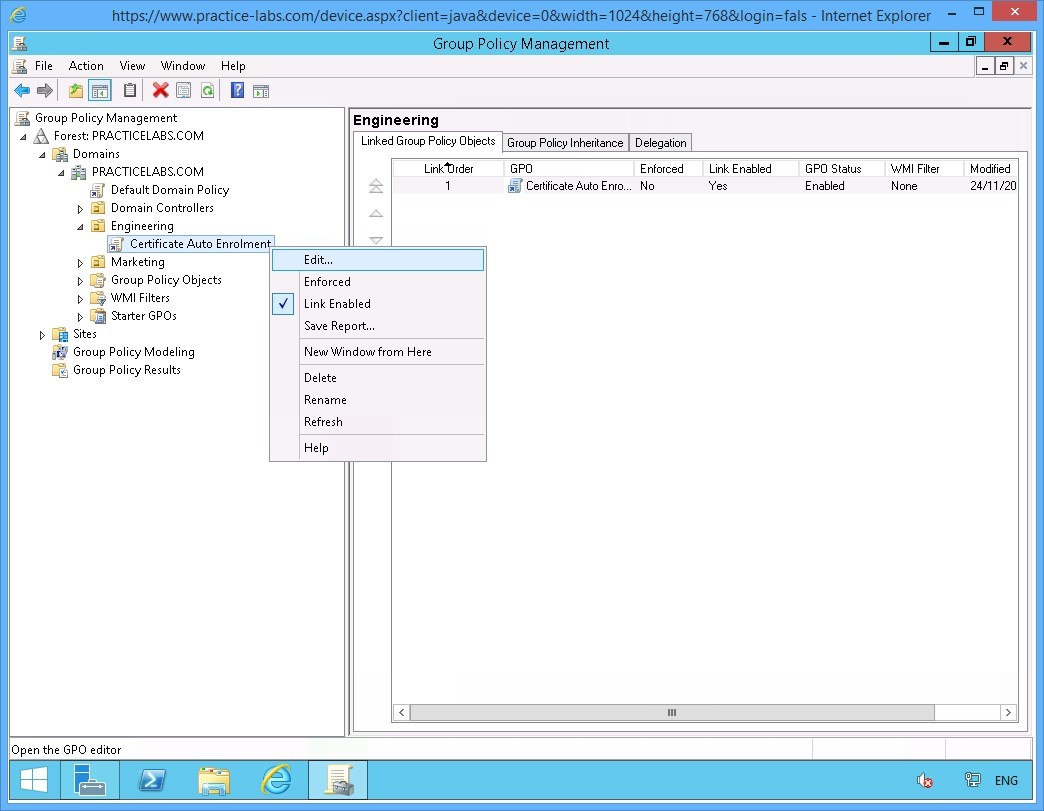
Under the Engineering OU, right-click on Certificate Auto Enrolment group policy object link.
Select Edit.
Step 5
The Group Policy Management Editor window opens.
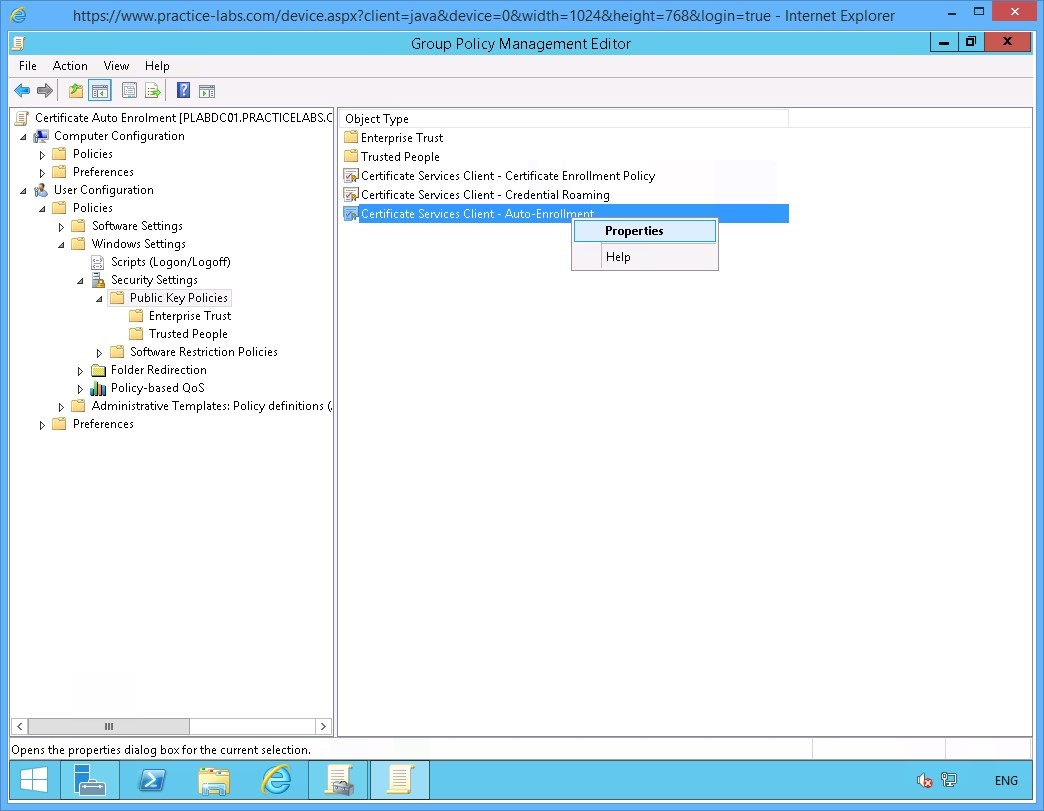
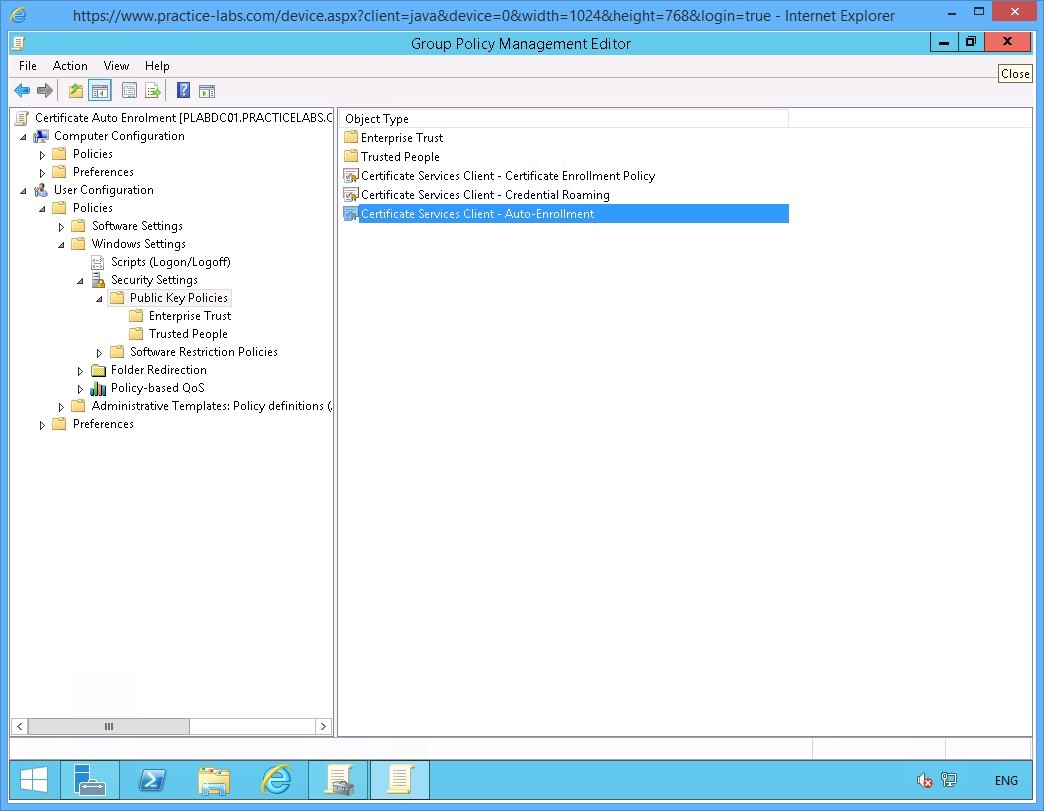
Expand User Configuration > Policies > Windows Settings > Security Settings then click Public Key Policies.
On the Public Key Policies details at the right, right-click on Certificate Services Client - Auto Enrollment and select Properties.
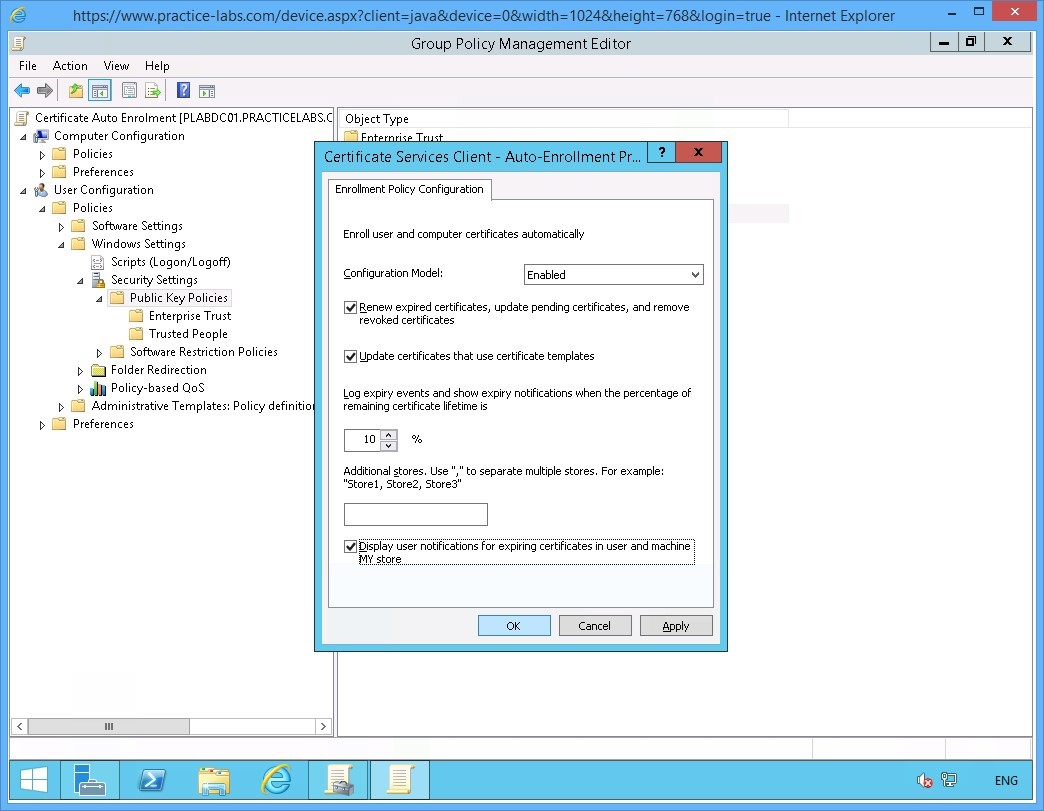
Step 6
On the Certificate Services Client-Auto-Enrollment… window, change the Configuration Model drop-down list to Enabled.
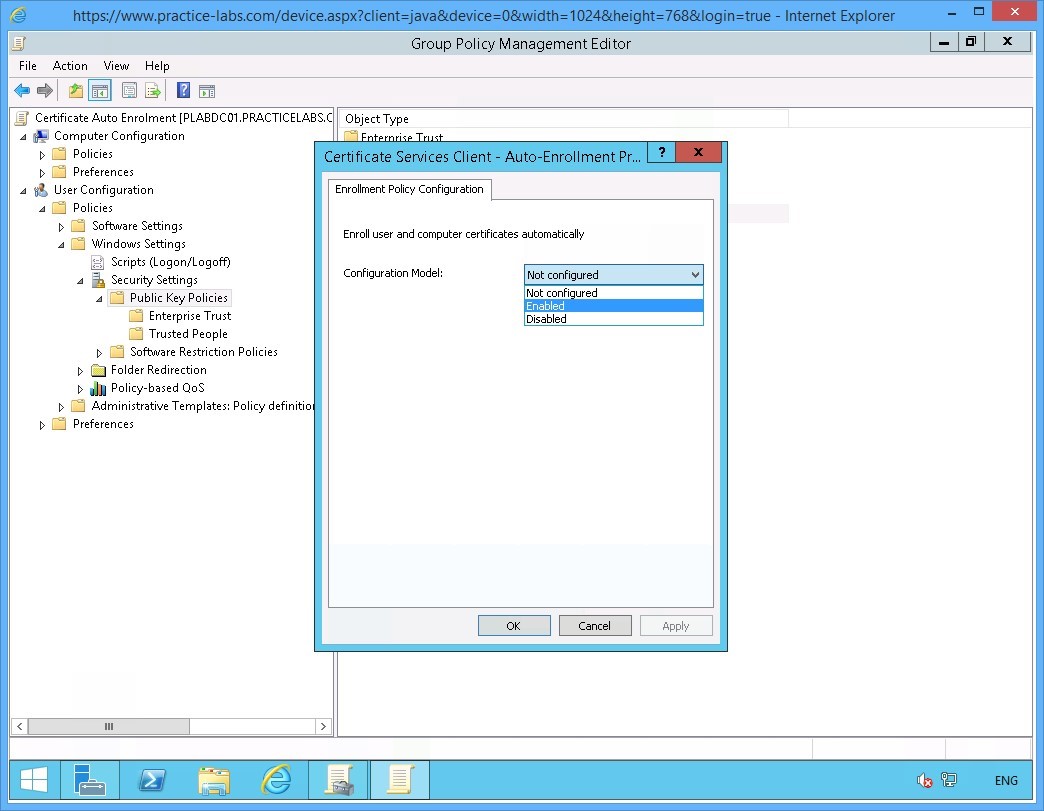
Step 7
A number of check boxes will become available as a result.
Select the following check boxes:
Renew expired certificates, update pending certificates, and remove revoked certificates
Update certificates that use certificate templates
Display user notifications for expiring certificates in user and machine MY store
Click OK.
Step 8
Close Group Policy Management Editor application window.
Similarly, exit from the Group Policy Management Console window.
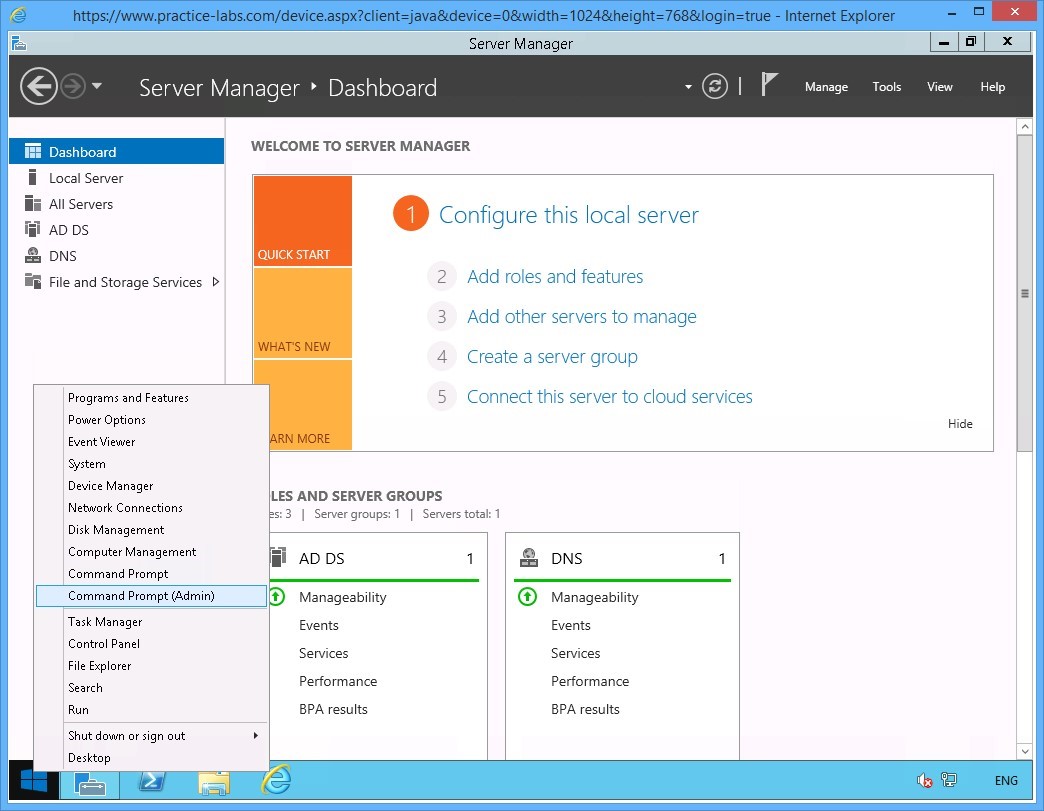
Step 9
Right-click on Start charm and select Command Prompt (Admin) from the context menu.
Step 10
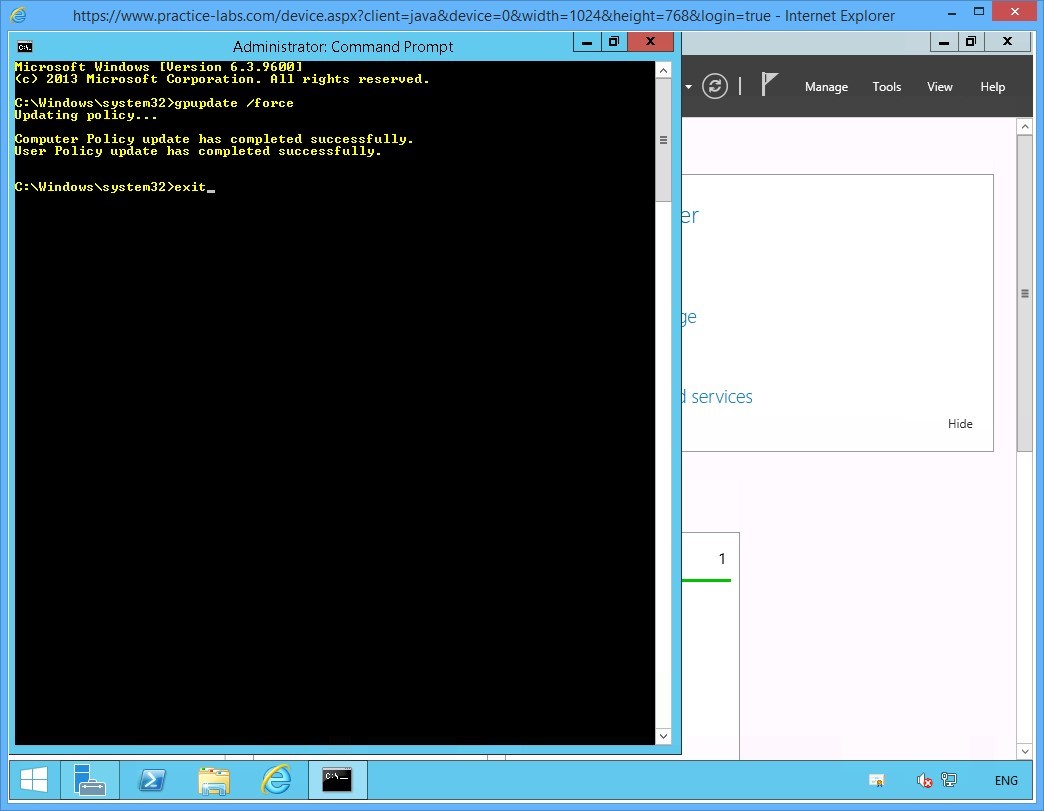
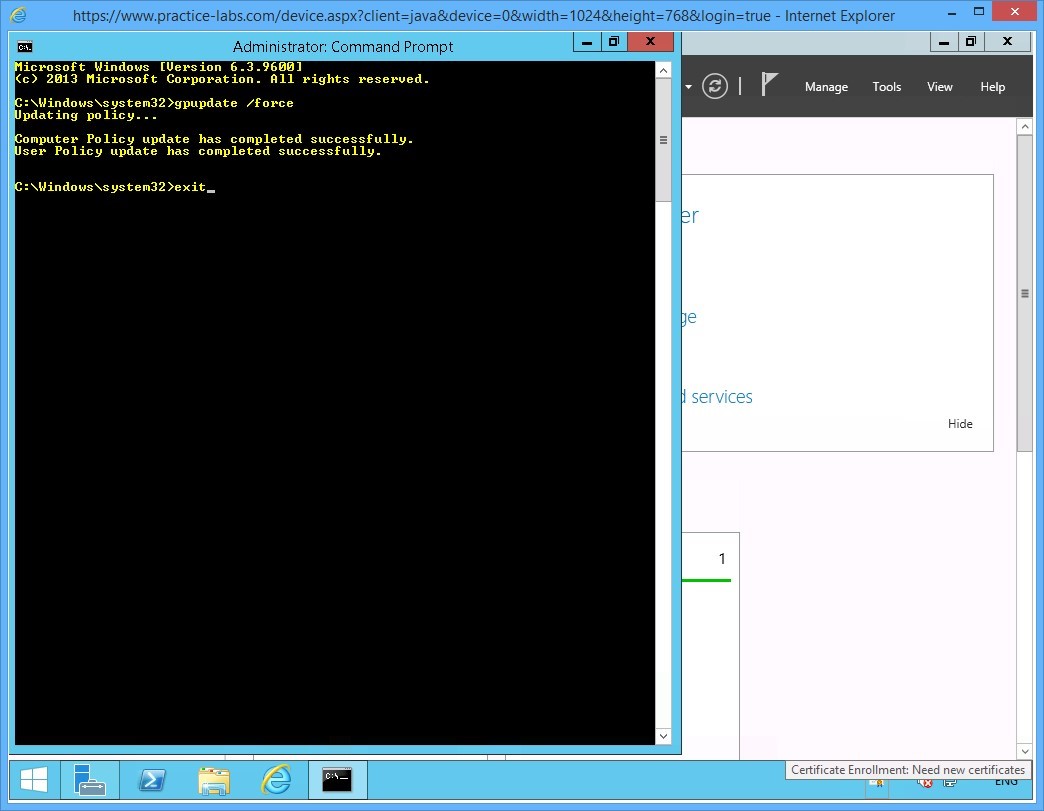
To propagate the new user Group Policy to the domain, type:
gpupdate /force
Press Enter.
On the next prompt, type:
exit
Press Enter.
Step 11
Please note that you may see the certificate prompt on the system tray of PLABDC01.
Ignore the certificate prompt on the server. User certificates are typically setup for enrolment on the user workstation not on the server computer.
Keep all devices powered on in their current state and proceed to the next task.
Task 3 - Verify the Certificate Issuance
Step 1
Go to Practice Labs web application.
Please consult the Help/Support section on how to Disable Server Auto login.
You will disable Server auto login to allow other users to sign on to the lab devices using other user accounts.
Step 2
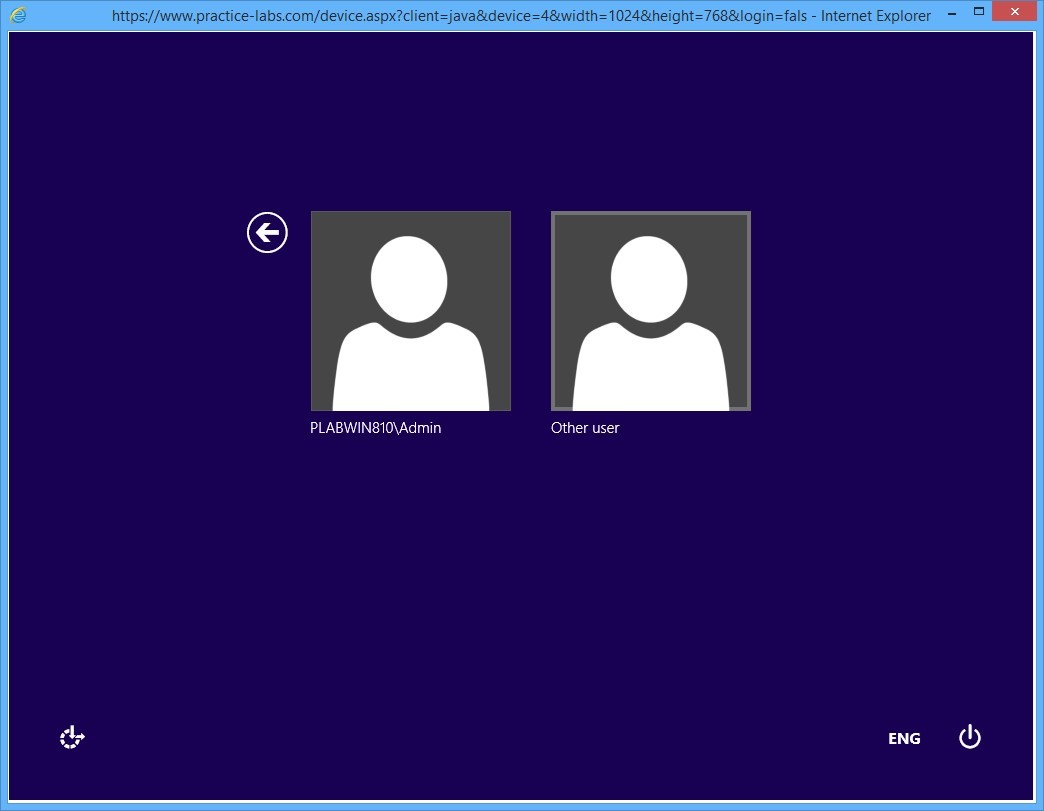
Connect to PLABWIN810 computer.
Important: Since Server auto logon was enabled previously, you may see the PRACTICELABS\Administrator already signed in. If this is the case, please sign out PRACTICELABS\Administrator from PLABWIN810.
Connect again to PLABWIN810.
On the sign on screen, click Other User.
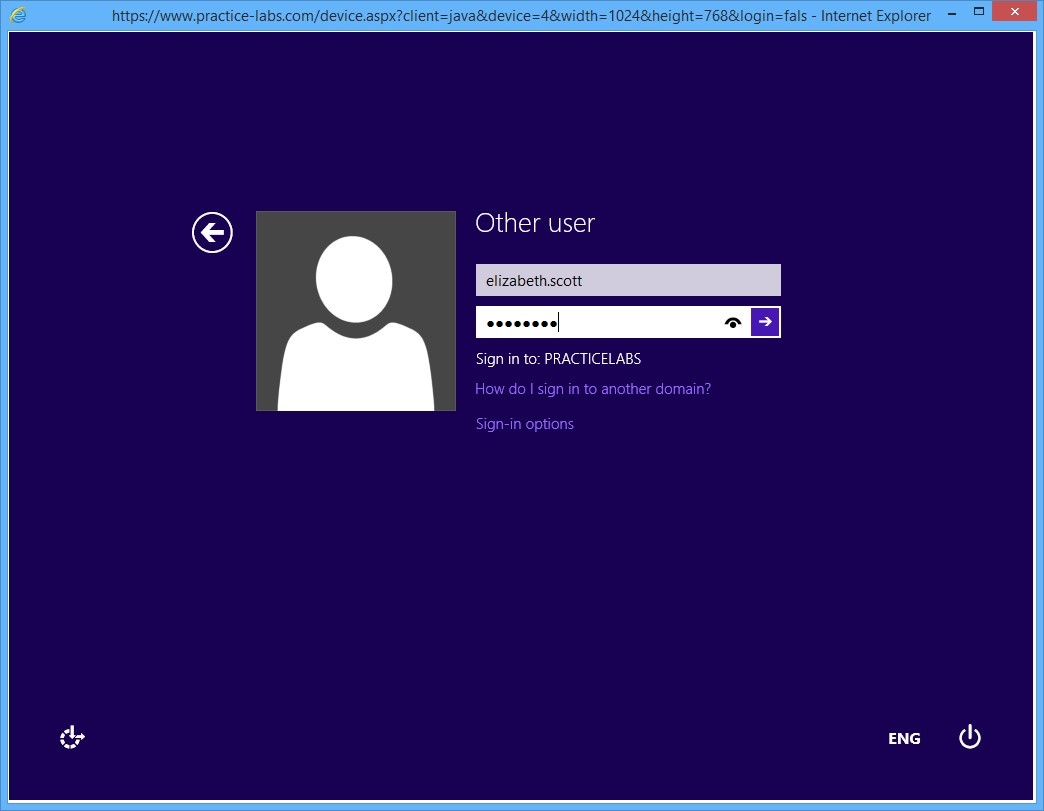
Step 3
On the User name box, type:
elizabeth.scott
In the password text box, type:
Passw0rd
Press Enter.
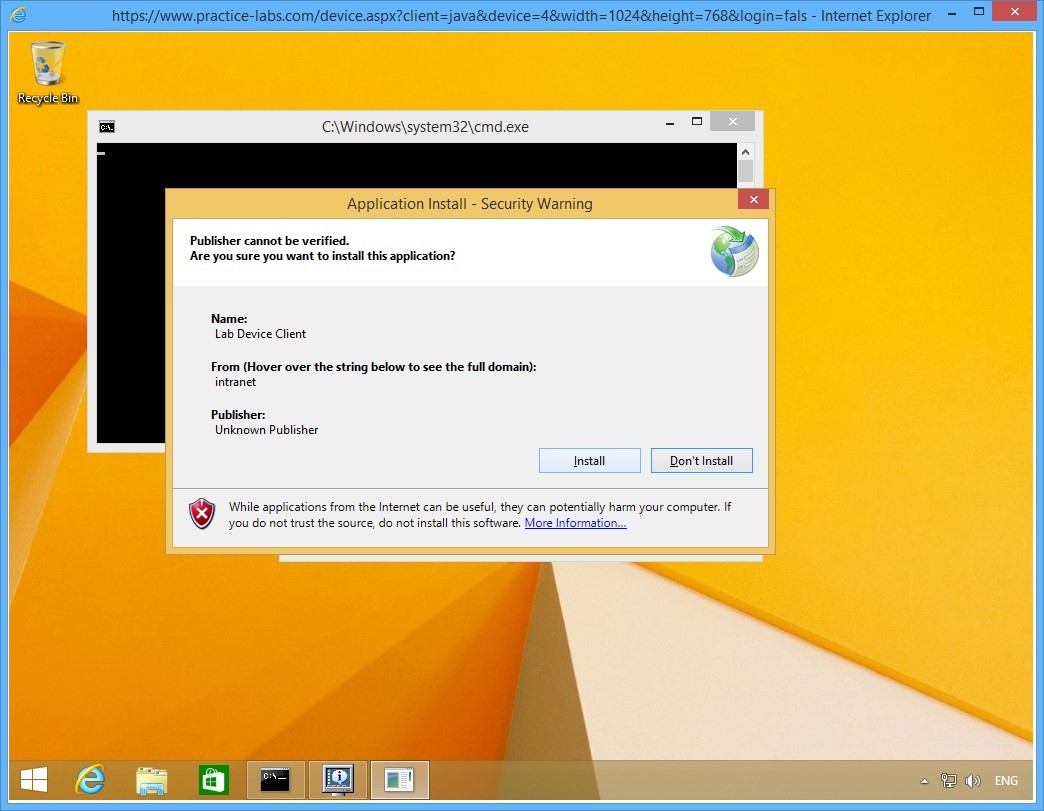
Step 4
On the Application Install - Security Warning page, click Install.
This application is for assessment engine in the lab.
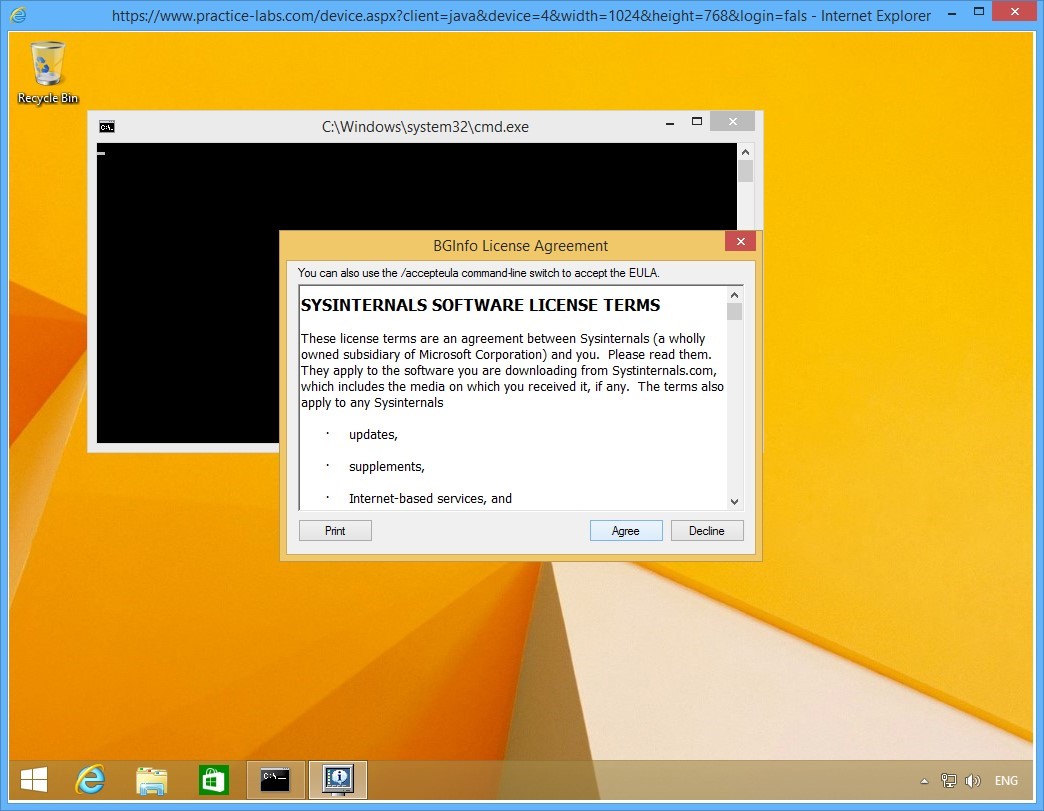
Step 5
Click Agree if presented with BGInfo License Agreement page.
Step 6
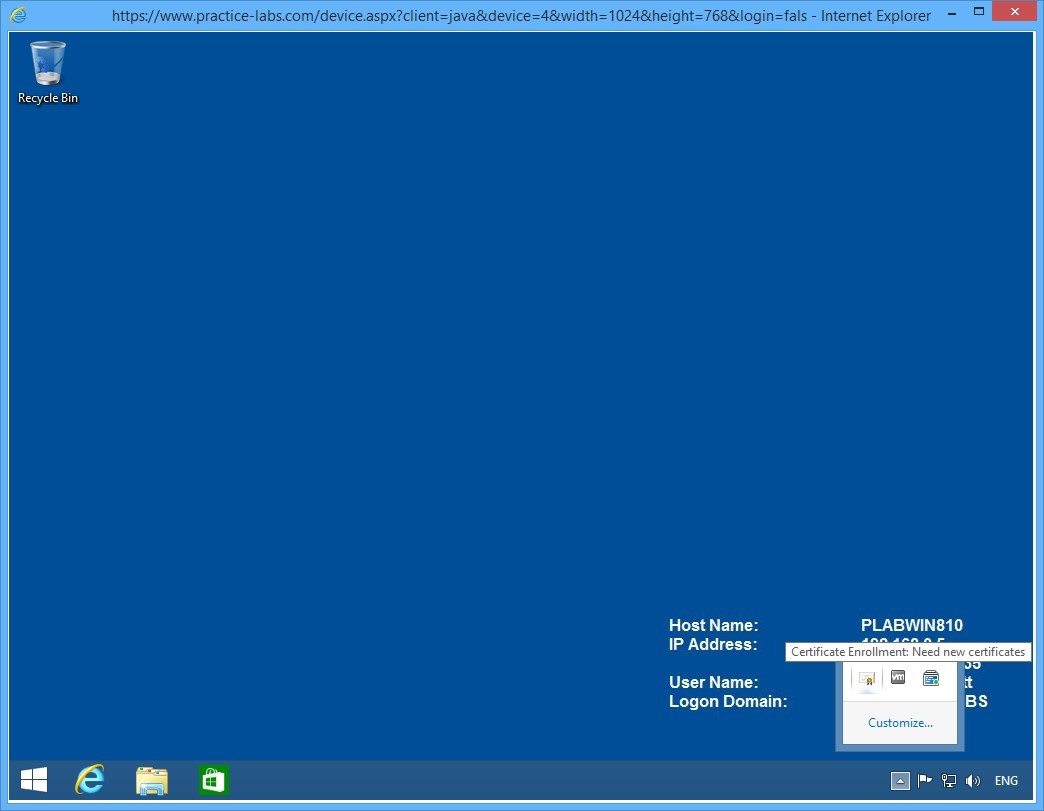
When signed on, access the system tray and click the arrow to expand.
You should get a certificate icon. Then click on the certificate icon to proceed with the enrolment of the user certificate for Elizabeth Scott.
Note: If you don't get a certificate, open a command prompt and type gpupdate /force. Sign out and sign back in as elizabeth.scott.
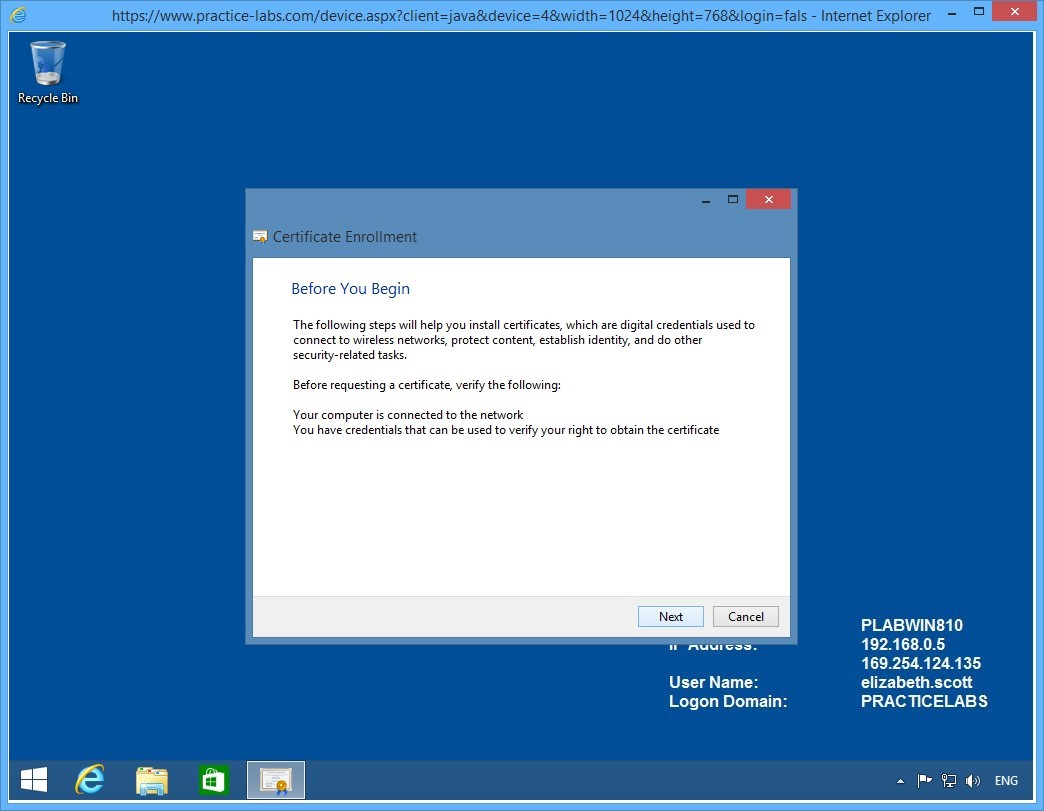
Step 7
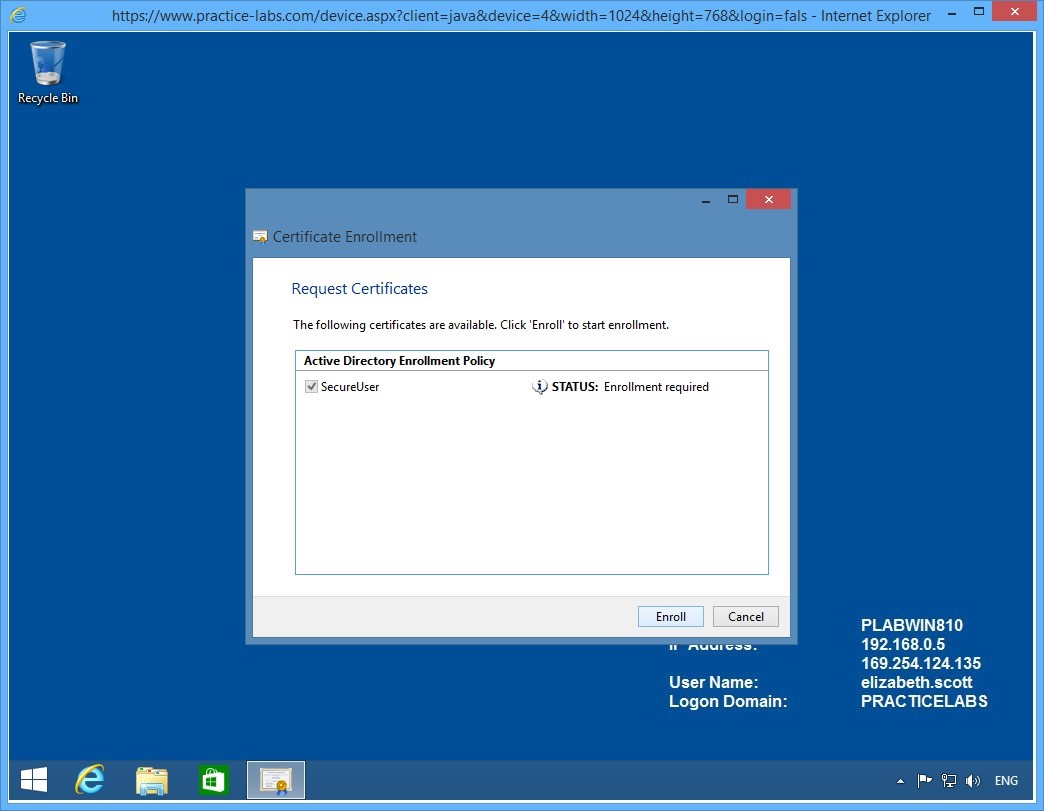
On the Before you begin page, click Next.
Step 8
The Request Certificates page will display SecureUser certificate template that you created earlier.
Click Enroll.
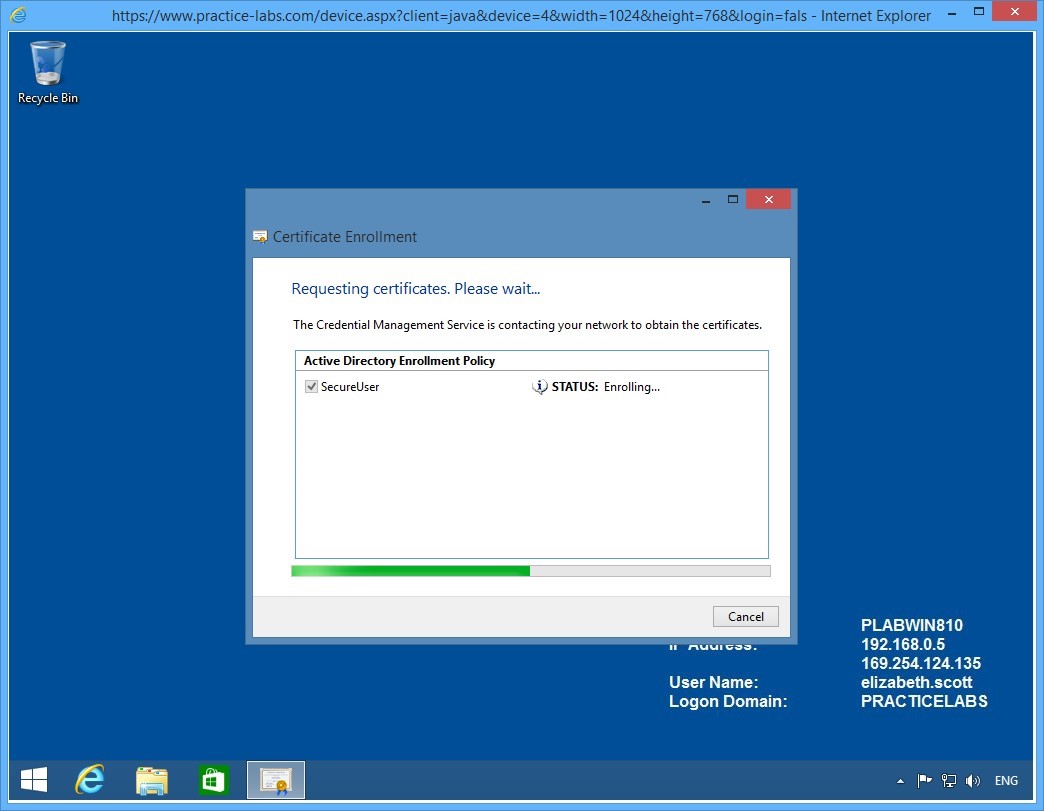
Step 9
Please wait while certificate enrolment is being processed.
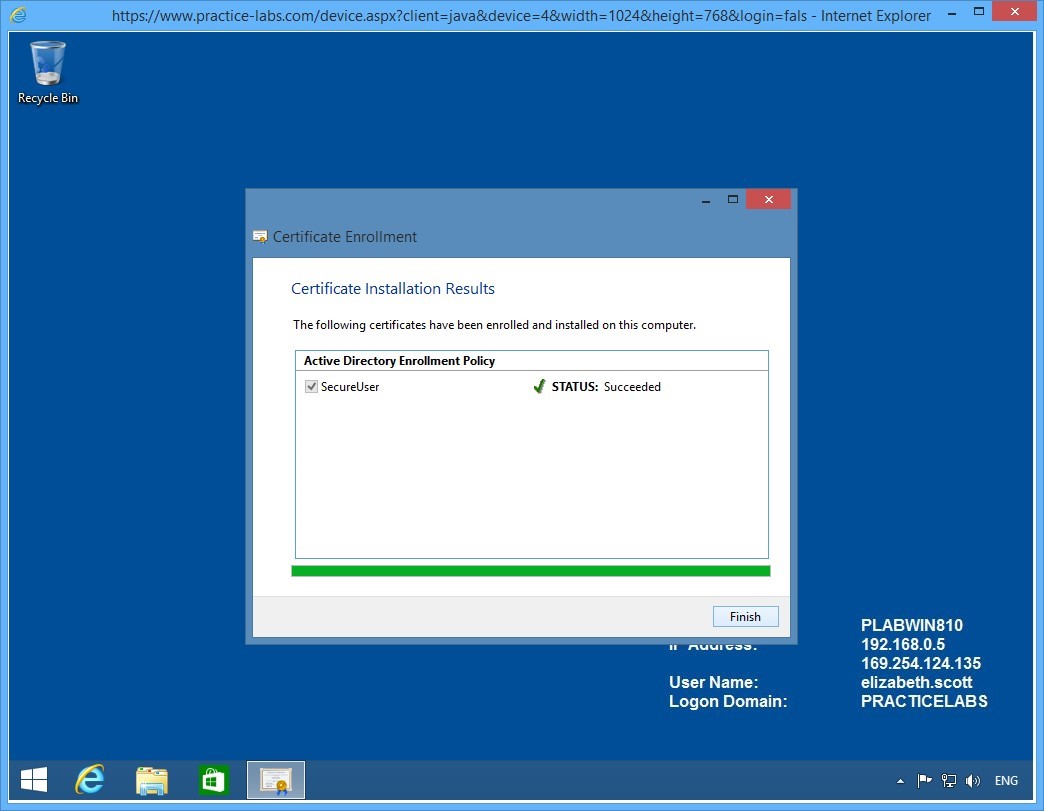
Step 10
Elizabeth Scott will enrol successfully for the SecureUser certificate template.
Click Finish.
The certificate issued to Elizabeth Scott can be used for a number of tasks like protecting her personal files using EFS and send encrypted e-mail messages, if there is an existing e-mail server in the network.
Step 11
Right-click Start charm and mouse over Shut down or sign out.
Then click Sign out.
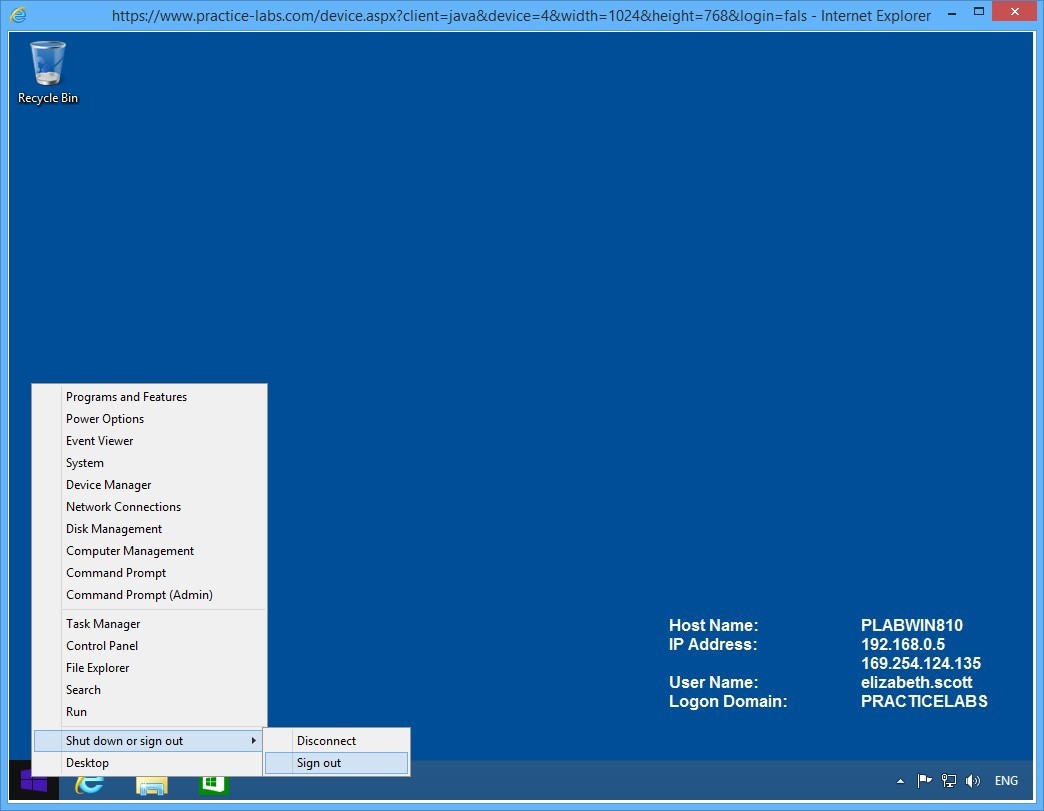
Keep the devices you have powered on in their current state and proceed to the next exercise.
Exercise 3 - Configuring Key Archival
Certification Authority service can be configured to archive keys it has issued to users. This is feature allows an administrator to recover certificates lost by the user due to a number of reasons such as theft of smart card, an accidental reformat of the user workstation where the user certificate is saved and among other things.
Please refer to your course material or use your preferred search engine to research this topic in more detail.
Task 1 - Enable a Key Recovery Agent
In this step, you will enable the administrator account for Key Recovery Agent role.
The Key Recovery Agent role is security-sensitive role that must be manually configured to enable the organization to recover lost keys issued by the Certification Authority.
To enable the key recovery agent, perform the following steps:
Step 1
Connect to PLABDM01 device. Server Manager Dashboard window is open.
Restore the Certification Authority from taskbar.
Step 2
On the Certificate Authority window, right-click on Certificate Templates folder and select New > Certificate Template to Issue.
Step 3
On the Enable Certificate Templates window, scroll down the list.
Then select Key Recovery Agent and click OK.
Minimize Certification Authority snap-in.
Step 4
In the next few steps, you will enrol the Administrator to use a Key Recovery Agent certificate.
Right-click Start charm and select Run.

Step 5
On the Run window, type:
mmc
Click OK.

Step 6
On the Console1 window, click on File and select Add/Remove Snap-in.

Step 7
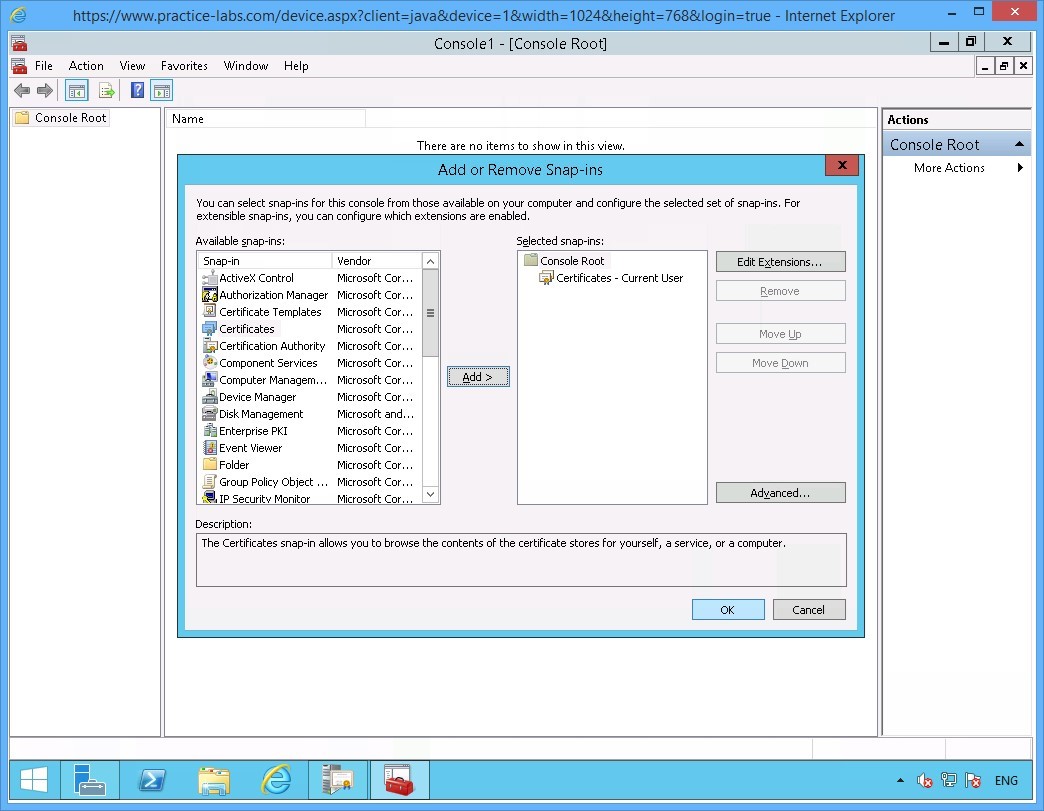
In the Add or Remove Snap-ins window, select Certificates and click Add.
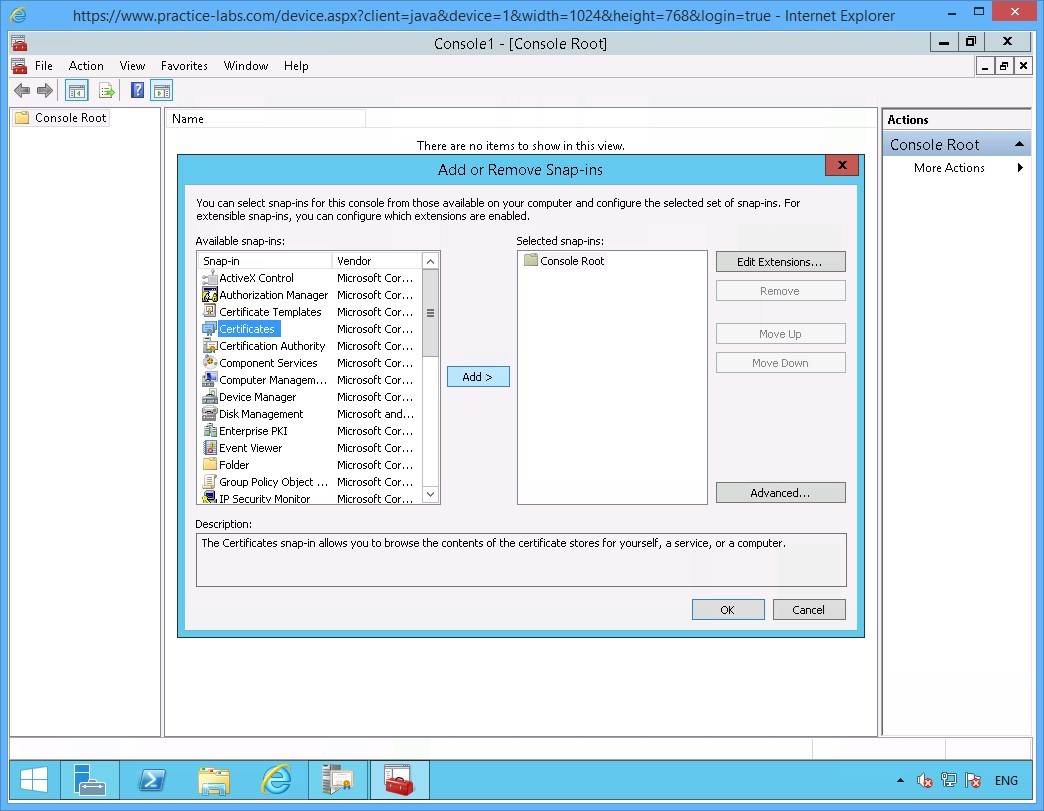
Step 8
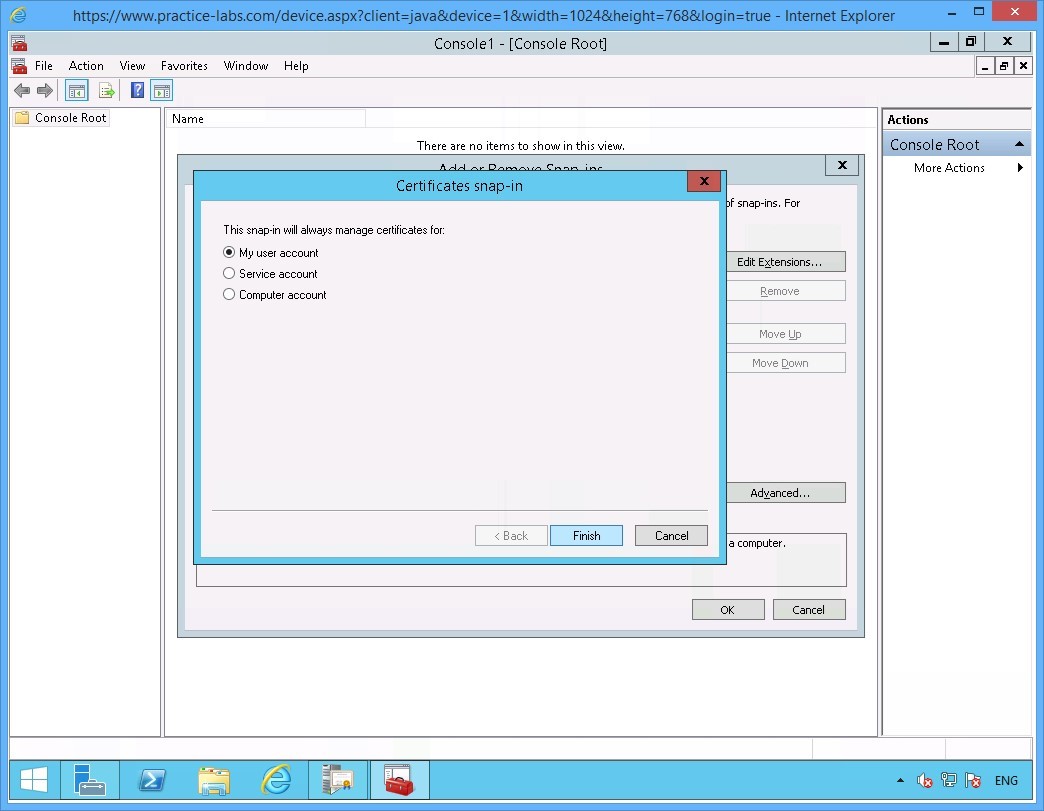
On the Certificates window ensure that My user account option is selected.
Click Finish.
Step 9
Click OK to close Add/Remove Snap-ins window.
Step 10
Back on the Console1 window.
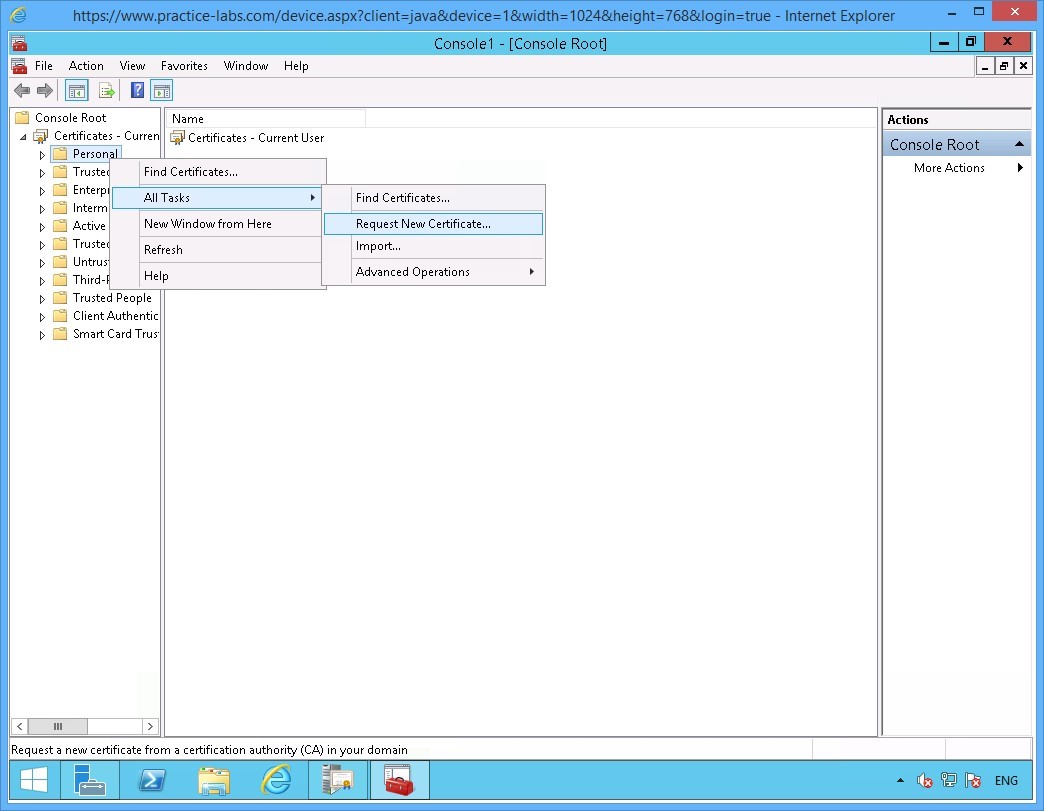
Expand Certificates-Current User node.
Then right-click on Personal folder, go to All Tasks > Request New Certificate.
Step 11
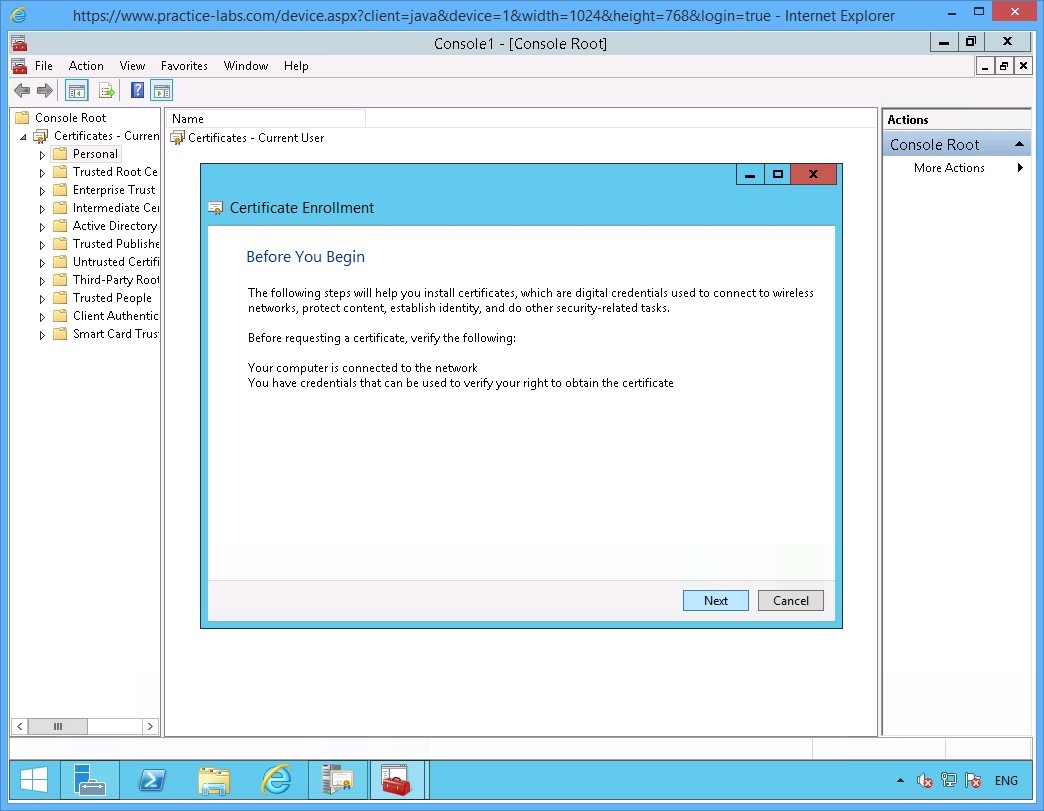
Click Next in Before you begin page.
Step 12
On the Select Certificate Enrolment Policy page, click Next.
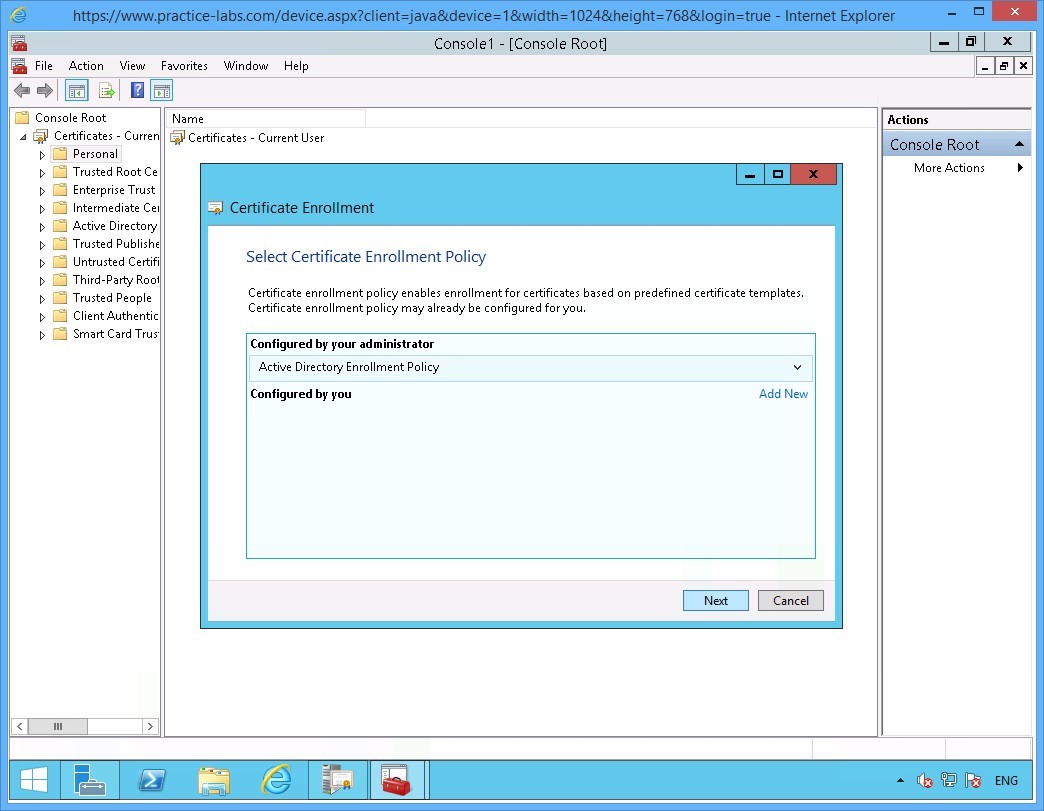
Step 13
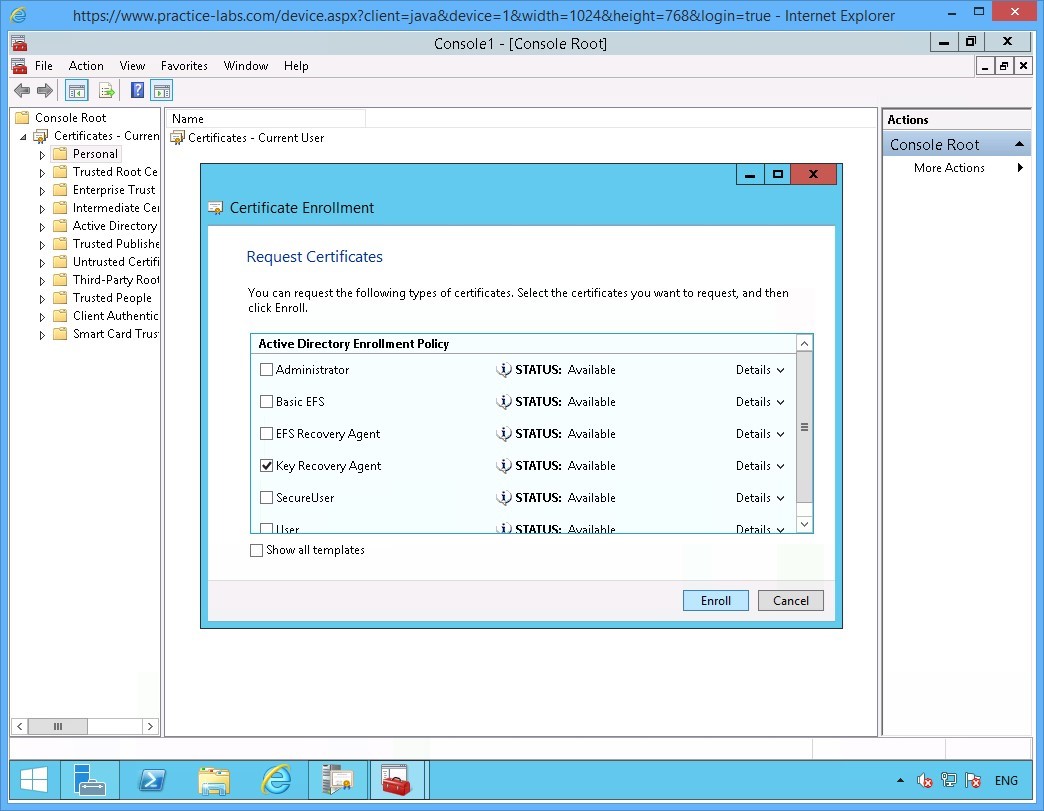
On the Request Certificates page, select Key Recovery Agent check box.
Click Enroll.
Step 14
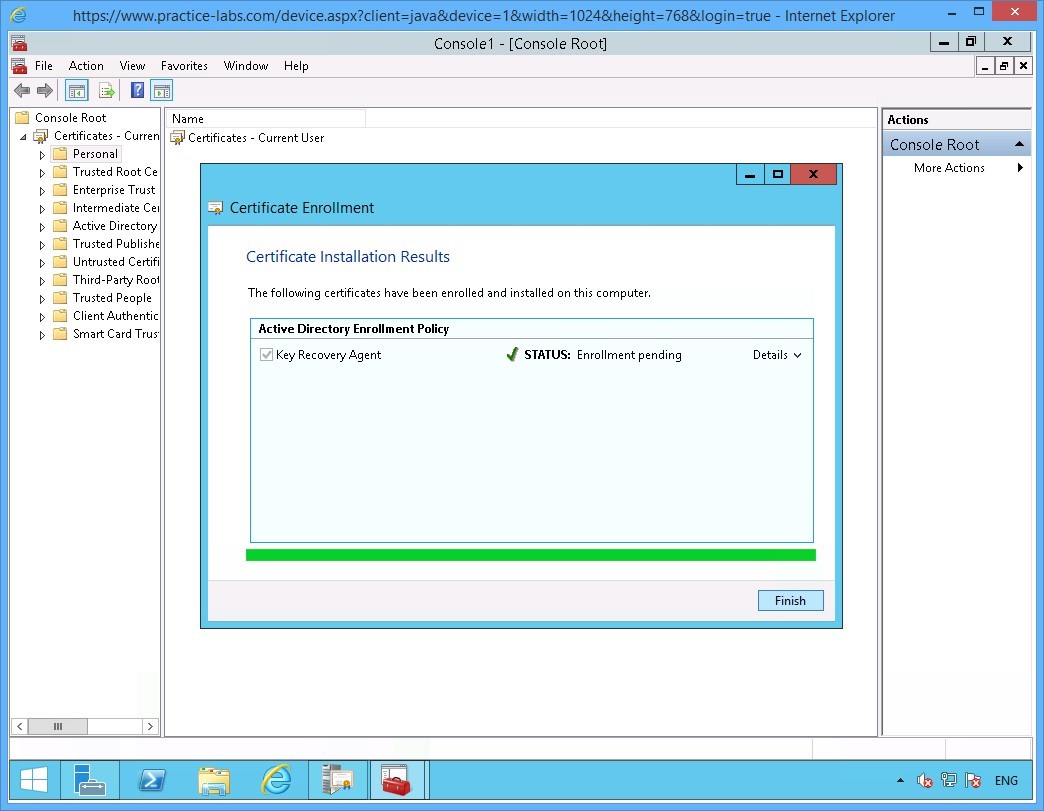
Please wait while enrolment for Key Recovery Agent is being processed.
Click Finish when Certificate Installation Results page reports a successful enrolment.
Since Key Recovery Agent certificate is a security-sensitive key, as it indicates “Enrollment pending” it will have to be issued (approved) manually to the user who requested for it.
Step 15
Minimize Console1 window.
Step 16
Restore the Certification Authority window again from the taskbar.
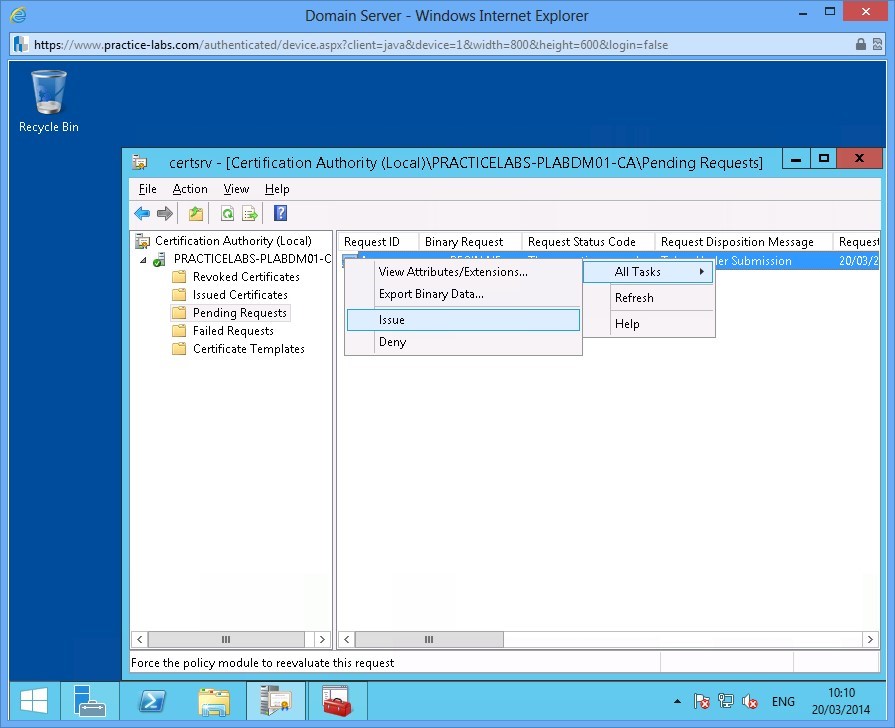
Navigate to Pending Requests folder, on the details pane right-click on the Certificate.
Select All Tasks then click Issue.
Step 17
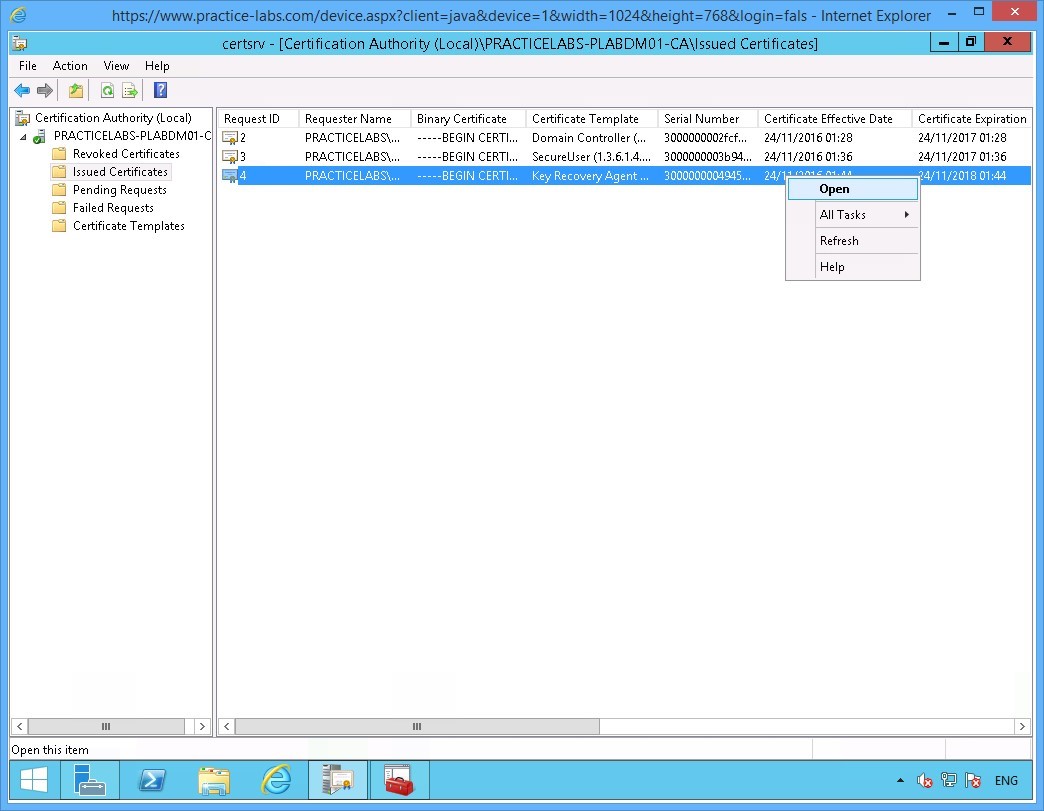
Click on the Issued Certificates folder, right-click on the certificate based on Key Recovery Agent template.
Choose Open.
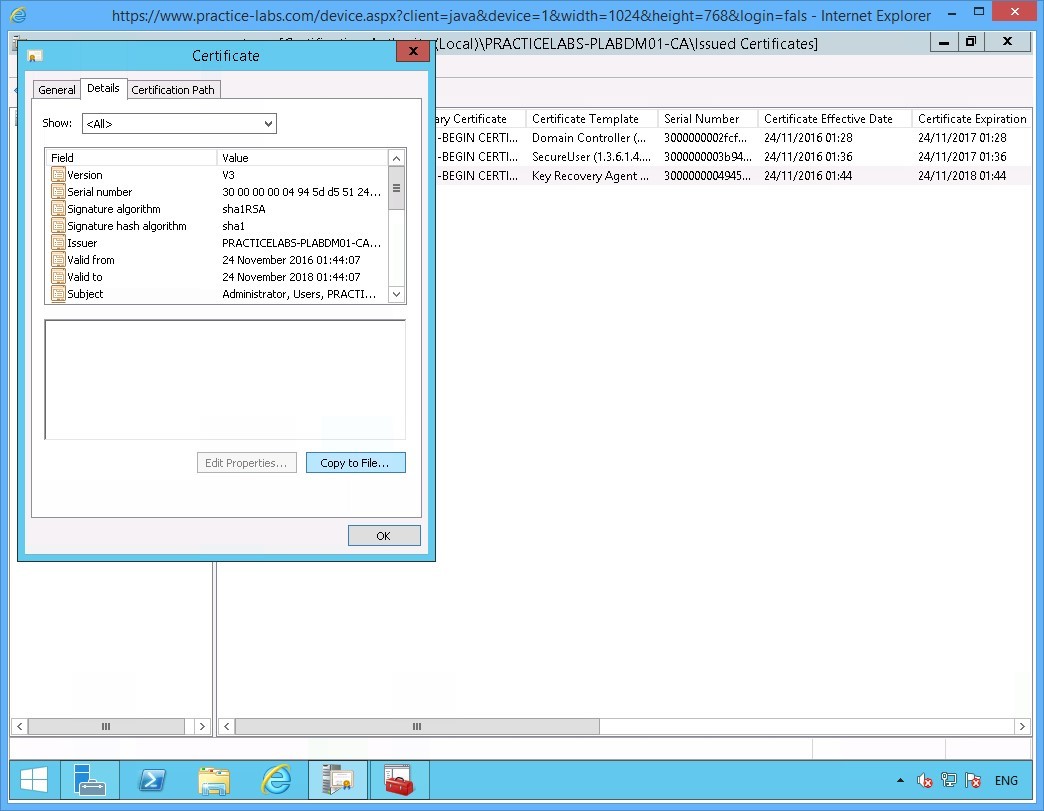
Step 18
On the Certificates window, go to Details tab.

Step 19
On the Details tab, click Copy to File.
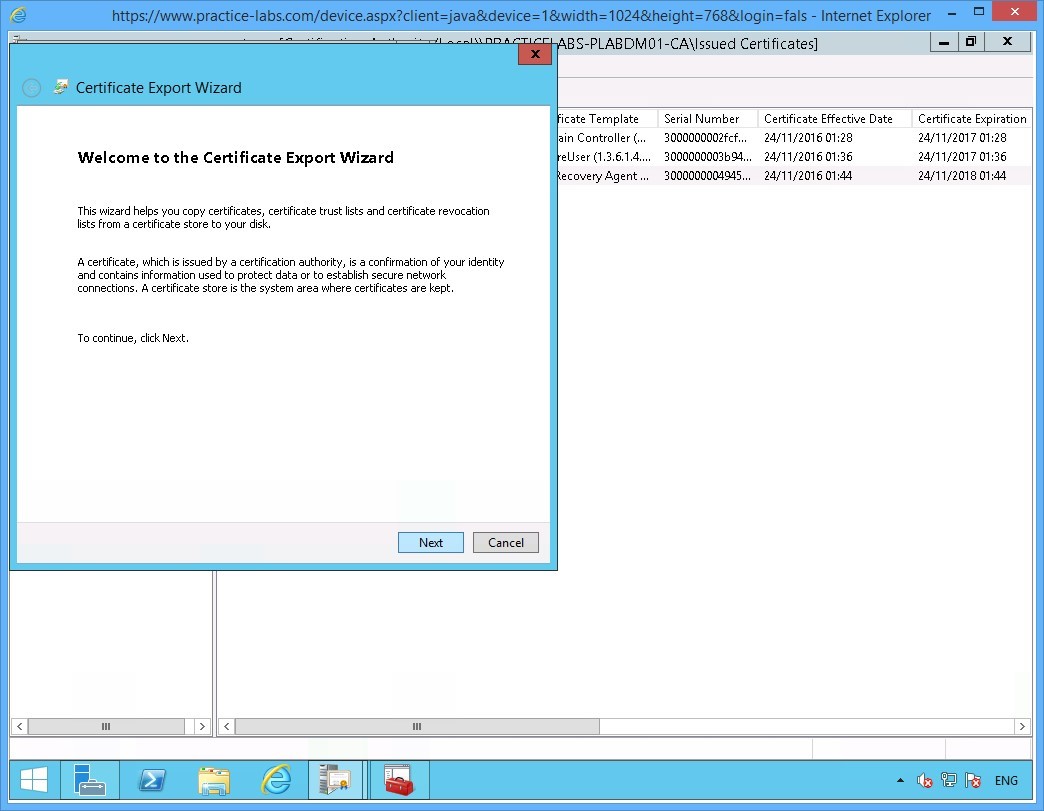
Step 20
On the Welcome to the Certificate Export Wizard page, click Next.
Step 21
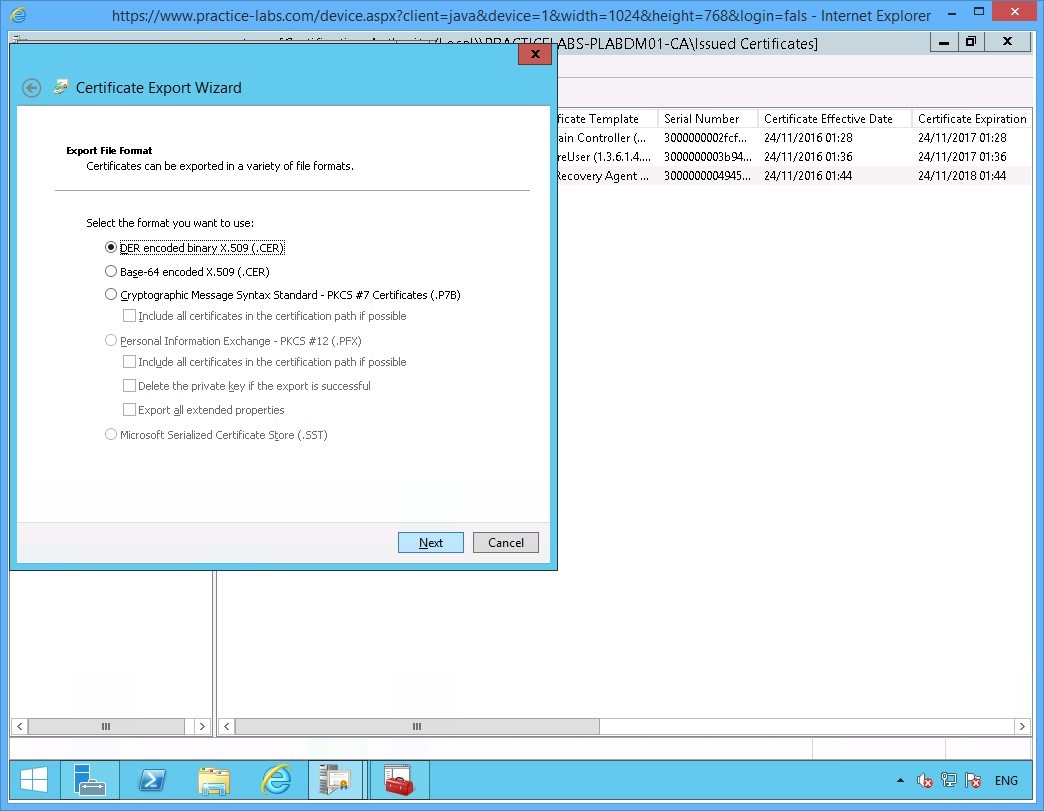
On the Export File Format page, the default DER encoded binary X.509 (.CER) format option is selected.
Click Next to proceed.
Step 22
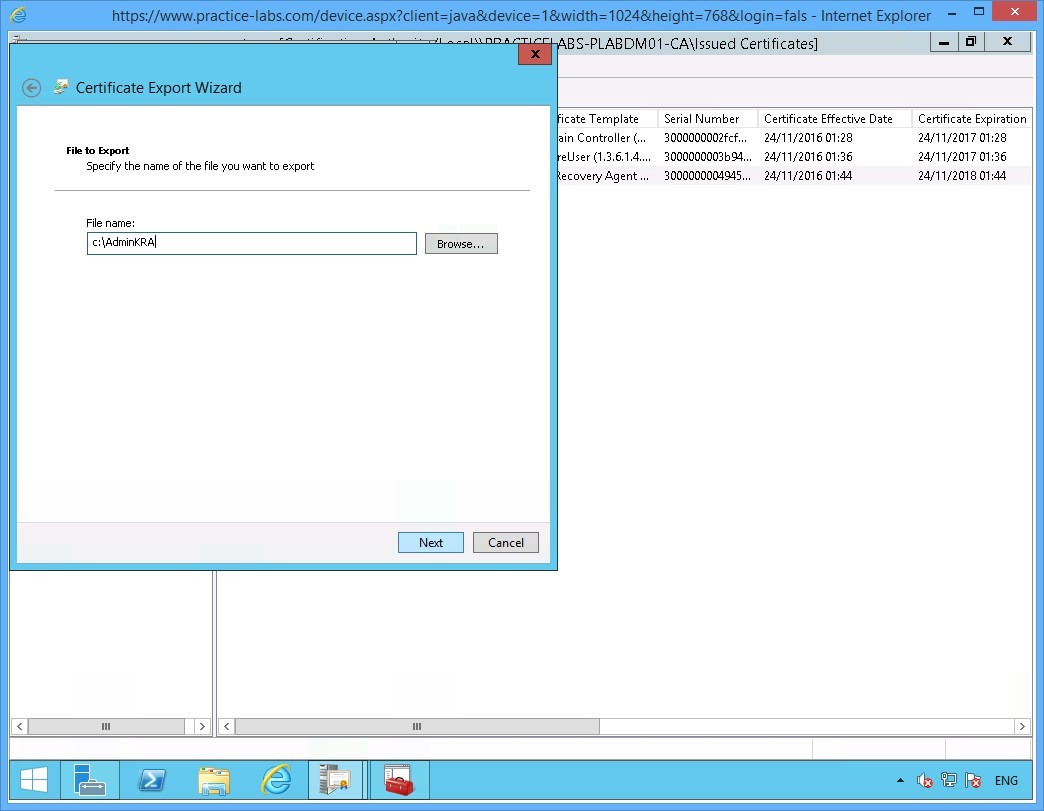
On the File to Export page, click in the File name box and type:
c:\AdminKRA
Click Next.
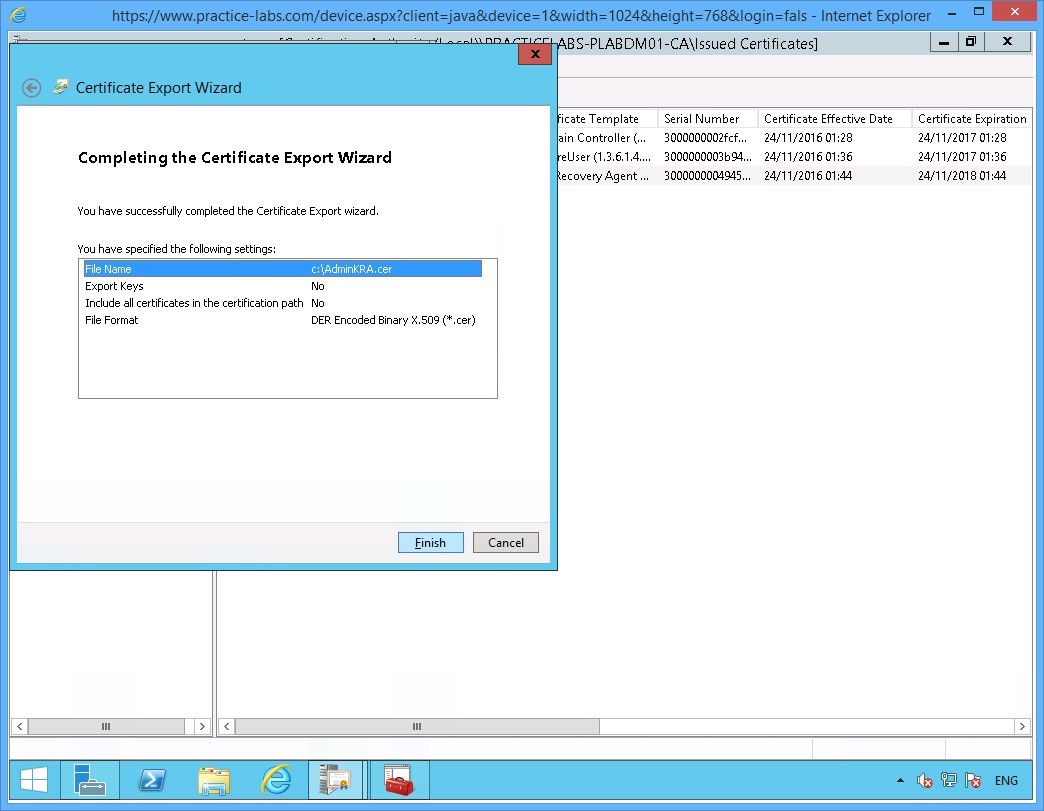
Step 23
Click Finish when you see Completing the Certificate Export Wizard box.
Step 24
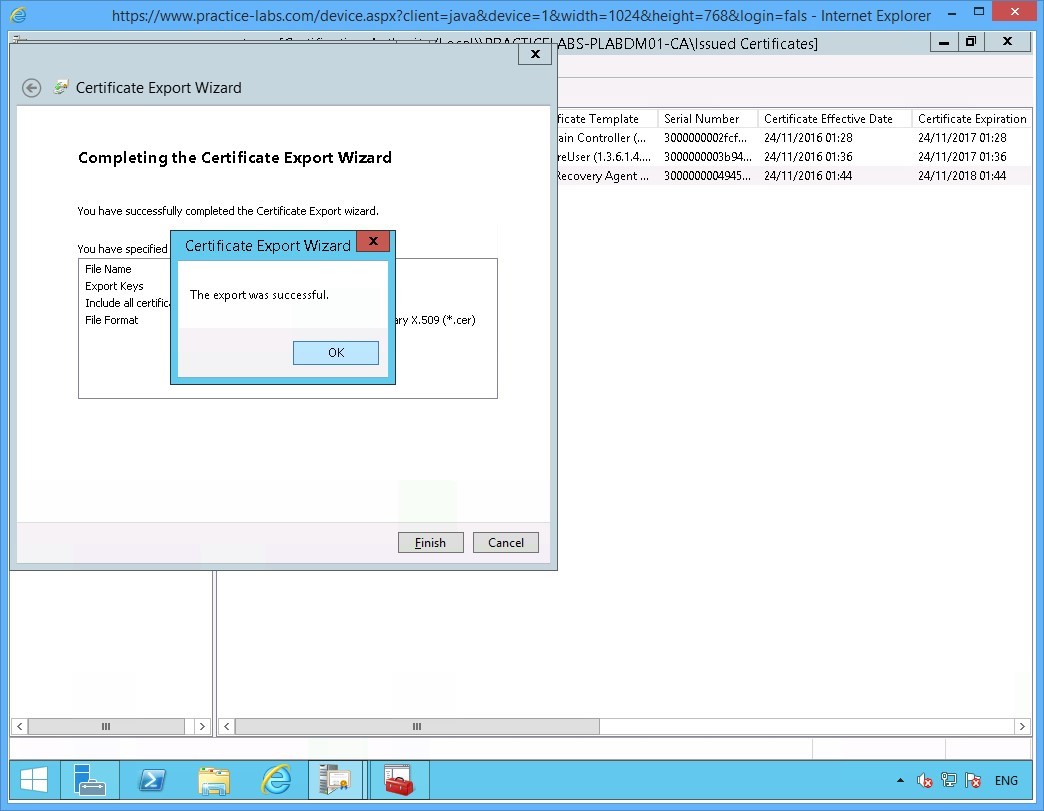
Click OK when the message "The export was successful" appears.
Click OK.
Similarly, click OK on the Certificate dialog box to close it.
Step 25
Restore the Console1 window from the taskbar.
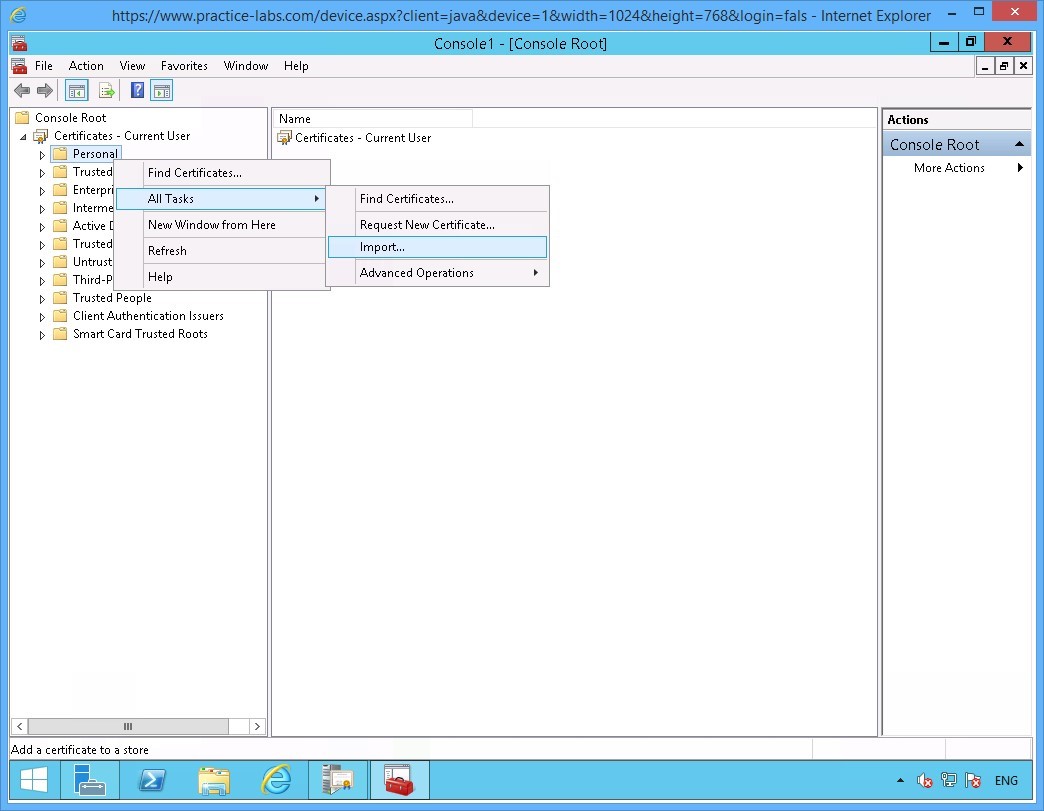
Right-click on Personal folder then click All Tasks > Import
Step 26
On the Welcome to the Certificate Import Wizard page, click Next.

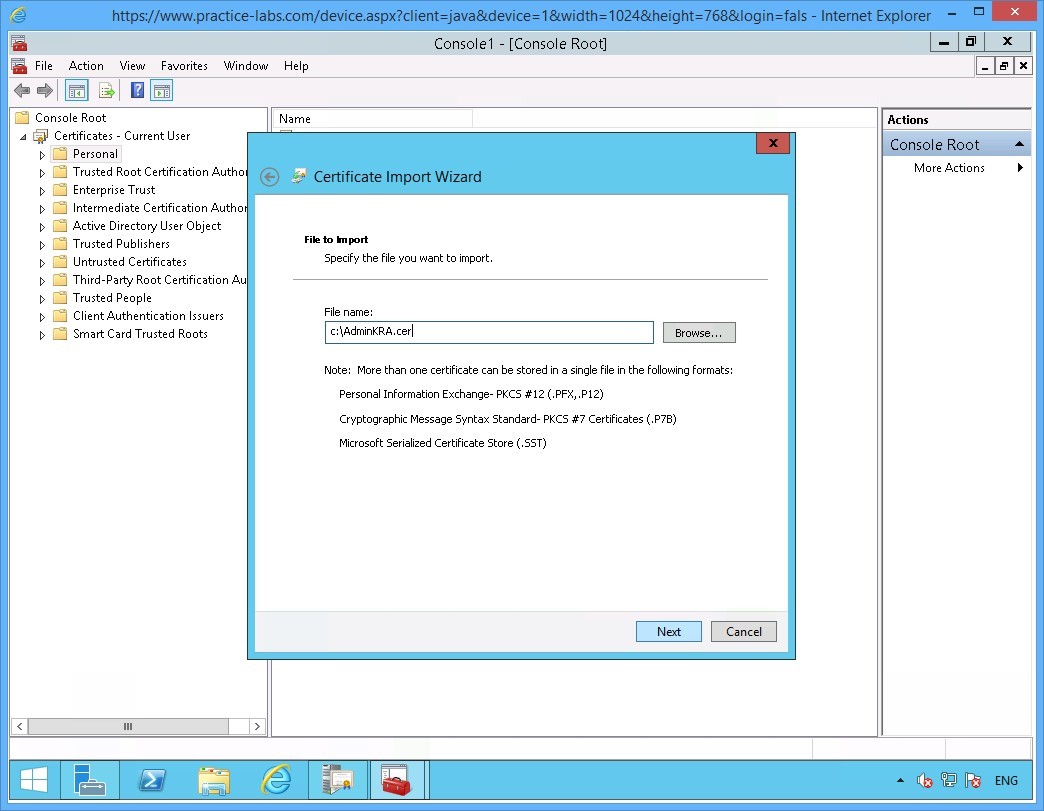
Step 27
On the File to Import page, click File name box and type:
c:\AdminKRA.cer
Click Next.
Note: Please note that you can use Browse… button to find the AdminKRA.cer certificate file.
Step 28
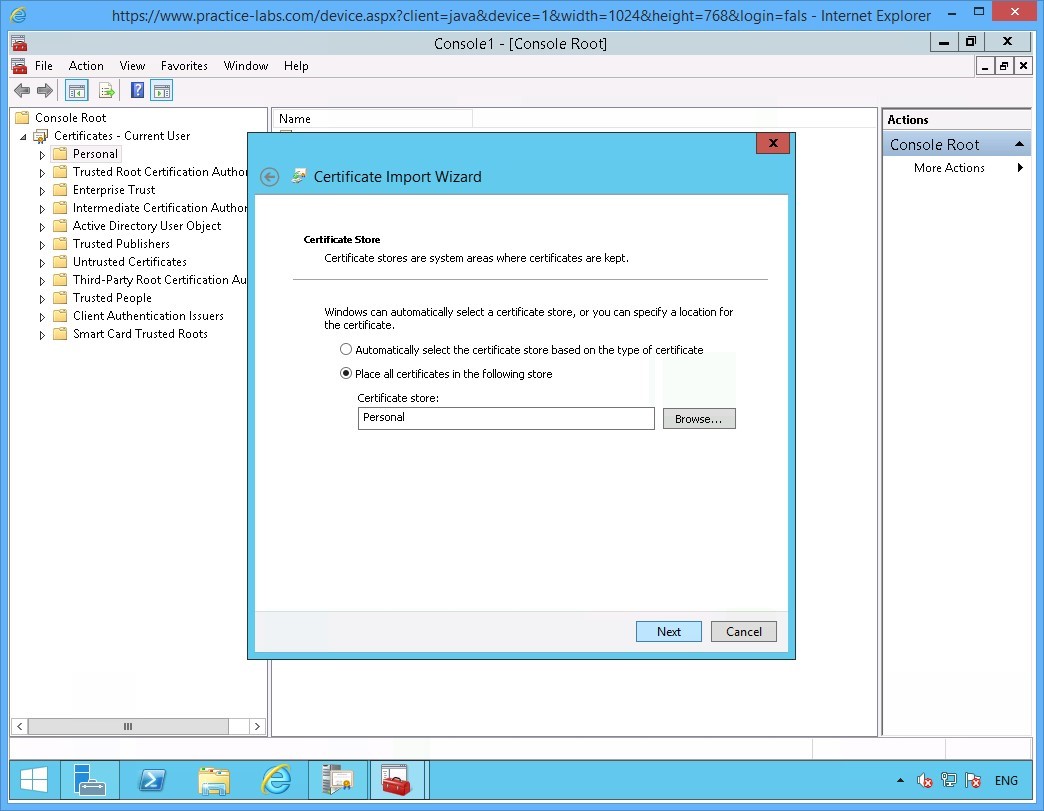
On the Certificate Store page, click Next to accept the default location for certificate in the Personal store.
Step 29
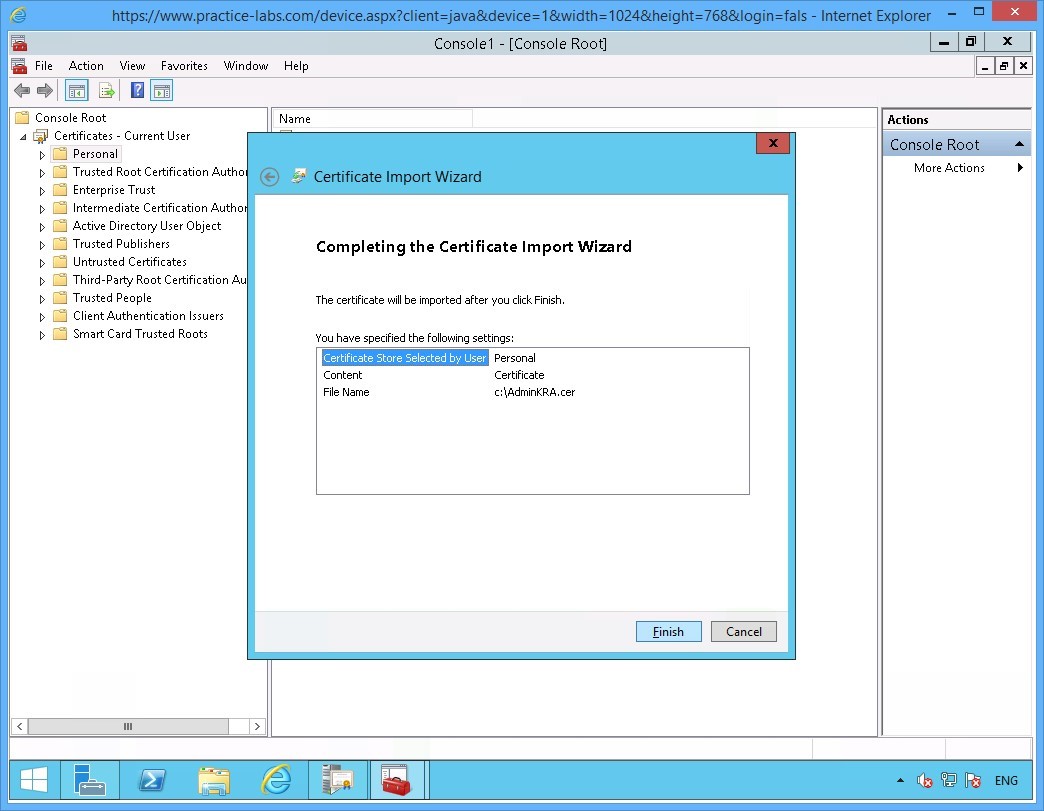
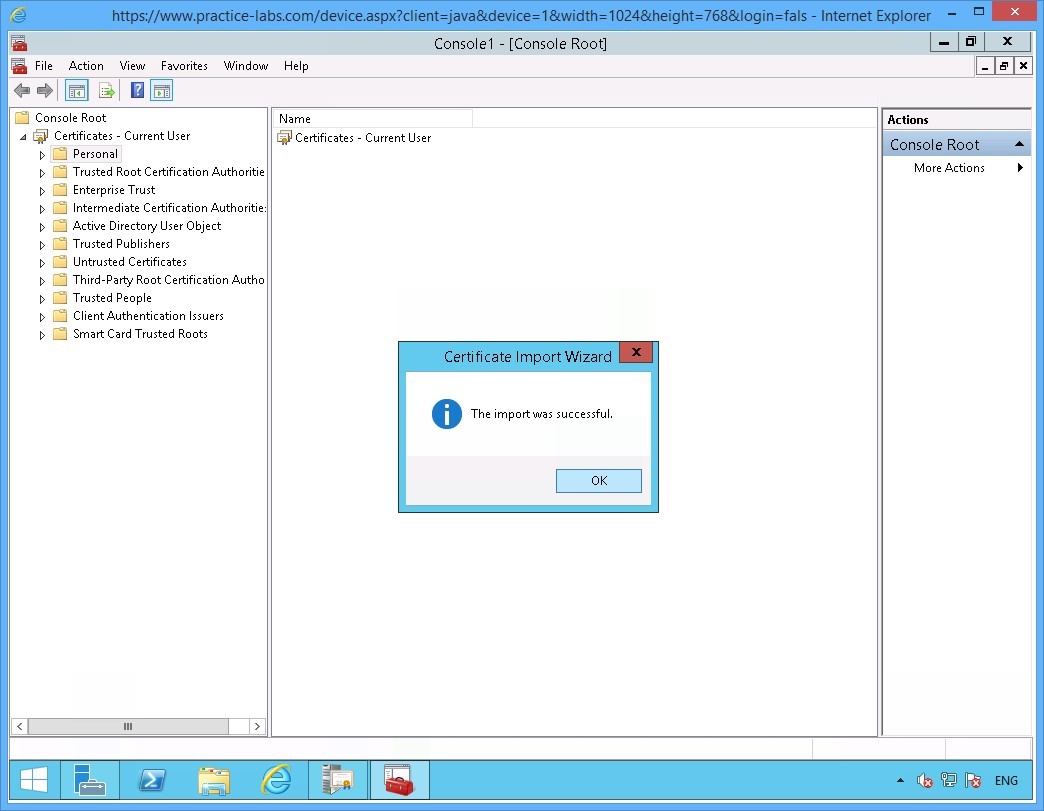
When Completing the Certificate Import Wizard page appears, click Finish.
Step 30
Click OK when prompted that the import was successful.
Step 31
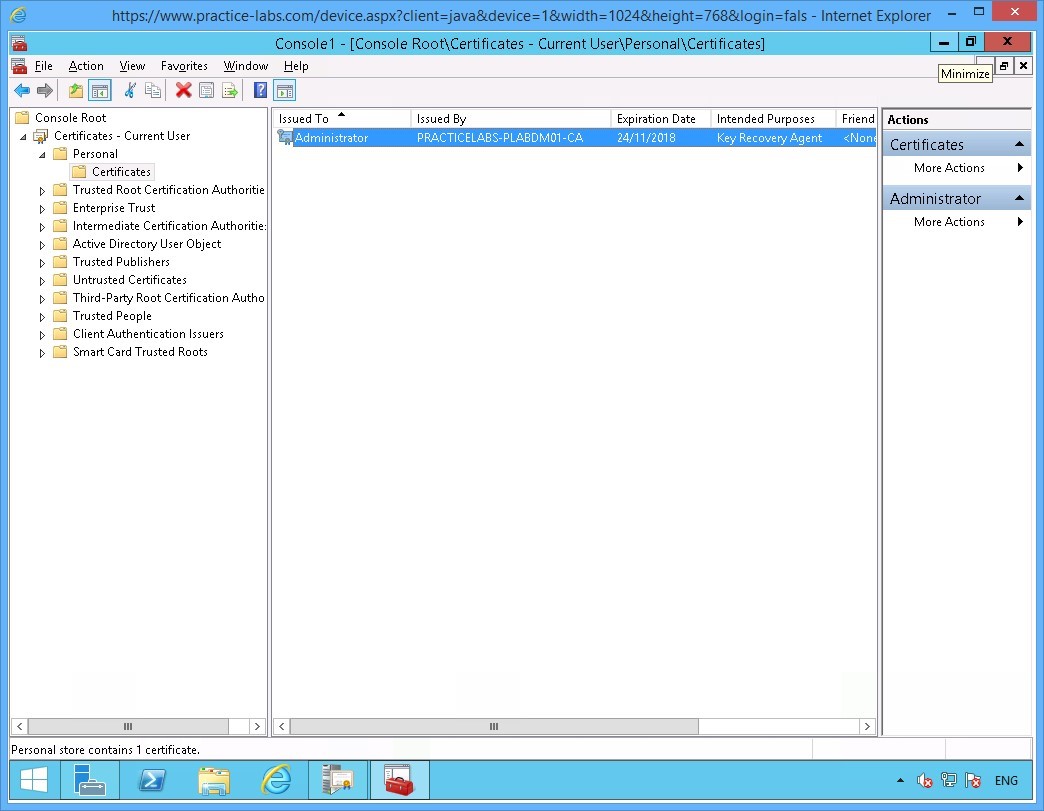
Back on the Console1 window. Expand Certificates - Current User > Personal and click Certificates folder.
Notice the certificate issued to Administrator with the Intended Purpose -Key Recovery Agent is now available.
Minimize Console1 MMC as you will need this for later.
Keep all devices powered on in their current state and proceed to the next task.
Task 2 - Configure CA for Key Archival
In this step, you will configure the Certification Authority to keep a copy of all issued certificates based on a certificate template.
To setup Key Archival on the CA, perform the following steps:
Step 1
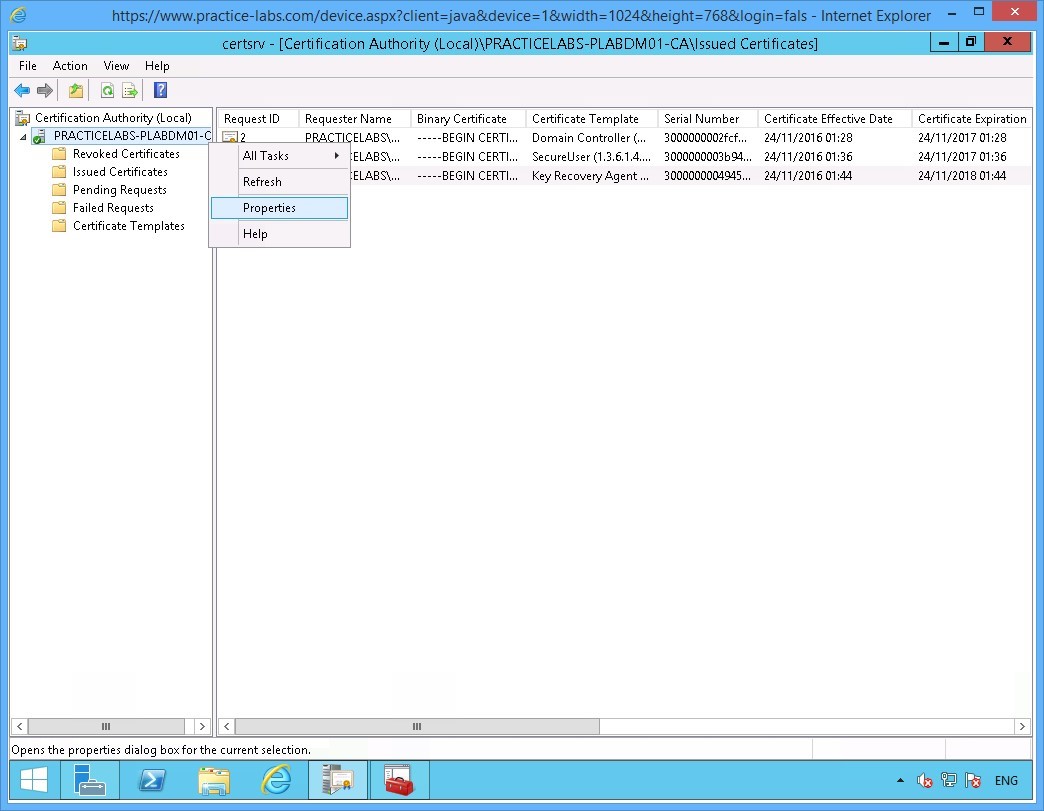
On the PLABDM01 server, restore Certification Authority window from taskbar if not yet open.
Right-click on PRACTICELABS-PLABDM01-CA and choose Properties.
Step 2
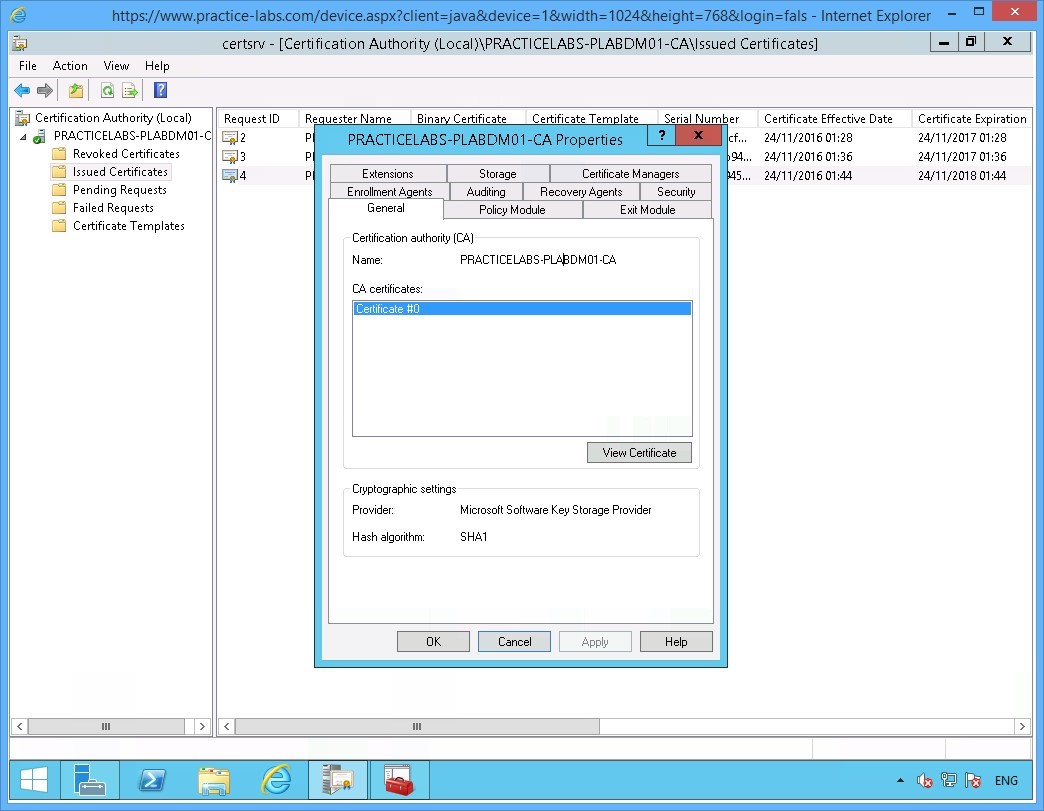
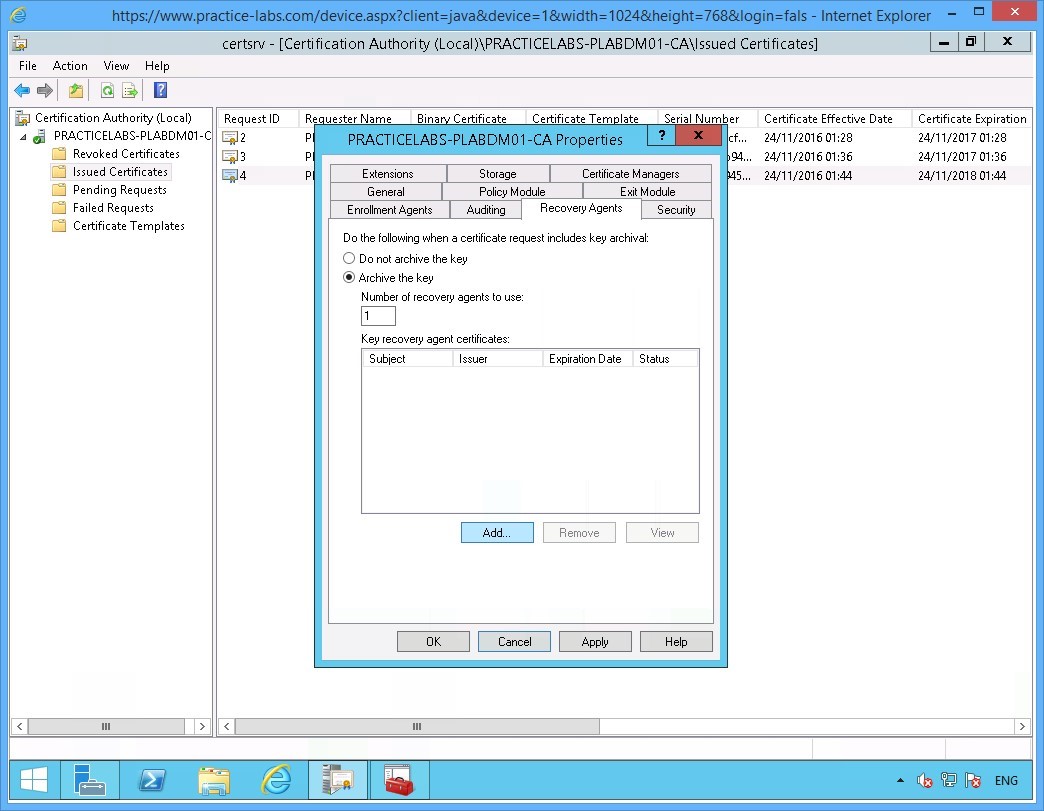
On the PRACTICELABS-PLABDM01-CA Properties window, select Recovery Agents tab.
Step 3
On the Recovery Agents tab, click Archive the key option.
Click Add…
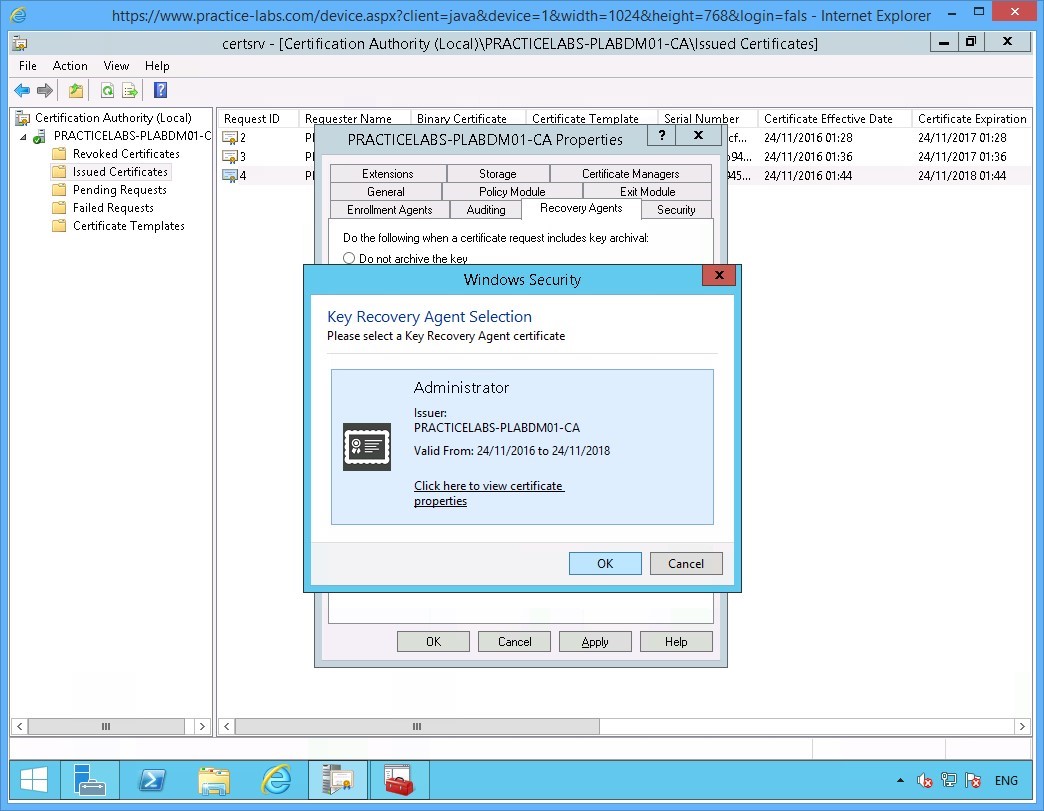
Step 4
The Key Recovery Agent certificate that was issued earlier to the Administrator is displayed.
Click OK.
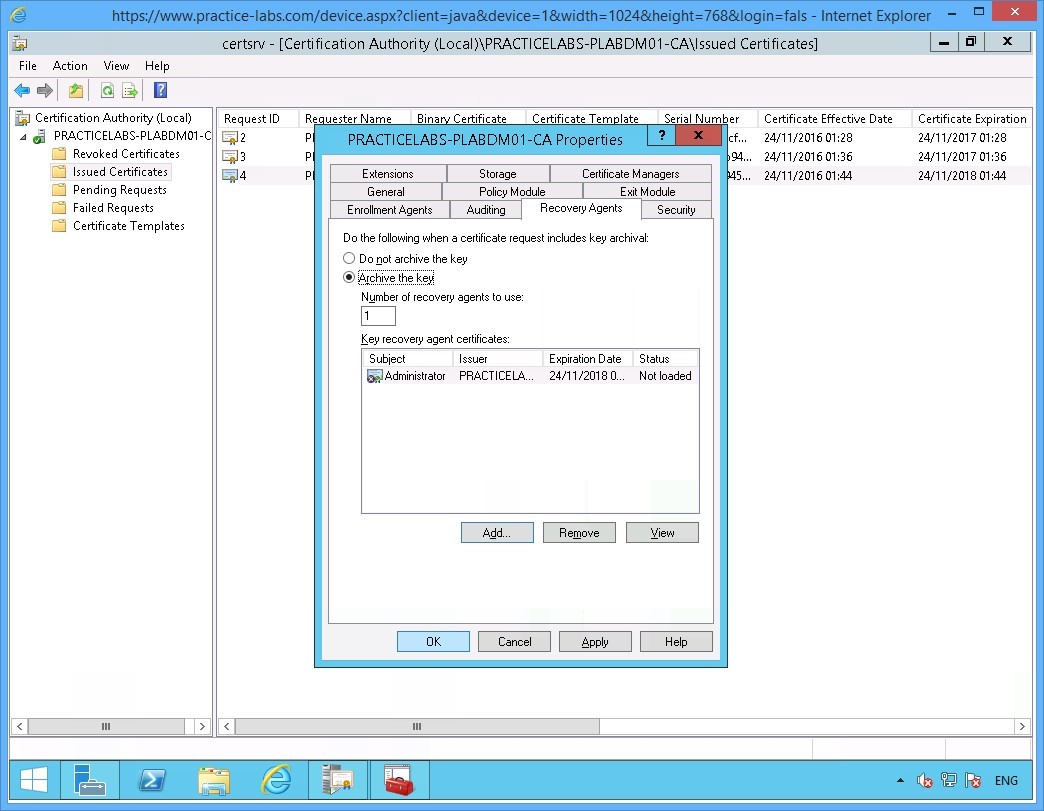
Step 5
Back on the PRACTITCELABS-PLABDM01-CA Properties window, click OK when the certificate is added.
Step 6
Choose Yes to restart Active Directory Certificate Services.
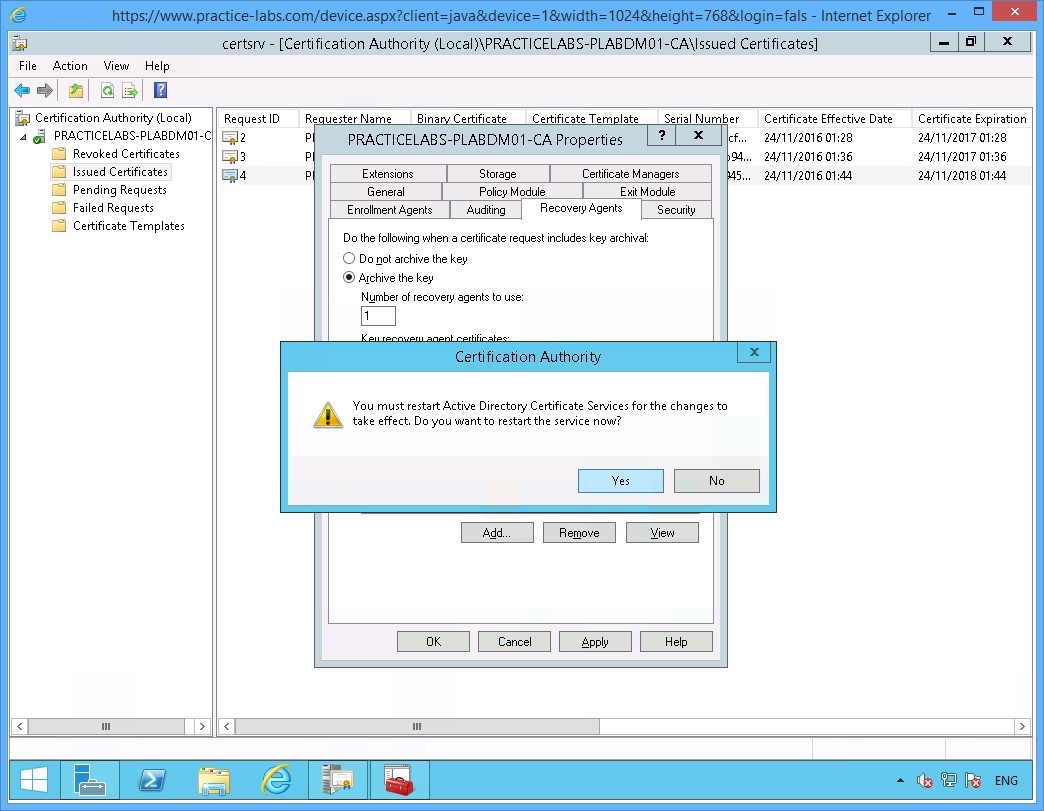
Step 7
Please wait while the Active Directory Certificate Services is stopped and started.
Keep Certification Authority window open for the next activity.
Keep all devices powered on in their current state and proceed to the next task.
Summary
In this module you covered the following topics:
- Manage Certificate Templates
- Manage Certificate Enrolment
- Configure Key Archival