Southern New Hampshire University | SNHU-CYB220: Network Security
IPv4 and IPv6 Access Lists for Traffic Filtering
Exercises
- Introduction
- Exercise 1 - Configuring Standard and Extended Access Lists using IPv4
- Exercise 2 - Configuring Named Access Lists Using IPv4
- Exercise 3 - Creating Access-Lists in IPv6
- Summary
Introduction
The Configure and verify IPv4 and IPv6 Access Lists for Traffic Filtering module provides you with the instructions and Cisco hardware to develop your hands on skills in creating and applying access lists to routed interfaces. This module includes exercises that will cover the following topics:
- Configuring standard and extended access lists for IPv4
- Configure named access-lists for IPv4
- Configuring and modifying IPv6 access-lists
Exam Objectives
The following exam objectives are covered in this lab:
- CS0-001 1.1: Given a scenario, apply environmental reconnaissance techniques using appropriate tools and processes
- CS0-001 1.3: Given a network-based threat, implement or recommend the appropriate response and countermeasure
Lab Diagram
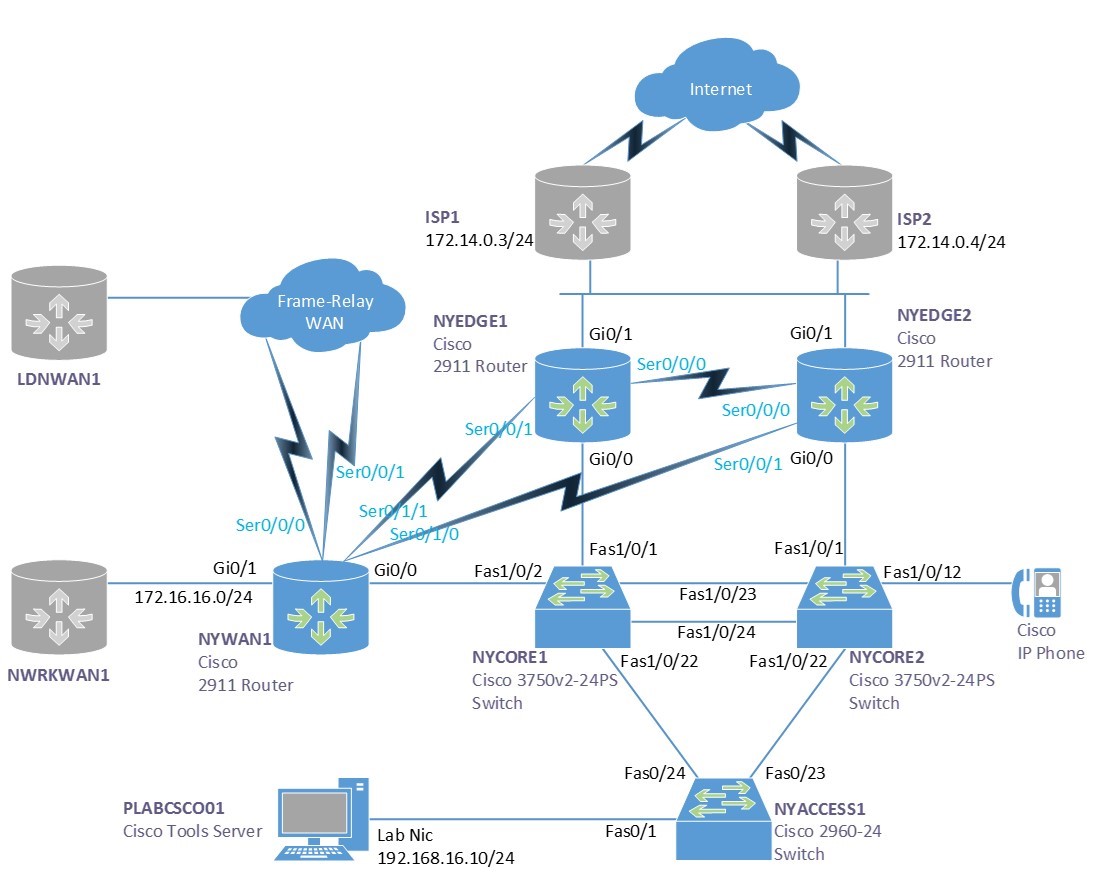
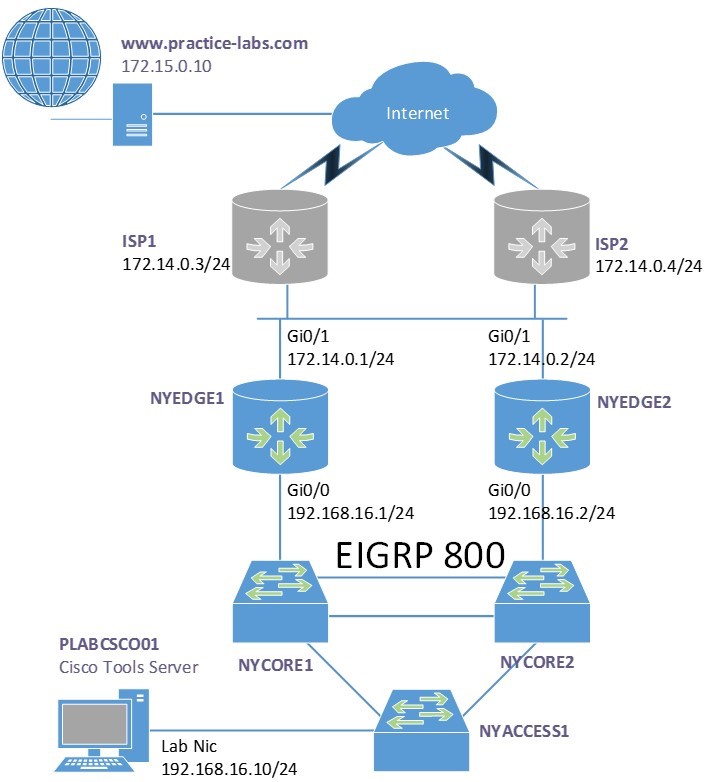
During your session, you will have access to the following lab configuration. Depending on the exercises you may or may not use all of the devices, but they are shown here in the layout to get an overall understanding of the topology of the lab.
Connecting to your Lab
In this module, you will be working on the following equipment to carry out the steps defined in each exercise.
- NYEDGE1
- NYEDGE2
- NYCORE1
- NYACCESS1
To start, simply choose a device and click Power on. In some cases, the devices may power on automatically.
For further information and technical support, please see our Help and Support page.
Copyright Notice
This document and its content is copyright of Practice-IT - © Practice-IT 2017. All rights reserved. Any redistribution or reproduction of part or all of the contents in any form is prohibited other than the following:
1. You may print or download to a local hard disk extracts for your personal and non-commercial use only.
2. You may copy the content to individual third parties for their personal use, but only if you acknowledge the website as the source of the material. You may not, except with our express written permission, distribute or commercially exploit the content. Nor may you transmit it or store it in any other website or other form of electronic retrieval system.
Exercise 1 - Configuring Standard and Extended Access Lists using IPv4
In this exercise, you will configure access control lists or ACLs to control traffic flows through the network.
Diagram
Use this diagram to help you understand the tasks in this exercise:

Task 1 - Creating Standard Access-Lists in IPv4
There are two types of access lists, standard and extended. These access lists can be referred to either by a name or a number, depending on how you configure them.
The difference between the two types of access lists is the granularity of the filtering that each provides. For example, a standard access list will only filter based on source address or network. This can be seen in the result of the context sensitive help below:
NYEDGE1(config)#access-list 1 permit ?
  Hostname or A.B.C.D  Address to match
  any                  Any source host
  host                 A single host address
NYEDGE1(config)#access-list 1 permit 192.168.16.0 0.0.0.255 ?
  log       Log matches against this entry
  smartlog  Smartlog matches against this entry
In the above output, the ? shows the options you have available at two different points, before a network address is entered you can see that you can enter the source address details. Once you have entered those, you only have logging options.
In this section, you will create a standard access list on NYEDGE1.
Step 1
This access list will match a single device on the network, specifically, the PLABCSCO01 server. Create a numbered access that matches the address of the server which is 192.168.16.10 and chose the action deny:
NYEDGE1#configure terminal
Enter configuration commands, one per line.  End with CNTL/Z.
NYEDGE1(config)#access-list 10 deny host 192.168.16.10
NYEDGE1(config)#exit
NYEDGE1#
Note: When configuring an access list to refer to only one host, you have two options. Either you use the host keyword as you have done above, or by including the IP address and a wildcard mask which indicates a host. The resulting command would be access-list 80 deny 192.168.16.10 0.0.0.0. Both commands would give the same result.
Step 2
To view the access lists you created use either of the following two commands:
NYEDGE1#show access-lists
Standard IP access list 10
    10 deny   192.168.16.10
Standard IP access list NAT
    10 permit 192.168.16.0, wildcard bits 0.0.0.255
NYEDGE1#
This command displays all of the access lists configured on the router.
The NAT access list has been preconfigured to enable NAT to function. This will be used later on in this lab.
Step 3
As there is an implicit deny at the end of each access list, you will need to include a permit statement. Otherwise, everything will be blocked. With the following command you will allow all other traffic:
NYEDGE1#configure terminal
Enter configuration commands, one per line.  End with CNTL/Z.
NYEDGE1(config)#access-list 10 permit any
NYEDGE1(config)#
Step 4
At this point, the access list has just been defined. It has not been applied anywhere, so filtering is not yet taking place. You must bind this access list to an interface.
Careful consideration needs to be taken when applying access lists. Should it be placed as close as possible or as far away as possible from the source? In what direction should it be applied? For example should you put place the access list on interface GigabitEthernet 0/0 or 0/1 and in what direction?
In this step you will place the access list on GigabitEthernet 0/1 in an outbound direction:
NYEDGE1(config)#interface gigabitethernet 0/1
NYEDGE1(config-if)#ip access-group 10 out
NYEDGE1(config-if)#exit
NYEDGE1(config)#exit
NYEDGE1#
Note: To help you understand directions, imagine yourself sitting on top of the router and a marble is the traffic, if the marble is coming towards you then it is inbound, if the marble is rolling away from you then it is outbound.
Step 5
If PLABCSCO01 is not powered on, power it on now. From PLABCSCO01 ping www.practice-labs.com:
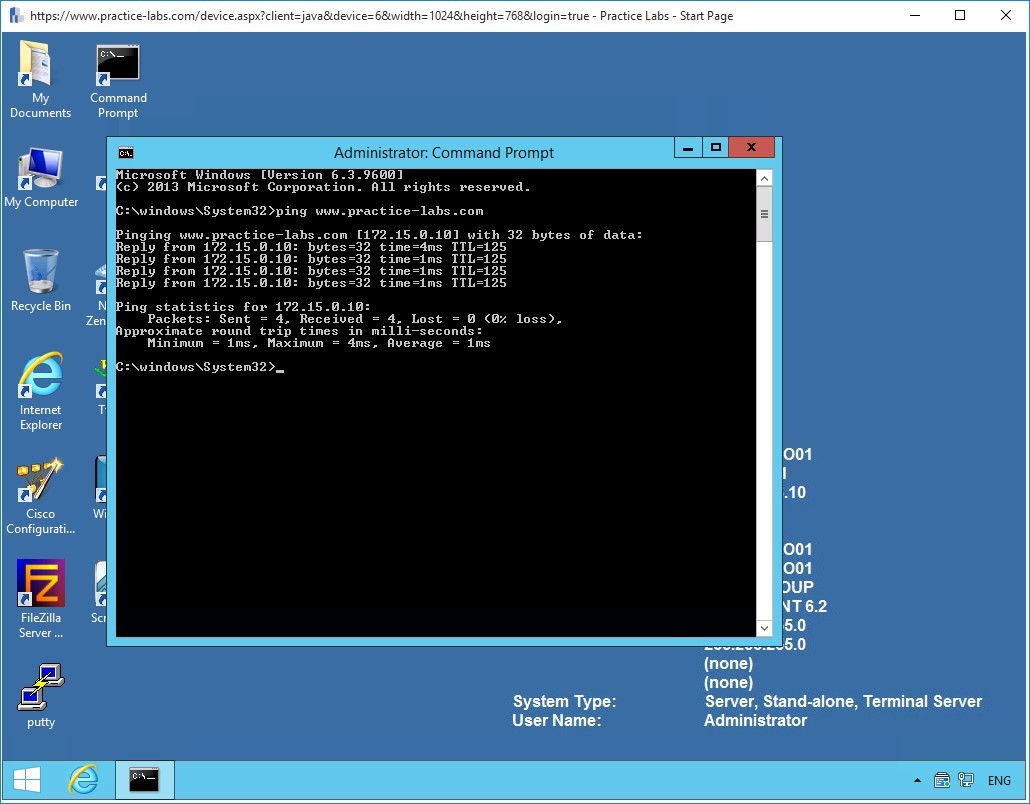 Figure 1.1 Configuring Access Lists: Pinging the web server on the Internet from the PLABCSCO01 server.
The pings are successful.
Step 6
Observe the access list hits, using the show access-lists command:
NYEDGE1#show access-lists
Standard IP access list 10
    10 deny   192.168.16.10
    20 permit any (4 matches)
NYEDGE1#
You can see from the above output that there were four matches on the permit any line and no matches on the deny 192.168.16.10 line of the access list.
Examining the configuration once again, you may realize that something is wrong. If the PLABCSCO01 server has an IP address of 192.168.16.10, then the pings should be denied and not permitted. Why is the incorrect line being matched?
Step 7
The placement of the access list is very important. Because NAT is operating on this router, the source address of the server is being translated. When the packet in question is exiting the GigabitEthernet 0/1 interface on which the access list was applied, it no longer has 192.168.16.10 as a source address. It has been translated by NAT. Therefore you must either change the access list placement and direction to GigabitEthernet 0/0 inbound, or you must modify the access list to match the translated IP address.
The best choice would be to change the placement and direction. Remove the access list from the GigabitEthernet 0/1 interface and place it on 0/0 in an inbound direction:
NYEDGE1#configure terminal
Enter configuration commands, one per line.  End with CNTL/Z.
NYEDGE1(config)#interface gigabitethernet 0/1
NYEDGE1(config-if)#no ip access-group 10 out
NYEDGE1(config-if)#exit
NYEDGE1(config)#interface gigabitethernet 0/0
NYEDGE1(config-if)#ip access-group 10 in
NYEDGE1(config-if)#exit
NYEDGE1(config)#exit
NYEDGE1#
Step 8
Retry the ping from PLABCSCO01 once more:
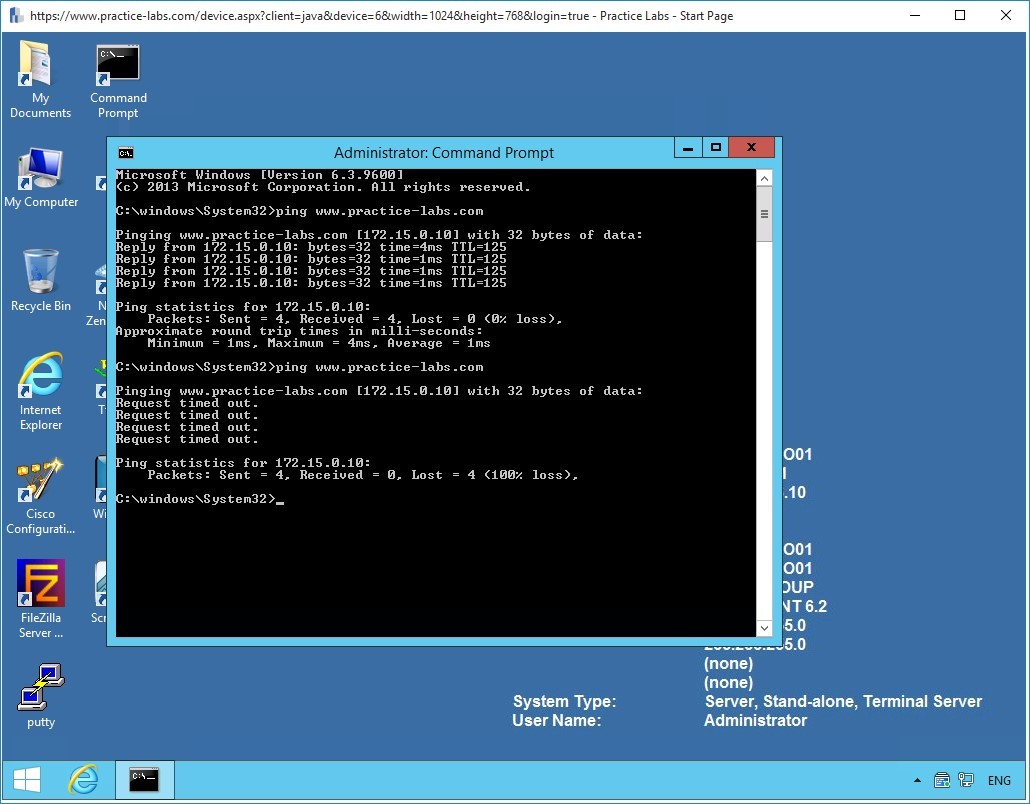 Figure 1.2 Configuring Access Lists: Pinging the web server on the Internet from PLABCSCO01 once more.
Step 9
Return to the NYEDGE1 router and view the access list again:
NYEDGE1#show access-lists
Standard IP access list 10
    10 deny   192.168.16.10 (8 matches)
    20 permit any (19 matches)
Standard IP access list NAT
    10 permit 192.168.16.0, wildcard bits 0.0.0.255 (1 match)
NYEDGE1#
You now see that there are matches on the deny line of the access list, meaning the access list denied the pings you sent.
Step 10
Before continuing on to the next exercise, remove the access-group you applied to GigabitEthernet 0/0:
NYEDGE1#configure terminal
Enter configuration commands, one per line.  End with CNTL/Z.
NYEDGE1(config)#interface gigabitethernet 0/0
NYEDGE1(config-if)#no ip access-group 10 in
NYEDGE1(config-if)#exit
NYEDGE1(config)#exit
NYEDGE1#
You have completed the creation of standard access lists. Leave your devices in their current states and continue on to the next section.
Task 2 - Create an Extended Access-List in IPv4
In this section, you will create an extended access list. The benefits of extended access lists are that you can be much more granular in what you want to permit and deny.
You will now configure an access list that permits FTP but denies ICMP on NYEDGE1.
Step 1
Configure access-list 110 allowing FTP:
NYEDGE1#configure terminal
Enter configuration commands, one per line.  End with CNTL/Z.
NYEDGE1(config)#access-list 110 permit tcp host 192.168.16.10 any eq ftp
NYEDGE1(config)#access-list 110 permit tcp host 192.168.16.10 any eq ftp-data
NYEDGE1(config)#
Note: You must create two access list entries because FTP uses two ports: 20 for data and 21 for control information. For well-known ports, keywords can be used instead of the port numbers.
Step 2
Next within the same access list, deny ICMP specifically to www.practice-labs .com which corresponds to an IP address of 172.15.0.10, remembering that ICMP is a protocol:
NYEDGE1(config)#access-list 110 deny icmp host 192.168.16.10 host 172.15.0.10
NYEDGE1(config)#exit
NYEDGE1#
Step 3
Examine your access list now and remember that there is an implicit deny at the end of the list:
NYEDGE1#show access-lists 110
Extended IP access list 110
    10 permit tcp host 192.168.16.10 any eq ftp
    20 permit tcp host 192.168.16.10 any eq ftp-data
    30 deny icmp host 192.168.16.10 host 172.15.0.10
NYEDGE1#
Step 4
Apply the access list to interface GigabitEthernet 0/0 inbound:
NYEDGE1#configure terminal
Enter configuration commands, one per line.  End with CNTL/Z.
NYEDGE1(config)#interface GigabitEthernet 0/0
NYEDGE1(config-if)#ip access-group 110 in
NYEDGE1(config-if)#exit
NYEDGE1(config)#
Note: You can only have one access-group per interface per direction. The above command will replace any other inbound access-group that may have been configured on this interface.
Step 5
Next, test the configuration using PLABCSCO01. First, try a ping to www.practice-labs.com then try and use FTP from within the command prompt:
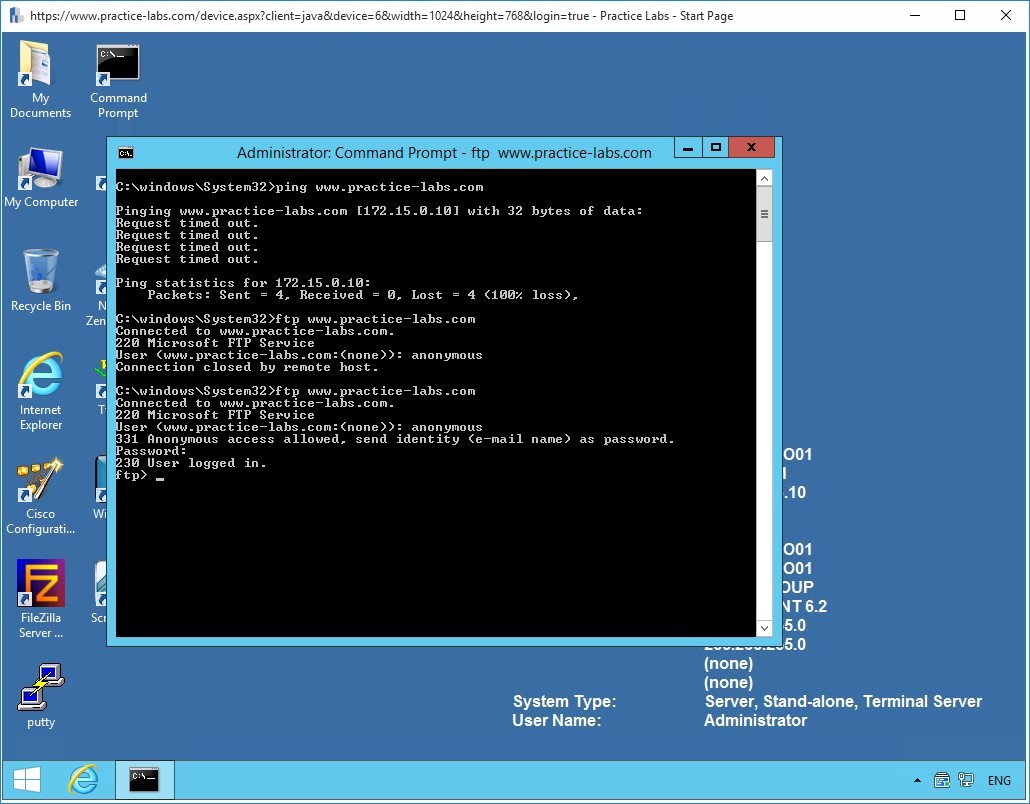 Figure 1.3 Configuring Access Lists: Attempting to ping and FTP into the web server from PLABCSCO01.
In the screenshot above you can see that the ping fails, however, the FTP connection is successful.
Test the connection further by entering the credentials.
anonymous
Passw0rd
Step 6
Finally, review the access list hits once more:
NYEDGE1#show access-lists 110
Extended IP access list 110
    10 permit tcp host 192.168.16.10 any eq ftp (21 matches)
    20 permit tcp host 192.168.16.10 any eq ftp-data
    30 deny icmp host 192.168.16.10 host 172.15.0.10 (10 matches)
NYEDGE1#
Note: No matches have been registered on line 20 of the access list because no file transfers have been initiated. Port 21 which corresponds to the ftp-data keyword, is used for the actual transfer of files in FTP.
Step 7
Before continuing on to the next section, remove the access-group you applied to GigabitEthernet 0/0:
NYEDGE1#configure terminal
Enter configuration commands, one per line.  End with CNTL/Z.
NYEDGE1(config)#interface gigabitethernet 0/0
NYEDGE1(config-if)#no ip access-group 110 in
NYEDGE1(config-if)#exit
NYEDGE1(config)#exit
NYEDGE1#
Exercise 2 - Configuring Named Access Lists Using IPv4
In the previous exercise, you configured standard and extended numbered access lists. In this exercise, you will create the same access lists, but this time, they will be named.
Diagram
Use this diagram to help you understand the tasks in this exercise:
Task 1 - Configuring a Named Access-List
Step 1
Connect to the NYEDGE1 device.
Create a named extended access list called permit-ftp allowing FTP from 192.168.16.10 to 172.15.0.10. In the same access list, block ICMP:
NYEDGE1#configure terminal
Enter configuration commands, one per line.  End with CNTL/Z.
NYEDGE1(config)#ip access-list extended permit-ftp
NYEDGE1(config-ext-nacl)#permit tcp host 192.168.16.10 host 172.15.0.10 eq ftp
NYEDGE1(config-ext-nacl)#deny icmp host 192.168.16.10 any
NYEDGE1(config-ext-nacl)#exit
NYEDGE1(config)#exit
NYEDGE1#
Note: One of the major differences between numbered and named access lists is that named access lists bring you into an access list configuration mode where you can input all of your configuration parameters. This is denoted by the NYEDGE1(config-ext-nacl)# prompt.
Step 2
View the access list:
NYEDGE1#show ip access-lists permit-ftp
Extended IP access list permit-ftp
    10 permit tcp host 192.168.16.10 host 172.15.0.10 eq ftp
    20 deny icmp host 192.168.16.10 any
NYEDGE1#
Take a closer look at the above access list. You didn’t include the line which permits the ftp-data port.
Step 3
One of the advantages of using named access lists is that you can insert entries into any position of the access list, assuming there is a line number free where you want to insert the new entry. Line numbers by default are assigned in 10s for this purpose.
The new line should be placed in between existing access list entries numbers 10 and 20. Put the ftp-data line in at number 15 allowing you to add still more entries above and below this point in the future:
NYEDGE1#configure terminal
Enter configuration commands, one per line.  End with CNTL/Z.
NYEDGE1(config)#ip access-list extended permit-ftp
NYEDGE1(config-ext-nacl)#15 permit tcp host 192.168.16.10 host 172.15.0.10 eq ftp-data
NYEDGE1(config-ext-nacl)#exit
NYEDGE1(config)#exit
NYEDGE1#
Step 4
View the access list once more:
NYEDGE1#show ip access-lists permit-ftp
Extended IP access list permit-ftp
    10 permit tcp host 192.168.16.10 host 172.15.0.10 eq ftp
    15 permit tcp host 192.168.16.10 host 172.15.0.10 eq ftp-data
    20 deny icmp host 192.168.16.10 any
NYEDGE1#
The new entry has been inserted successfully.
Step 5
Apply the named access list to the interface:
NYEDGE1#configure terminal
Enter configuration commands, one per line.  End with CNTL/Z.
NYEDGE1(config)#interface gigabitEthernet 0/0
NYEDGE1(config-if)#ip access-group permit-ftp in
NYEDGE1(config-if)#exit
NYEDGE1(config)#exit
NYEDGE1#
Step 6
Test your configuration using the PLABCSCO01 server:
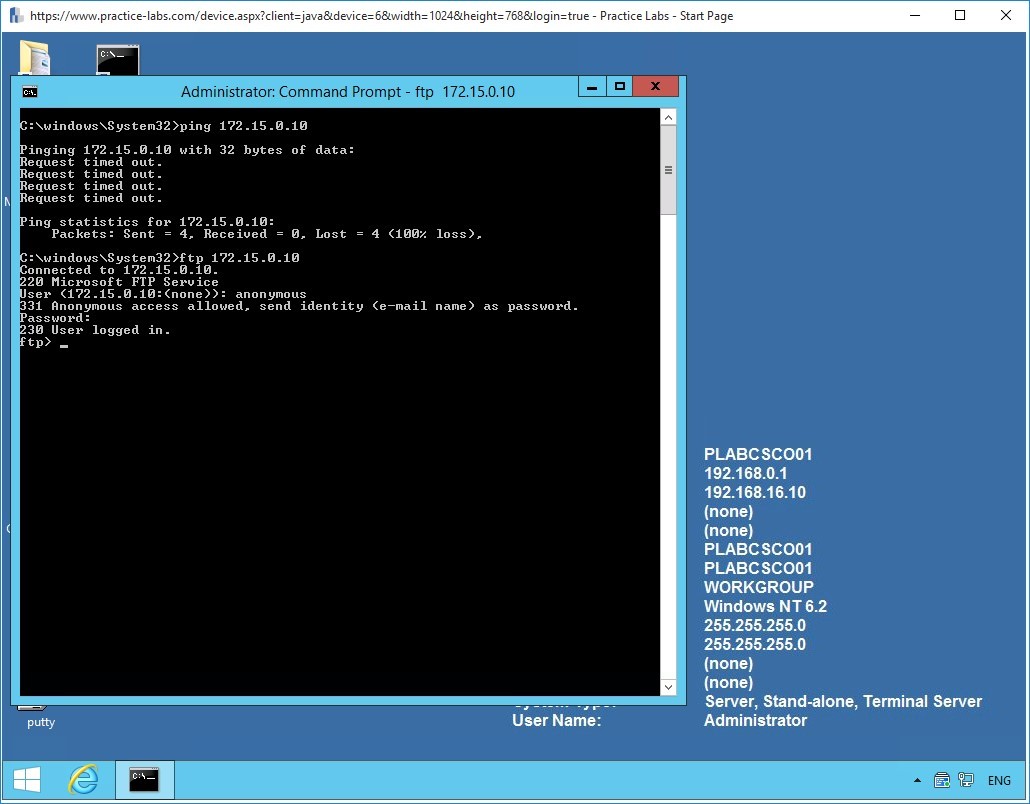 Figure 2.1 Configuring Named Access Lists: Attempting to ping and FTP into the web server from PLABCSCO01.
Step 7
When troubleshooting connections through your access list, sometimes it’s helpful to reset the match counters. In this step, you will clear the counters.
First, display the access list information with the following command:
NYEDGE1#show ip access-lists permit-ftp
Extended IP access list permit-ftp
    10 permit tcp host 192.168.16.10 host 172.15.0.10 eq ftp (21 matches)
    15 permit tcp host 192.168.16.10 host 172.15.0.10 eq ftp-data
    20 deny icmp host 192.168.16.10 any (12 matches)
NYEDGE1#
Next, issue the following command to clear the counters
NYEDGE1# clear ip access-list counters
NYEDGE1#
Note: This command clears the counters for all access lists. To specify the specific access list for which you want to clear counters, use the clear ip access-list counters XX command where XX is either the access list number or access list name.
You can check to see that the counters have been reset:
NYEDGE1#clear ip access-list counters
NYEDGE1#show ip access-lists permit-ftp
Extended IP access list permit-ftp
    10 permit tcp host 192.168.16.10 host 172.15.0.10 eq ftp
    15 permit tcp host 192.168.16.10 host 172.15.0.10 eq ftp-data
    20 deny icmp host 192.168.16.10 any
NYEDGE1#
Step 8
Before finishing off this exercise, it’s important to be able to see what access lists are being applied to an interface. Here are two approaches you can use:
First you can view the running configuration of the interface in question:
NYEDGE1#show run interface gigabitethernet 0/0
Building configuration...
Current configuration : 172 bytes
!
interface GigabitEthernet0/0
 ip address 192.168.16.1 255.255.255.0
 ip access-group permit-ftp in
 ip nat inside
 ip virtual-reassembly in
 duplex auto
 speed auto
end
You can also use the show ip interface command, this shows which inbound and outbound access lists are set:
NYEDGE1#show ip interface gigabitEthernet 0/0
GigabitEthernet0/0 is up, line protocol is up
  Internet address is 192.168.16.1/24
  Broadcast address is 255.255.255.255
  Address determined by setup command
  MTU is 1500 bytes
  Helper address is not set
  Directed broadcast forwarding is disabled
  Outgoing access list is not set
  Inbound  access list is permit-ftp
!<-- Output omitted -->
Leave the devices powered on and in their current states and continue to the next exercise.
Exercise 3 - Creating Access-Lists in IPv6
IPv6 access lists don’t come in standard and extended forms in the same way as IPv4 access lists do. When defining IPv6 access lists, you must define both source and destination addresses or networks. Also, IPv6 access lists must be defined using a name and not a number.
Other than these difference, the logic behind access lists in IPv6 is virtually identical to that of IPv4.
In this section, you will configure IPv6 access lists on the NYEDGE1 router.
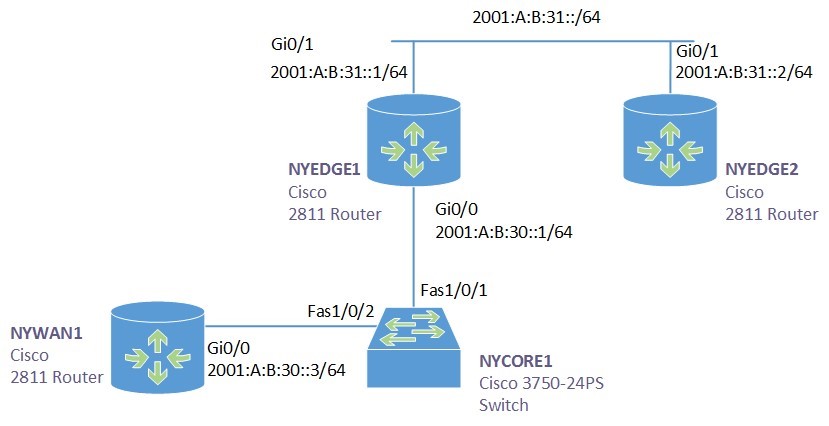
Diagram
The lab IPv6 topology that will be used for this exercise can be seen below along with the IPv6 addresses that will be used.
Step 1
The connectivity that you will be using to test IPv6 access lists in this exercise will be between the GigabitEthernet 0/0 interface of the NYWAN1 router and the GigabitEthernet 0/1 interface of the NYEDGE2 router. The appropriate routing between these two devices has already been configured for you, so there should currently be connectivity between them.
You can test this connectivity by connecting to the NYWAN1 router and pinging the appropriate IP address like so:
NYWAN1#ping 2001:A:B:31::2
Type escape sequence to abort.
Sending 5, 100-byte ICMP Echos to 2001:A:B:31::2, timeout is 2 seconds:
!!!!!
Success rate is 100 percent (5/5), round-trip min/avg/max = 1/2/4 ms
NYWAN1#
Looking at the lab diagram, you can see that this ping must traverse the NYEDGE1 router to get to its destination.
Step 2
Next you will create an IPv6 access list on NYEDGE1 to deny traffic to this specific destination address. You will name the access list block_NYEDGE2 and you will configure the destination address to be 2001:A:B:31::2/64. To do so, connect to NYEDGE1 and issue the following commands:
NYEDGE1#configure terminal
Enter configuration commands, one per line.  End with CNTL/Z.
NYEDGE1(config)#ipv6 access-list block_NYEDGE2
NYEDGE1(config-ipv6-acl)#deny any host 2001:A:B:31::2
NYEDGE1(config-ipv6-acl)#permit any any
NYEDGE1(config-ipv6-acl)#exit
NYEDGE1(config)#
With the above commands, you are denying any source to have access to the specific host address, that is, the address of the GigabitEthernet 0/1 interface of the NYEDGE2 router.
Alert: Remember that that both source and destination addresses or networks must always be defined in IPv6 access lists.
Note: Spend some time using Cisco’s context-sensitive help using the ? character to observe the options that are available to you when configuring IPv6 access lists. It will also help you to get a feel of the syntax necessary for the associated commands.
Step 3
View the access list you have created using a similar command like that for IPv4 access lists:
NYEDGE1#show ipv6 access-list
IPv6 access list block_NYEDGE2
    deny ipv6 any host 2001:A:B:31::2 log sequence 10
    permit ipv6 any any sequence 20
NYEDGE1#
Step 4
At this point the access list has just been defined. It has not been applied anywhere, so filtering is not yet taking place. You must bind this access list to an interface and define a direction.
In this step you will place the access list on GigabitEthernet 0/1 in an outbound direction:
Alert: Make sure you type the name of the access list correctly. If you make a mistake, the router will not inform you and you may be spending a lot of time troubleshooting the misconfiguration.
NYEDGE1#configure terminal
Enter configuration commands, one per line.  End with CNTL/Z.
NYEDGE1(config)#interface gigabitethernet 0/1
NYEDGE1(config-if)#ipv6 traffic-filter block_NYEDGE2 out
NYEDGE1(config-if)#exit
NYEDGE1(config)#exit
NYEDGE1#
Note: Notice that IPv6 access lists use a much more logical name for the command to apply the access list to the interface. traffic-filter is more intuitive than access-group as used for IPv4.
Step 5
Next, you will attempt to ping the GigabitEthernet 0/1 interface of NYEDGE2 from the NYWAN1 router once again:
NYWAN1#ping ipv6 2001:A:B:31::2
Type escape sequence to abort.
Sending 5, 100-byte ICMP Echos to 2001:A:B:31::2, timeout is 2 seconds:
AAAAA
Success rate is 0 percent (0/5)
NYWAN1#
The ping is unsuccessful. You have successfully created an IPv6 access list that denies access to the specific host.
Note: A ping response of AAAAA means that the destination is Administratively Unreachable. This is the response that IPv6 indicates when an access list has blocked the path to the destination.
Step 6
Return to the NYEDGE1 router and examine the console for any syslog messages. You should see something similar to the following:
*Oct 14 09:48:26: %IPV6_ACL-6-ACCESSLOGDP: list block_NYEDGE2/10 denied icmpv6 2001:A:B:30::3 -> 2001:A:B:31::2 (128/0), 1 packet
*Oct 14 09:54:13: %IPV6_ACL-6-ACCESSLOGDP: list block_NYEDGE2/10 denied icmpv6 2001:A:B:30::3 -> 2001:A:B:31::2 (128/0), 9 packets
The syslog message doesn’t only indicate the access list that was invoked, but also the sequence number of the line that matched the packet. In the above output, the access list is the block_NYEDGE2 and the sequence number is 10.
Step 7
Much of the IPv6 access list manipulation is similar to that of the named access lists in IPv4 with slight changes in syntax. You can experiment by adding additional lines to the access list.
Specifically, add a line that denies all of the 2001:A:B:31::/64 subnet as a destination in between the two existing lines. To do so, first examine the access list:
NYEDGE1#show ipv6 access-list
IPv6 access list block_NYEDGE2
    deny ipv6 any host 2001:A:B:31::2 log (5 matches) sequence 10
    permit ipv6 any any sequence 20
NYEDGE1#
Now issue the following commands:
NYEDGE1#configure terminal
Enter configuration commands, one per line.  End with CNTL/Z.
NYEDGE1(config)#ipv6 access-list block_NYEDGE2
NYEDGE1(config-ipv6-acl)#sequence 15 deny any 2001:A:B:31::/64 log
NYEDGE1(config-ipv6-acl)#exit
NYEDGE1(config)#exit
NYEDGE1#
A sequence number of 15 should place the line in between the existing lines.
Step 8
Now view the access list once more:
NYEDGE1#show ipv6 access-list
IPv6 access list block_NYEDGE2
    deny ipv6 any host 2001:A:B:31::2 log (5 matches) sequence 10
    deny ipv6 any 2001:A:B:31::/64 log sequence 15
    permit ipv6 any any sequence 20
NYEDGE1#
The line has been successfully placed between the previously existing lines.
You have successfully created and configured IPv6 access lists.
You have successfully completed this lab.
Summary
In this module you achieved the following activities:
- You configured standard and extended numbered access-lists for IPv4.
- You applied these access lists to an interface and saw how important the placement and the direction you configure is.
- You verified that your access list was operational, and saw access list counters change.
- You configured a named access list and saw how you can insert entries between existing entries.
- You learned how to view where access lists are being applied, and how to clear access list counters.
- You learned the similarities and the differences between IPv4 and IPv6 access lists.
- You learned how to configure IPv6 access lists.
- You observed the functionality of IPv6 access lists and you learned how to modify them.