Southern New Hampshire University | SNHU-CYB220: Network Security
Implement a Host-based Firewall
Exercises
- Introduction
- Lab Topology
- Exercise 1 - Preliminary Tasks
- Exercise 2 - Configuring Firewall Rules Using Windows Firewall
- Exercise 3 - Configuring Firewall Rules using Windows Firewall with Advanced Security
- Exercise 4 - Configuring Firewall Rules from the Command Line Interface
- Review
Introduction
Welcome to the Implement a Host-based Firewall Practice Lab. In this module you will be provided with the instruction and computer hardware to develop your hands on skills in the defined topics.
Learning Outcomes
In this module, you will complete the following exercises:
- Exercise 1 - Preliminary Tasks
- Exercise 2 - Configuring Firewall Rules Using Windows Firewall
- Exercise 3 - Configuring Firewall Rules using Windows Firewall with Advanced Security
- Exercise 4 - Configuring Firewall Rules from the Command Line Interface
After completing this lab, you will be able to:
- Configure Firewall Rules Using Windows Firewall
- Configure Firewall Rules Using Windows Firewall with Advanced Security
- Configure Firewall Rules Using Remote Access
- Configure Firewall Rules from the Command Line Interface
Exam Objectives
- N10-007 2.2: Given a scenario, determine the appropriate placement of networking devices on a network and install/configure them (Firewall)
- N10-007 5.5: Given a scenario, troubleshoot common network service issues (Incorrect host-based firewall settings)
Note: Our main focus is to cover the practical, hands-on aspects of the exam objectives. We recommend referring to course material or a search engine to research theoretical topics in more detail.
Lab Duration
It will take approximately 1 hour to complete this lab.
Help and Support
For more information on using Practice Labs, please see our Help and Support page. You can also raise a technical support ticket from this page.
Click Next to view the Lab topology used in this module.
Copyright © Practice Labs 2007 - 2018. All rights reserved.
Lab Topology
During your session, you will have access to the following lab configuration.
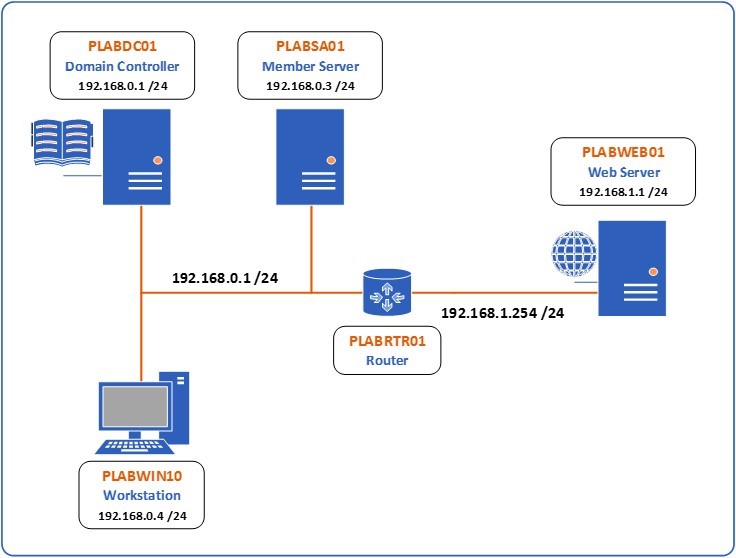 Figure 1 Lab Topology - The lab topology is composed of two subnets separated by an Ubuntu device called PLABRTR01 functioning as a router. The first subnet contains three computers. The first, called PLABDC01 is a Windows 2016 Server with an IP address of 192.168.0.2/24 and functions as the Domain Controller. The second, called PLABSA01 is also a Windows 2016 Server with an IP address of 192.168.0.3/24. The third, called PLABWIN10 is a Windows 10 device with an IP address of 192.168.0.4/24. The PLABRTR01 device has an IP address of 192.168.0.1/24 on the interface that connects to this subnet. The other interface connects to the second subnet with an IP address of 192.168.1.254/24. This second subnet contains only one other device, the PLABWEB01 device which is also running Windows 2016 Server and has an IP address of 192.168.1.1/24.
Depending on the exercises you may or may not use all of the devices, but they are shown here in the layout to get an overall understanding of the topology of the lab.
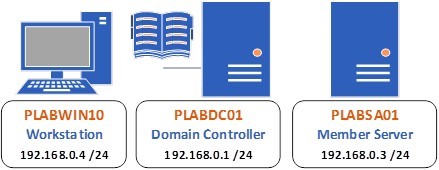
- PLABDC01 (Domain Controller - Windows Server 2016)
- PLABSA01 (Member Server - Windows Server 2016)
- PLABWIN10 (Workstation - Windows 10)
- PLABRTR01 (Router - Linux Ubuntu 17.10)
- PLABWEB01 (Web Server - Windows Server 2016)
Click Next to proceed to the first exercise.
Exercise 1 - Preliminary Tasks
In order to successfully complete this lab, you will be required to perform some preliminary tasks on devices PLABDC01, PLABWIN10 and PLABSA01. All these devices have IPv6 enabled. This means that if for whatever reason IPv4 fails to function, connectivity will be available between the devices using IPv6.
For the purposes of this lab, you will disable IPv6 on these devices. To do so, perform the following tasks.
Learning Outcomes
After completing this exercise, you will be able to:
- Create a trunk link and pass two VLANs through it
- Configure DTP functions
Your Devices
You will be using the following devices in this lab. Please make sure these are powered on before proceeding.
- PLABWIN10 (Workstation - Windows 10)
- PLABDC01 (Domain Controller - Windows Server 2016)
- PLABSA01 (Member Server - Windows Server 2016)
Task 1 - Perform preliminary task on PLABDC01
Step 1
Connect to the PLABDC01 device. Right-click the Network icon at the bottom right of the screen and choose Open Network and Sharing Center.
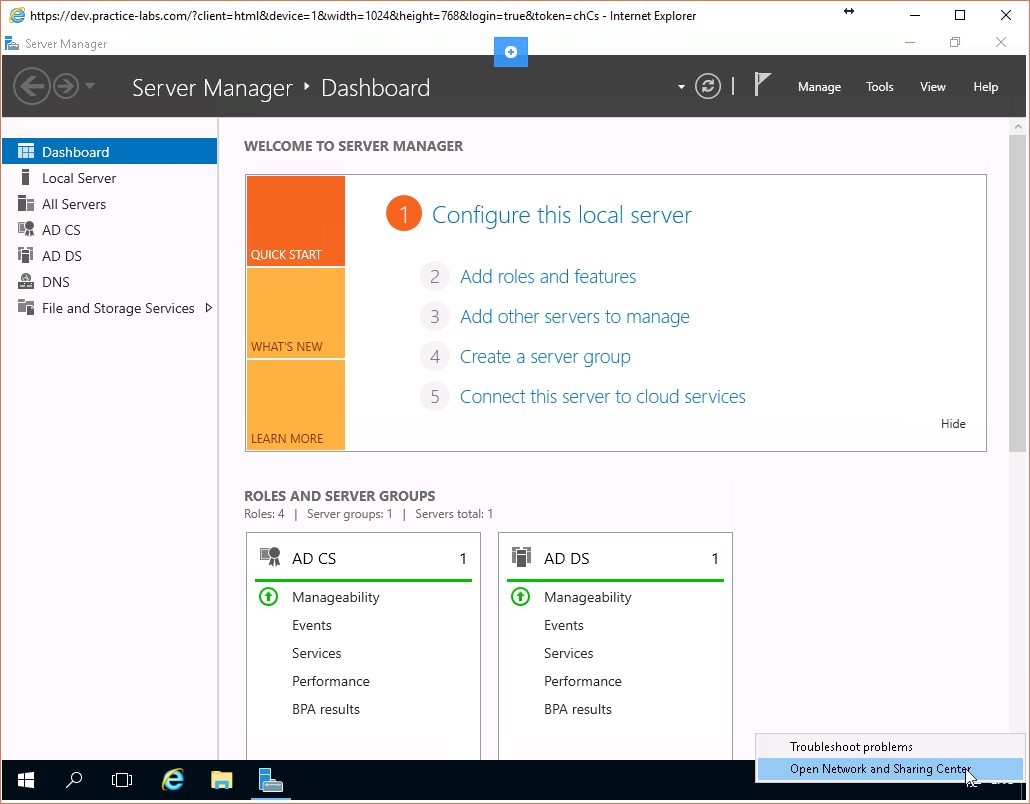 Figure 1.1 Screenshot of the PLABDC01 desktop: Context menu (that appears by right-clicking the network icon) > Open Network and Sharing Center menu-options are displayed on the PLABDC01 Windows desktop.
Step 2
Click on Change adapter settings.
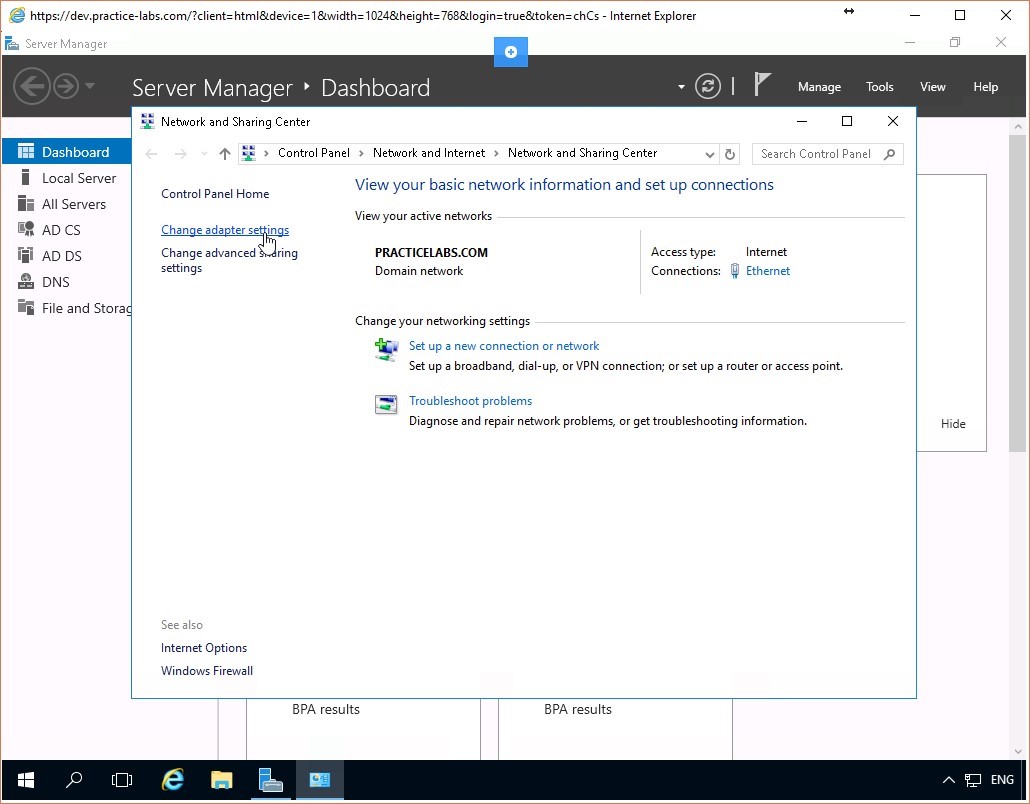 Figure 1.2 Screenshot of the PLABDC01 desktop: Change adapter settings link is highlighted on the Network and Sharing Center window.
Step 3
Right-click on the Ethernet interface and click Properties.
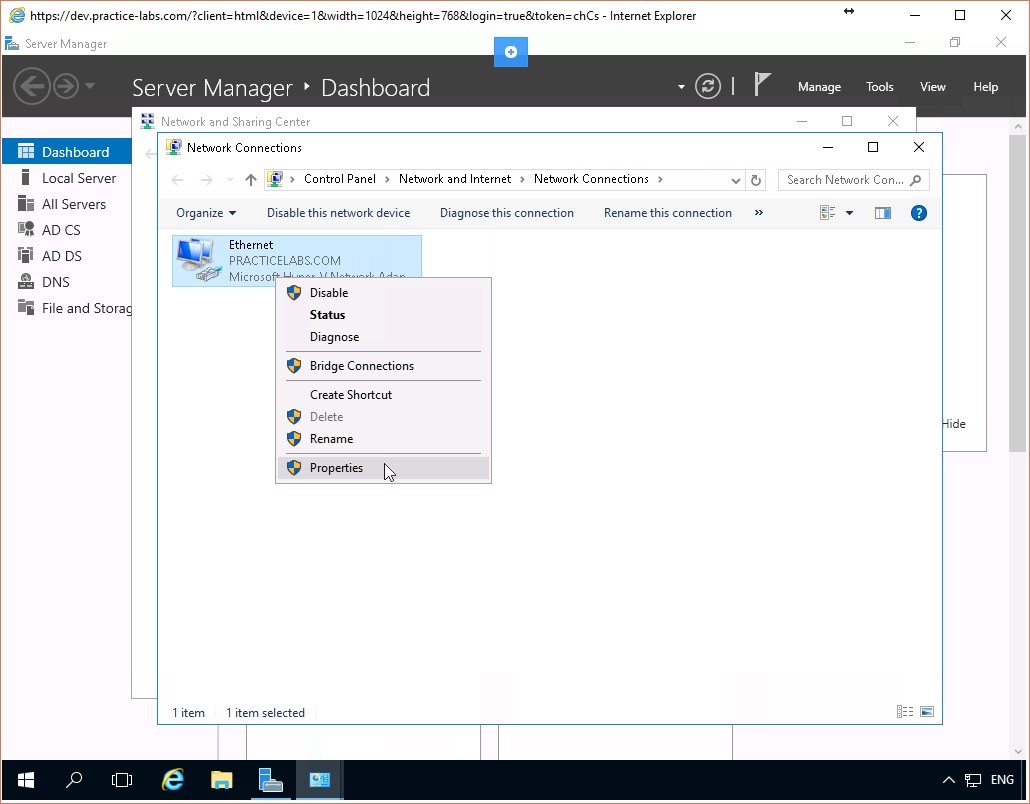 Figure 1.3 Screenshot of the PLABDC01 desktop: Context menu (that appears on right-clicking a listed network connection) > Properties menu-options are highlighted on the Network Connections window.
Step 4
Scroll down to the Internet Protocol Version 6(TCP/IPv6) item and uncheck its checkbox.
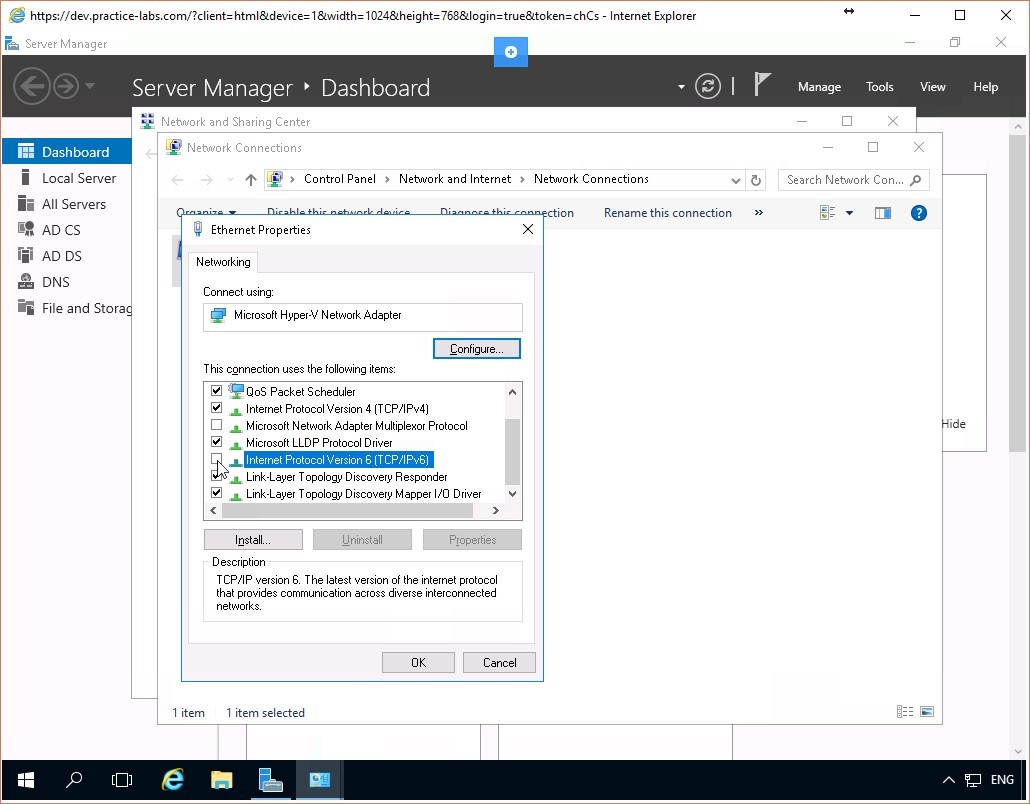 Figure 1.4 Screenshot of the PLABDC01 desktop: Ethernet Properties dialog box is displayed showing the required settings performed.
Step 5
Click OK and close the Network Connections and the Network and Sharing Center windows.
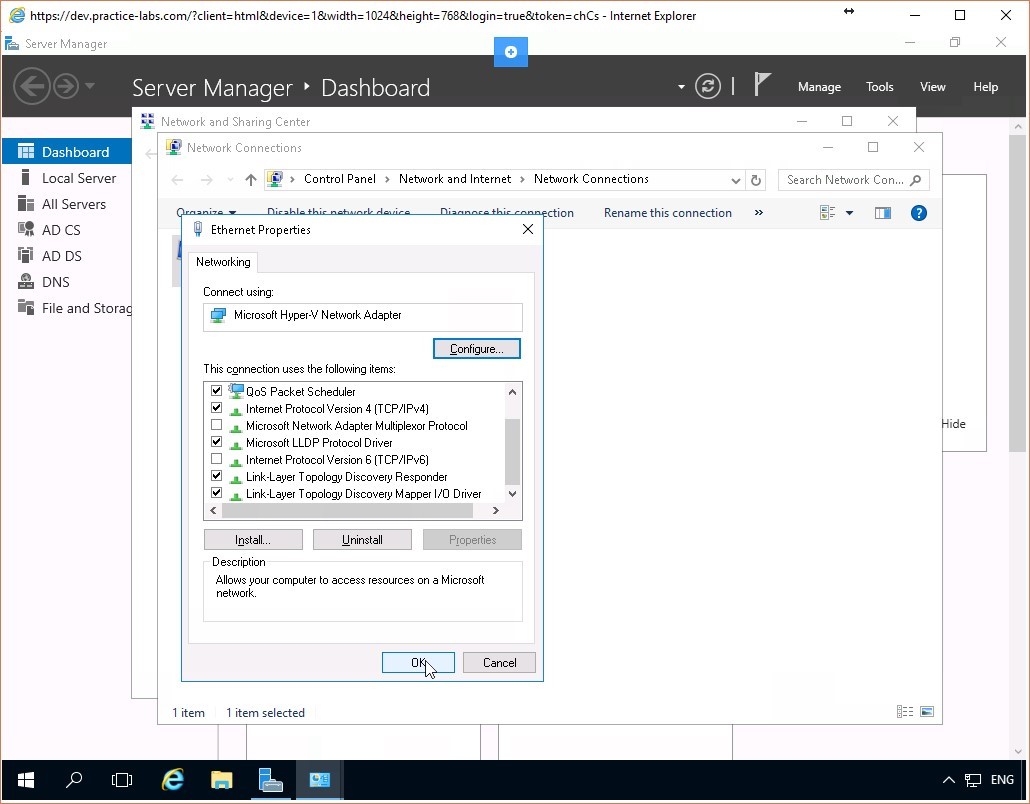 Figure 1.5 Screenshot of the PLABDC01 desktop: Ethernet Properties dialog box is displayed showing the OK button highlighted.
Task 2 - Perform preliminary task on PLABSA01
Step 1
Connect to the PLABSA01 device. Right-click the Network icon at the bottom right of the screen and choose Open Network and Sharing Center.
 Figure 1.6 Screenshot of the PLABSA01 desktop: Context menu (that appears by right-clicking the network icon) > Open Network and Sharing Center menu-options are displayed on the PLABSA01 Windows desktop.
Step 2
Click on Change adapter settings.
 Figure 1.7 Screenshot of the PLABSA01 desktop: Change adapter settings link is highlighted on the Network and Sharing Center window.
Step 3
Right-click on the Internal interface and click Properties.
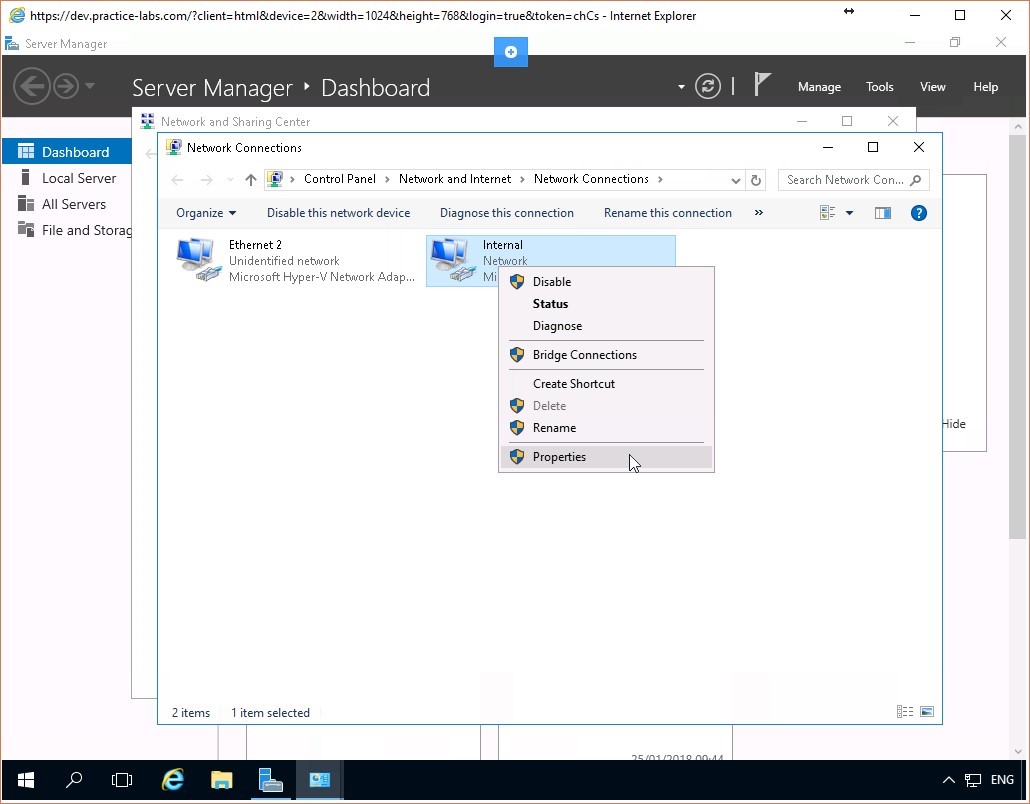 Figure 1.8 Screenshot of the PLABSA01 desktop: Context menu (that appears on right-clicking a listed network connection) > Properties menu-options are highlighted on the Network Connections window.
Step 4
Scroll down to the Internet Protocol Version 6(TCP/IPv6) item and uncheck its checkbox.
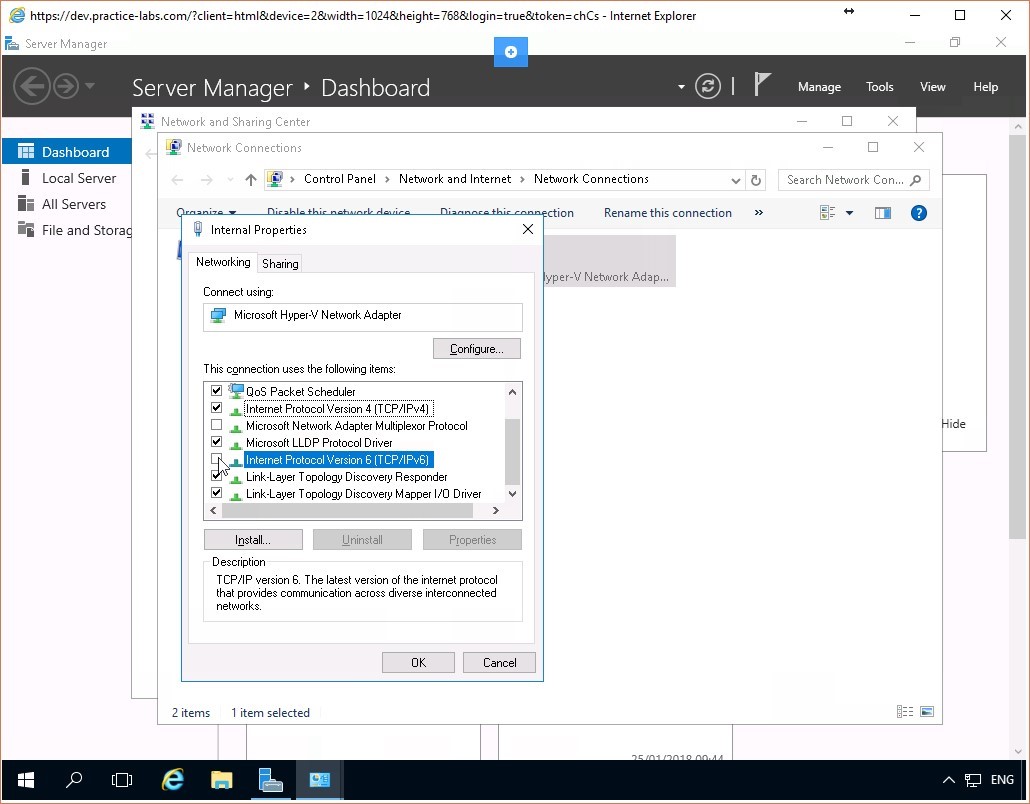 Figure 1.9 Screenshot of the PLABSA01 desktop: Ethernet Properties dialog box is displayed showing the required settings performed.
Step 5
Click OK and close the Network Connections and the Network and Sharing Center windows.
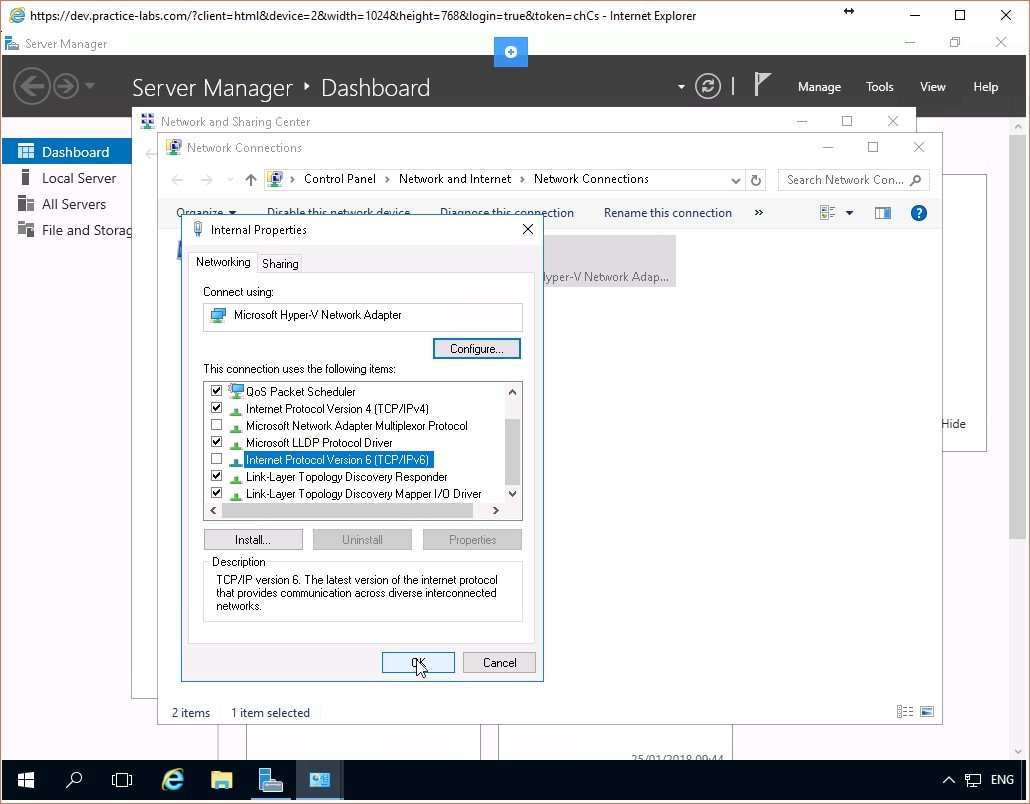 Figure 1.10 Screenshot of the PLABSA01 desktop: Ethernet Properties dialog box is displayed showing the OK button highlighted.
Task 3 - Perform preliminary task on PLABWIN10
Step 1
Connect to the PLABWIN10 device. Right-click the Network icon at the bottom right of the screen and choose Open Network and Sharing Center.
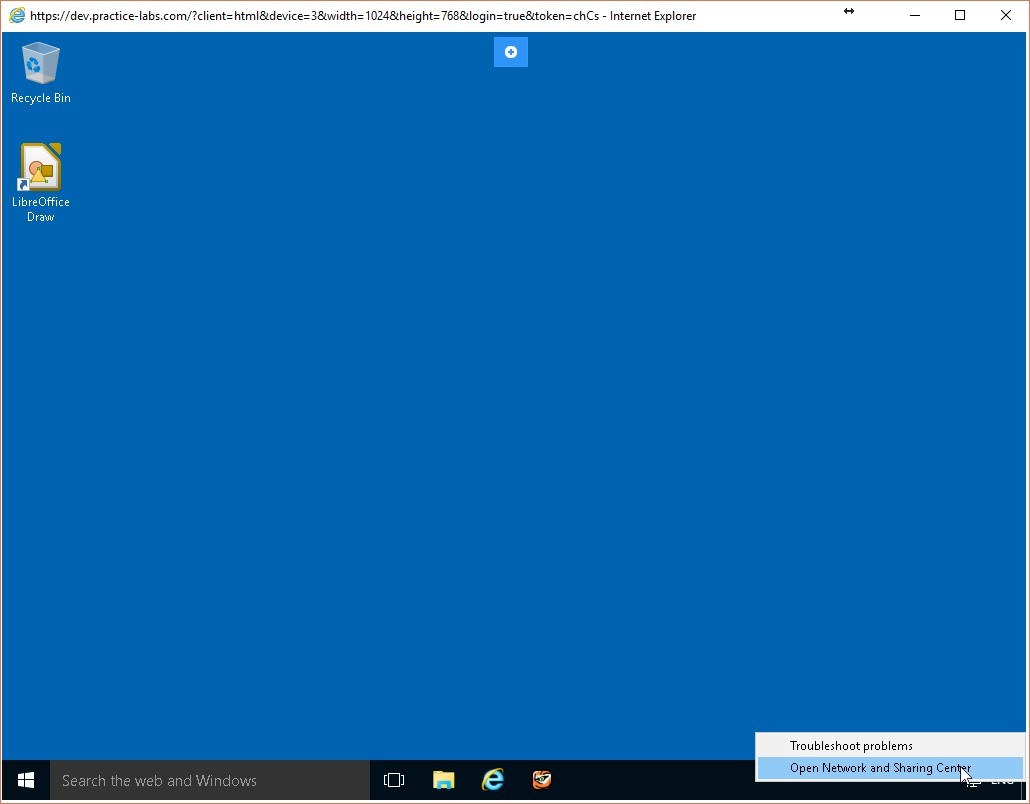 Figure 1.11 Screenshot of the PLABWIN10 desktop: Context menu (that appears by right-clicking the network icon) > Open Network and Sharing Center menu-options are displayed on the PLABWIN10 Windows desktop.
Step 2
Click on Change adapter settings.
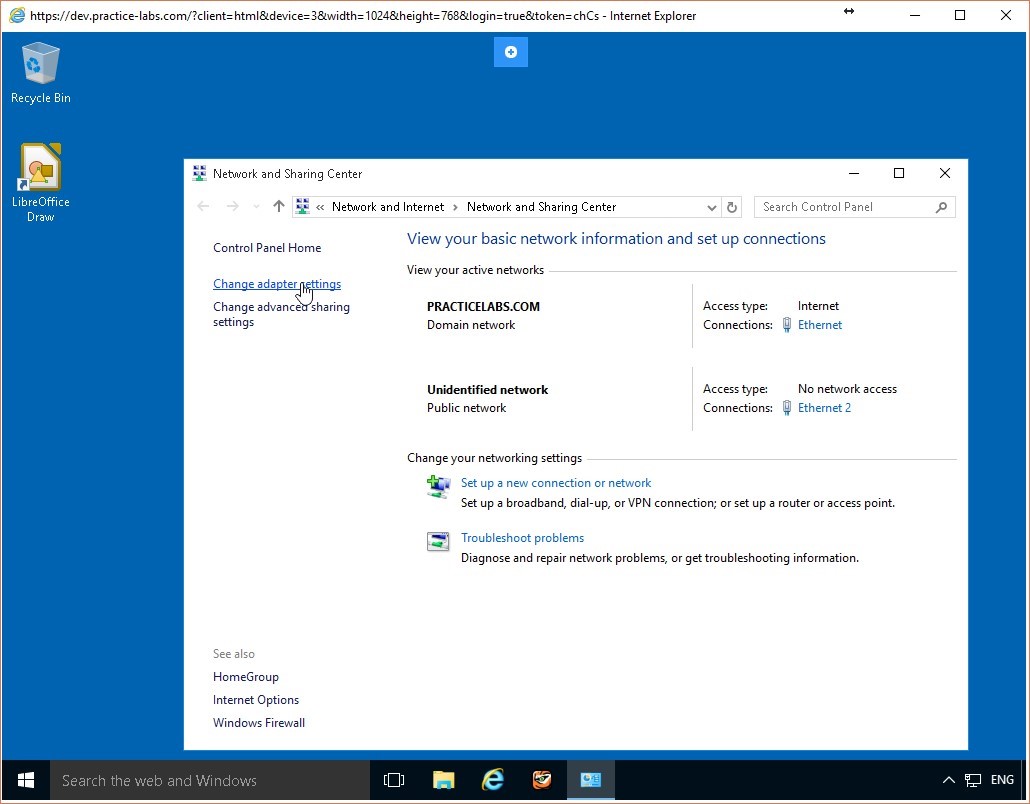 Figure 1.12 Screenshot of the PLABWIN10 desktop: Change adapter settings link is highlighted on the Network and Sharing Center window.
Step 3
Right-click on the Ethernet interface and click Properties.
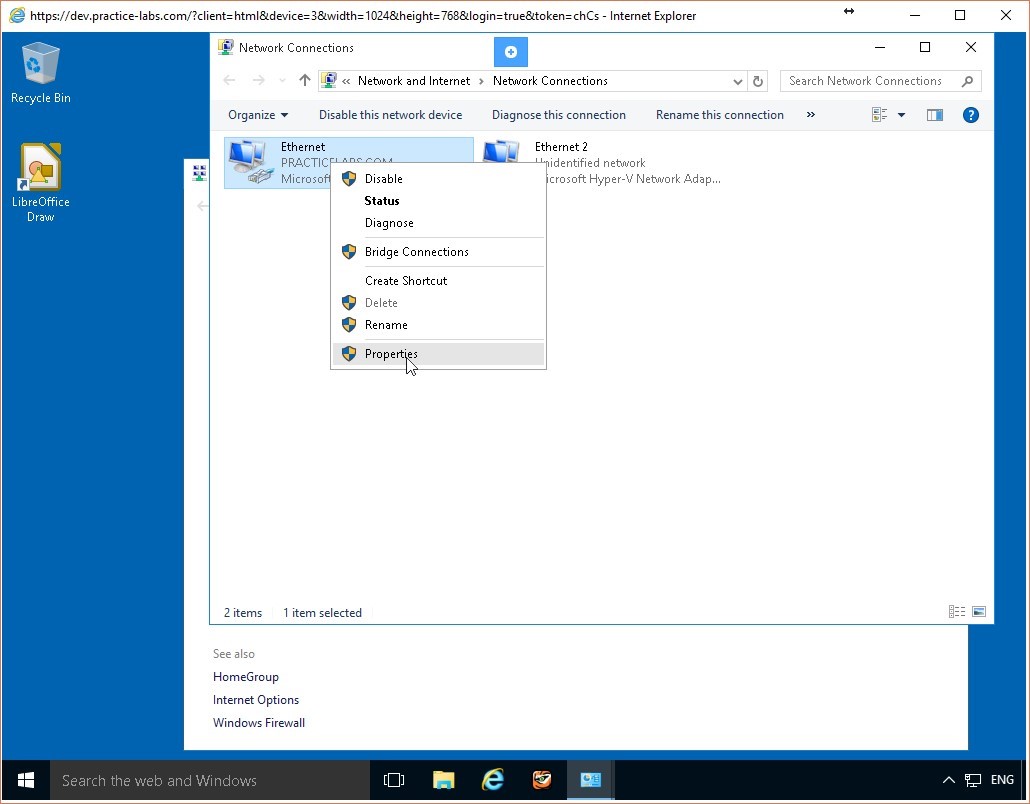 Figure 1.13 Screenshot of the PLABWIN10 desktop: Context menu (that appears on right-clicking a listed network connection) > Properties menu-options are highlighted on the Network Connections window.
Step 4
Scroll down to the Internet Protocol Version 6(TCP/IPv6) item and uncheck its checkbox.
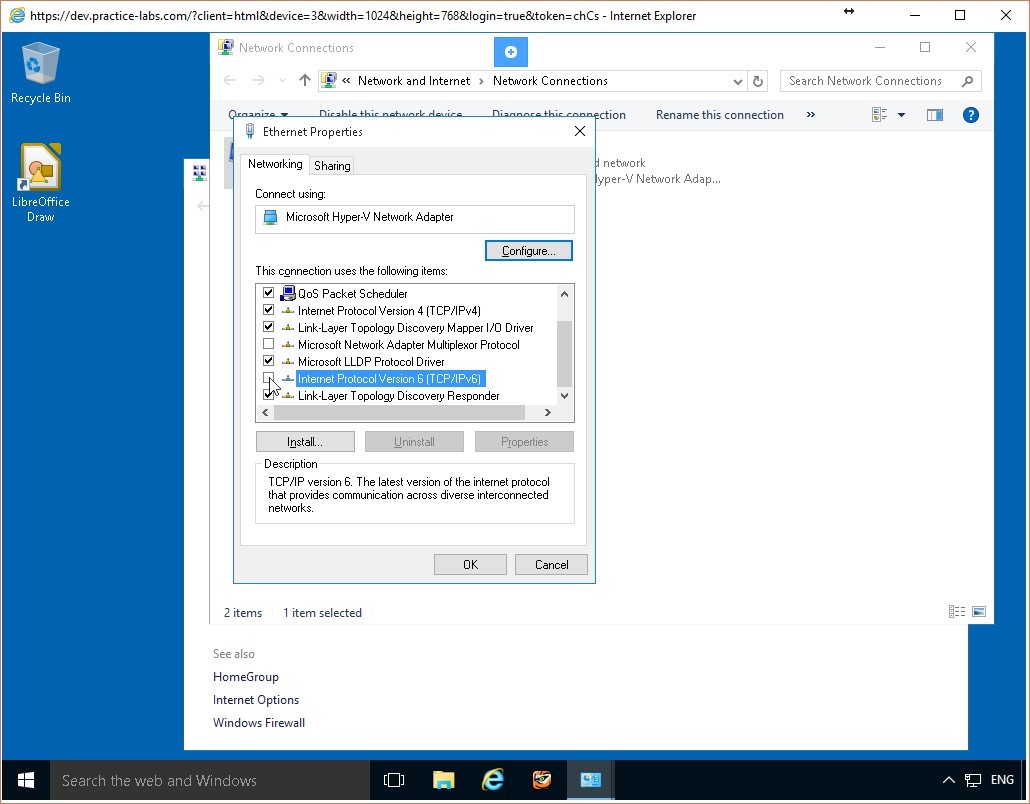 Figure 1.14 Screenshot of the PLABWIN10 desktop: Ethernet Properties dialog box is displayed showing the required settings performed.
Step 5
Click OK and close the Network Connections and the Network and Sharing Center windows.
 Figure 1.15 Screenshot of the PLABWIN10 desktop: Ethernet Properties dialog box is displayed showing the OK button highlighted.
Leave the devices you have powered on in their current state and proceed to the next exercise.
Figure 1.15 Screenshot of the PLABWIN10 desktop: Ethernet Properties dialog box is displayed showing the OK button highlighted.
Leave the devices you have powered on in their current state and proceed to the next exercise.
Exercise 2 - Configuring Firewall Rules Using Windows Firewall
A host-based firewall protects the computer it is configured on from unauthorized access by users or applications either from outside or even from inside your corporate network. To make the firewall effective, you need to define and configure firewall rules. These rules analyze the packets coming to the computer determine whether the specified conditions are satisfied and then allow or deny access to the computer or network accordingly. The Windows Firewall application enables you to configure and edit these firewall rules.
To better understand this technology, refer to your course material or use your preferred search engine to research this topic in detail.
Learning Outcomes
After completing this exercise, you will be able to:
- Configure Firewall Rules Using Windows Firewall
- Configure Firewall Rules Using Remote Access
Your Devices
You will be using the following devices in this lab. Please power these on now.
- PLABDC01 (Domain Controller - Windows Server 2016)
- PLABWIN10 (Workstation - Windows 10)

Task 1 - Verify that Network Connection is Enabled
Two computers are considered connected to each over when they can successfully communicate with each other over the network. You can verify a successful connection by pinging one computer from the other. In this task, you will ping the PLABWIN10 computer from the PLABDC01 computer to verify that communication between them is successful.
To verify this, perform the following steps:
Step 1
Connect to the PLABDC01 computer. Minimize the Server Manager window. Click Start, type cmd, and press Enter.
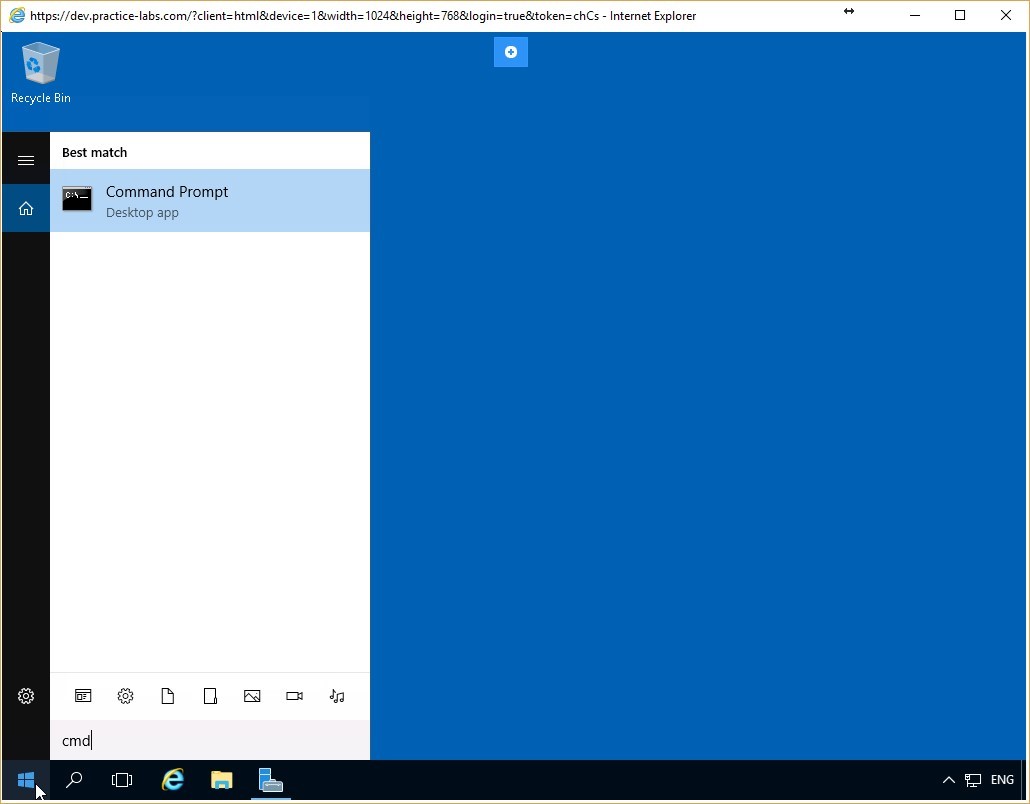 Figure 2.1 Screenshot of the PLABDC01 desktop: Command Prompt option is highlighted on the Start menu.
Step 2
The Command Prompt window appears. Input the following command:
ping plabwin10
Press Enter.
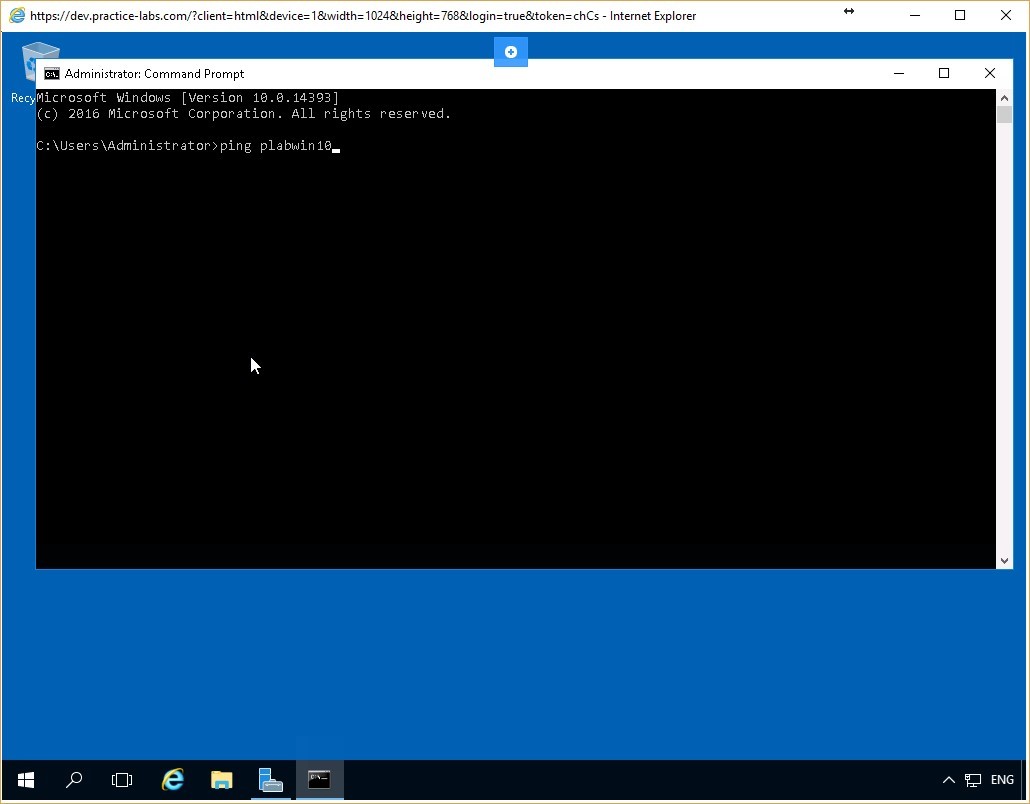 Figure 2.2 Screenshot of the PLABDC01 desktop: Administrator Command Prompt window is displayed showing the command to ping a server-name typed-in.
Step 3
Notice that the output of the command includes the Fully Qualified Domain Name (FQDN) of the PLABWIN10 device which is plabwin10.PRACTICELABS.COM. The command also displays the IP address of PLABWIN10 which is 192.168.0.4.
Notice also that the PLABWIN10 device responds successfully to the pings.
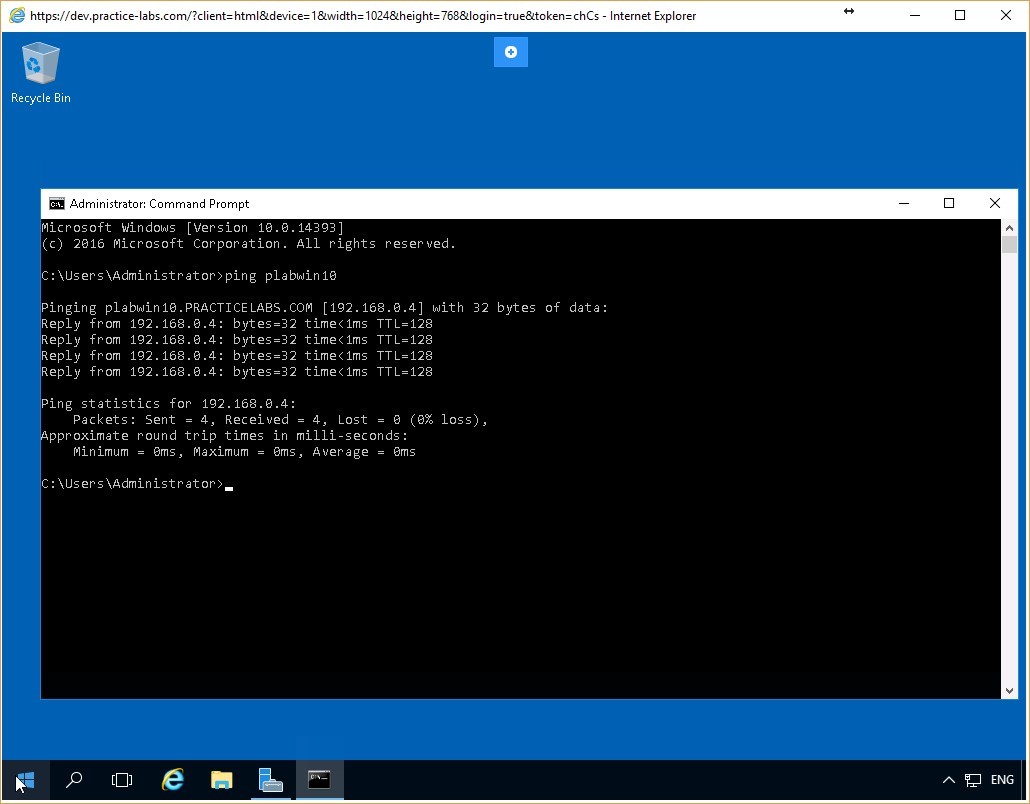 Figure 2.3 Screenshot of the PLABDC01 desktop: Administrator Command Prompt window is displayed showing system-response to the command typed-in in the previous step.
Task 2 - Create a Simple Windows Firewall Rule
A firewall rule defines whether the inbound and outbound traffic to and from a specified device is to be fully/partially/completely blocked or allowed. You can also specify whether the rule applies to the LAN/WAN/remote access/all of these modes of operation of the computer. Further, these rules can be easily adjusted to the evolving network environment.
In this task, you will create a rule that will block incoming ping packets to the PLABWIN10 device.
Step 1
Connect to PLABWIN10 and click Start. Begin typing Windows Firewall and as soon as the Windows Firewall item appears in the menu, click it.
Make certain you choose the Windows Firewall and not the Windows Firewall with Advanced Security option.
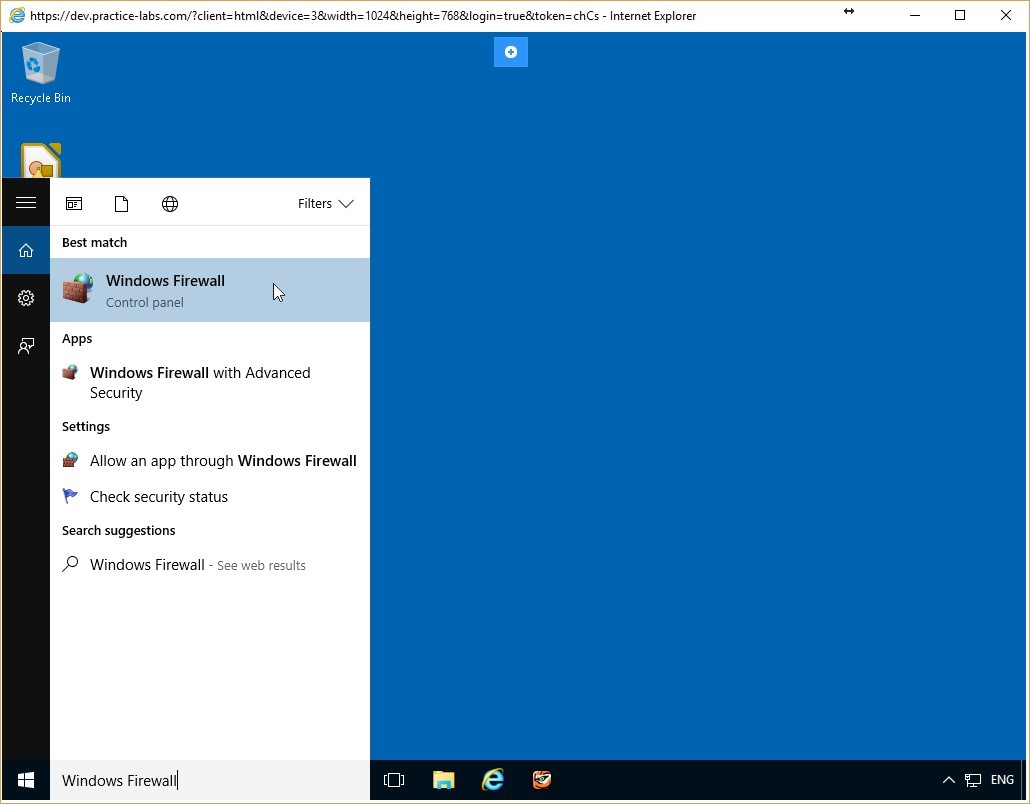 Figure 2.4 Screenshot of the PLABWIN10 desktop: Windows Firewall option is highlighted on the Start menu.
Step 3
The Windows Firewall window appears. Notice that the firewall for all networks is deactivated. Click the Use recommended settings button. The indicators should all turn green.
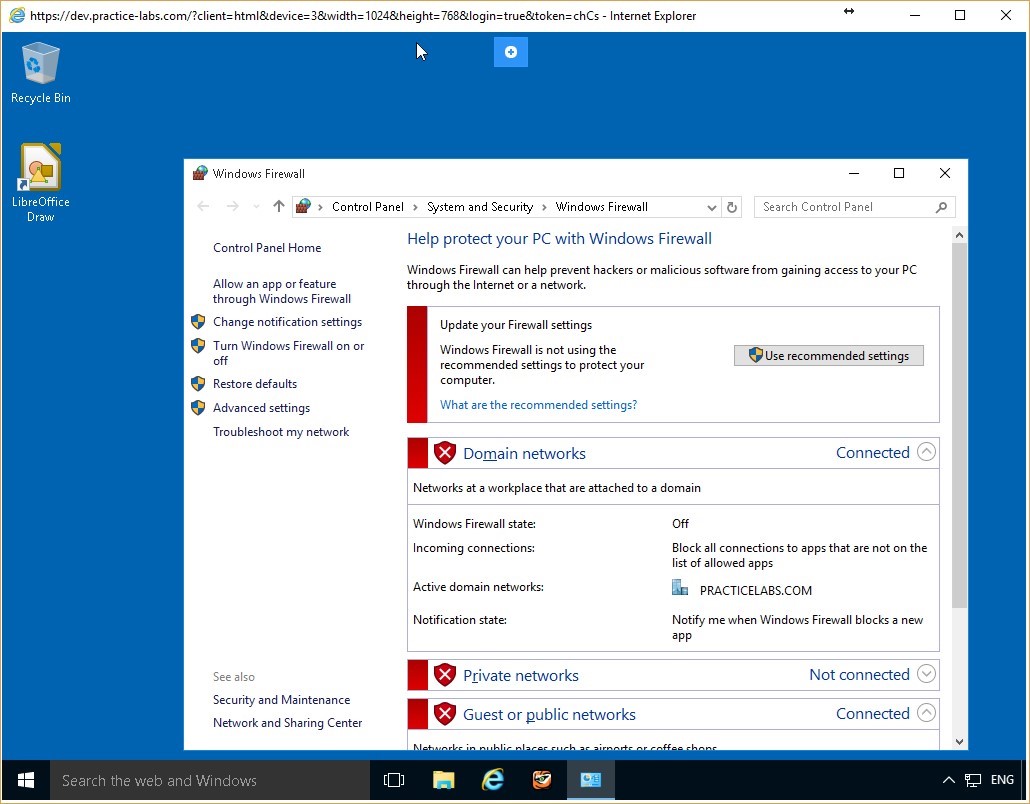 Figure 2.5 Screenshot of the PLABWIN10 desktop: Windows Firewall window is displayed showing the Use recommended settings button available.
Step 4
Click the Allow a program or feature through Windows Firewall link on the left pane.
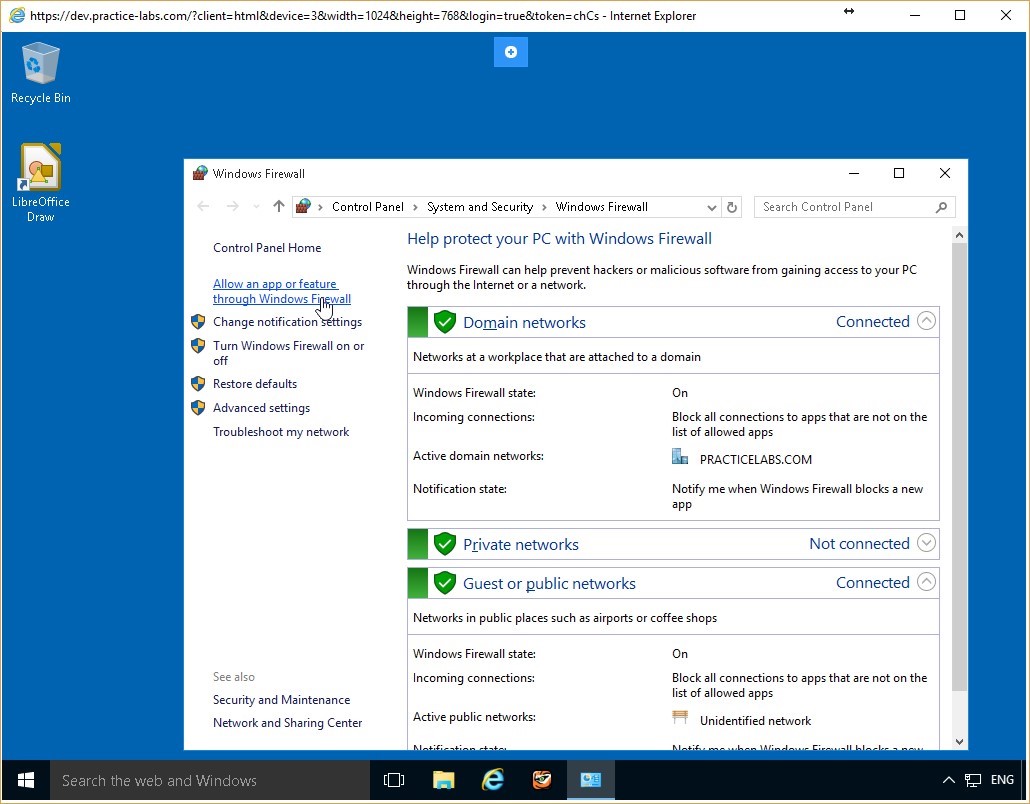 Figure 2.6 Screenshot of the PLABWIN10 desktop: Allow an app or feature through Windows Firewall link is highlighted on the Windows Firewall window.
Step 5
On the Allowed Programs window, locate the File and Printer Sharing on the Allowed programs and features list and verify that the check box is cleared. If it is not, clear it, then click OK.
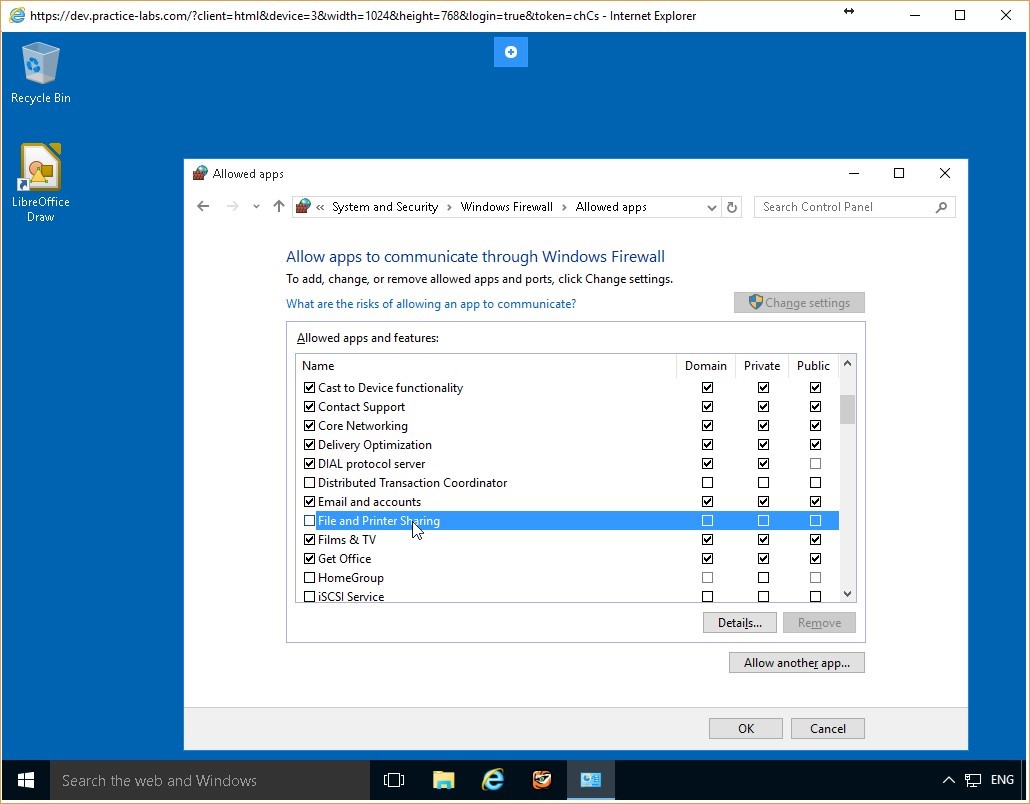 Figure 2.7 Screenshot of the PLABWIN10 desktop: Allowed apps window is displayed showing the required settings performed and the OK button available.
Step 6
You are returned to the Windows Firewall window. Keep this window open.
 Figure 2.8 Screenshot of the PLABWIN10 desktop: Windows Firewall window is displayed on the PLABWIN10 Windows desktop.
Task 3 - Test the Firewall
After activating the firewall and ensuring the configuration of a specific rule, it is always best practice to test its effectiveness to ensure the security of your computer. In this task, you will test whether the ping requests to PLABWIN10 are blocked, as specified by the firewall.
Step 1
Connect once again to the PLABDC01 device. Access the command prompt and type:
ping plabwin10
Press Enter.
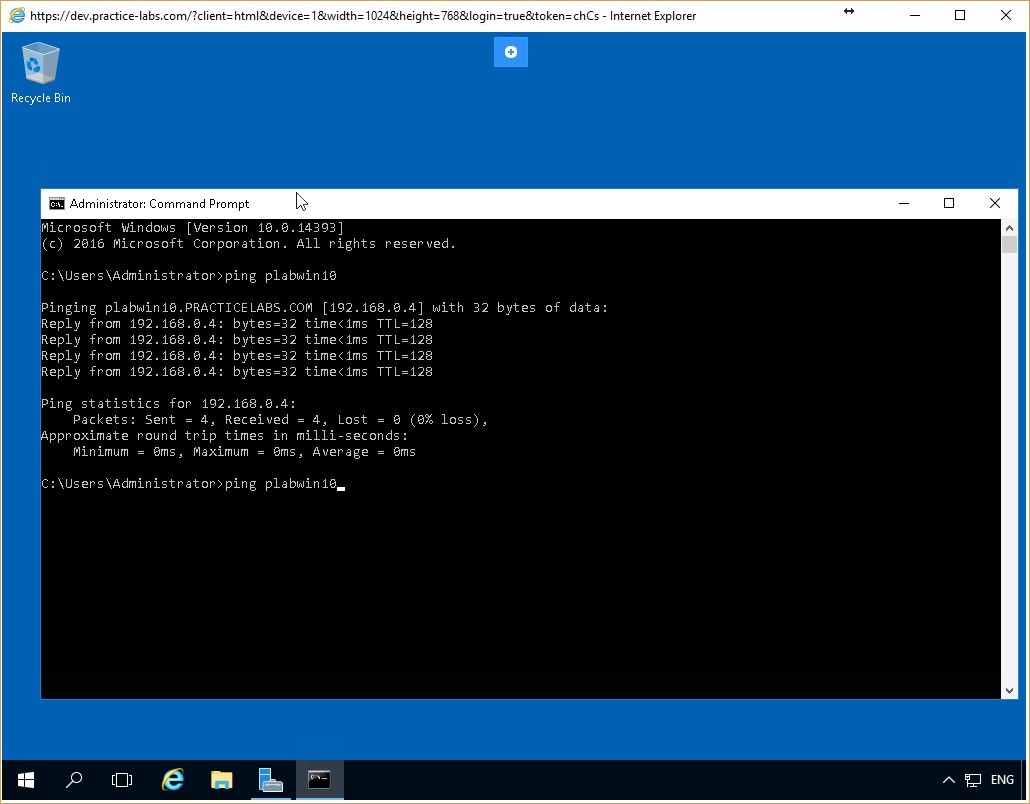 Figure 2.9 Screenshot of the PLABDC01 desktop: Administrator Command Prompt window is displayed showing the command to ping a server-name typed-in.
Step 2
The command again pings the FQDN of PLABWIN10, but this time there is no response from the computer and the request times out.
This is because the firewall rule you created blocks any ping packets going to PLABWIN10.
ICMP is included within the File and Printer Sharing functionality of Windows.
 Figure 2.10 Screenshot of the PLABDC01 desktop: Administrator Command Prompt window is displayed showing system-response to the command typed-in in the previous step.
Task 4 - Reconfigure the Firewall Rule Created
You can easily edit the firewall rules once configured. Access the firewall settings to modify existing rules or to create new ones. In this task, you will reconfigure a rule on the PLABWIN10 device that will allow incoming ping packets. You will also verify that the rule is functioning correctly.
Step 1
Connect once again to the PLABWIN10 device. On the Windows Firewall window, click the Allow a program or feature through Windows Firewall link.
 Figure 2.11 Screenshot of the PLABWIN10 desktop: Allow an app or feature through Windows Firewall link is highlighted on the Windows Firewall window.
Step 2
On the Allow programs window, select the File and Printer Sharing check box. Ensure that the Domain check box is enabled too.
Click OK and close all open windows.
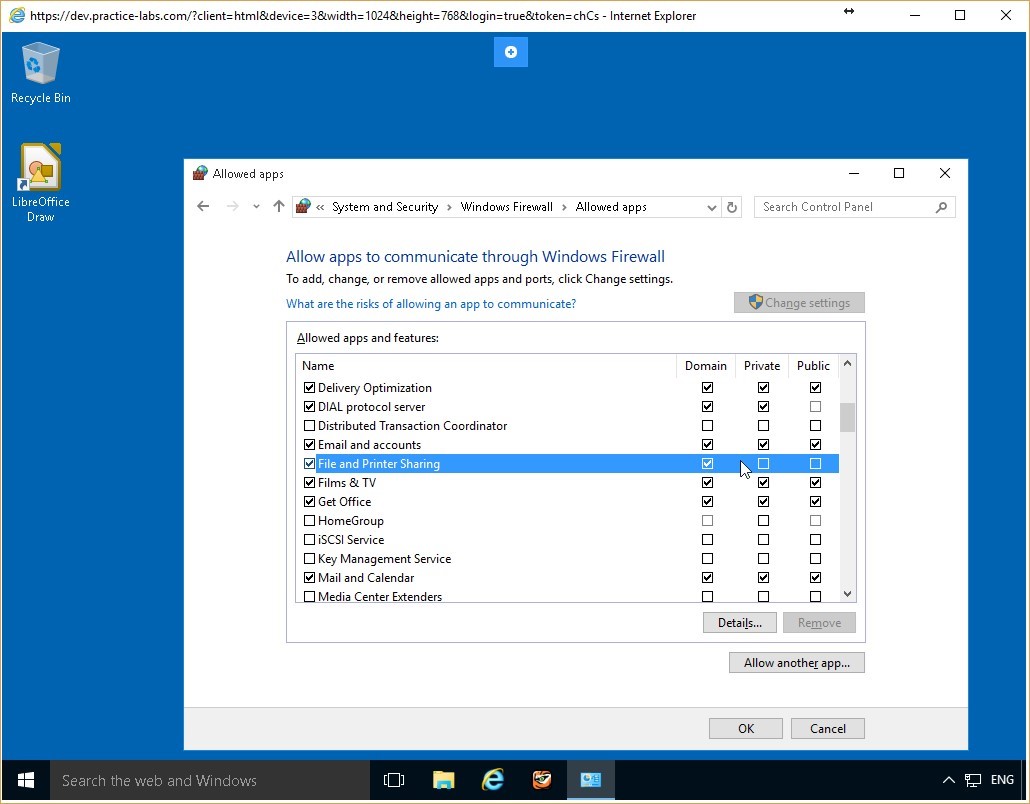 Figure 2.12 Screenshot of the PLABWIN10 desktop: Allowed apps window is displayed showing the required settings performed and the OK button available.
Step 3
Return to the PLABDC01 device. On the Command Prompt window, type:
ping plabwin10
Press Enter.
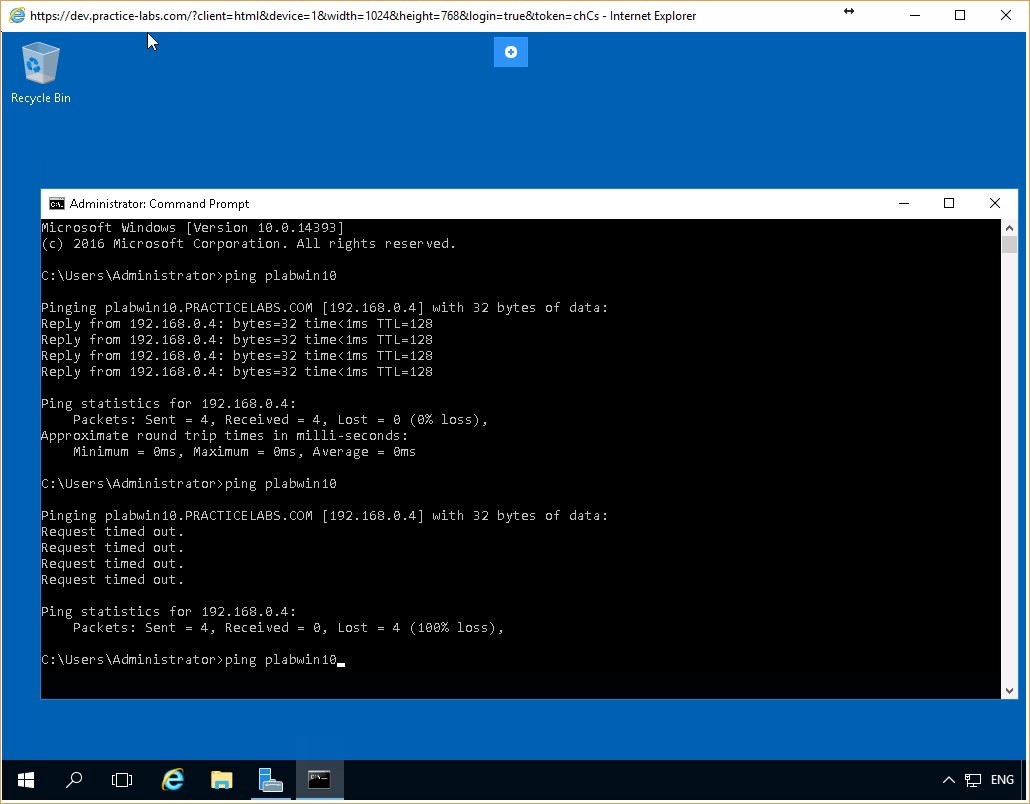 Figure 2.13 Screenshot of the PLABDC01 desktop: Administrator Command Prompt window is displayed showing the command to ping a server-name typed-in.
Step 4
The PLABDC01 device successfully receives responses from PLABWIN10. This verifies that the reconfigured firewall rule has indeed allowed the ICMP packets through with the modification of the File and Print Sharing rule.
Close the Command Prompt window.
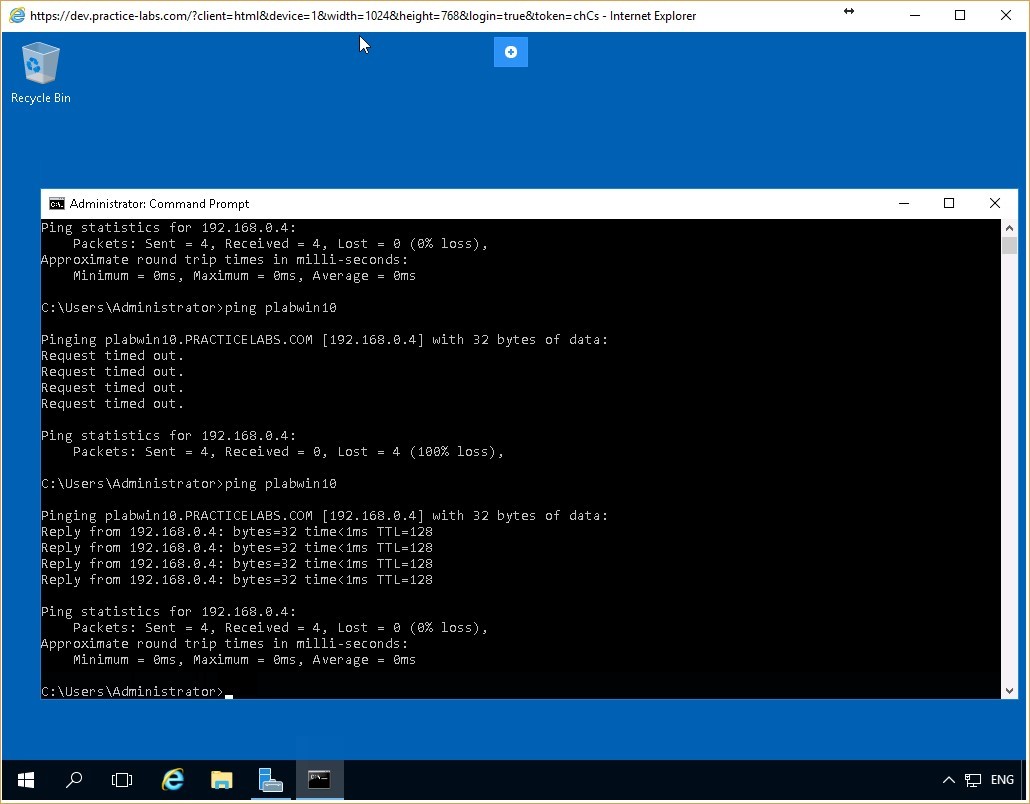 Figure 2.14 Screenshot of the PLABDC01 desktop: Administrator Command Prompt window is displayed showing system-response to the command typed-in in the previous step.
Leave the devices you have powered on in their current state and proceed to the next exercise.
Figure 2.14 Screenshot of the PLABDC01 desktop: Administrator Command Prompt window is displayed showing system-response to the command typed-in in the previous step.
Leave the devices you have powered on in their current state and proceed to the next exercise.
Exercise 3 - Configuring Firewall Rules using Windows Firewall with Advanced Security
Current Windows versions provide another built-in application for system security - Windows Firewall with Advanced Security. This application offers an expansive view of firewall security and has additional features compared to the simple firewall application of the previous exercise.
In this exercise, you will create firewall rules using the Windows Firewall with Advanced Security, and you will verify their operation.
To better understand this technology, also refer to your course material or use your preferred search engine to research this topic in detail.
Learning Outcomes
After completing this exercise, you will be able to:
- Configure Firewall Rules Using Windows Firewall with Advanced Security
Your Devices
You will be using the following devices in this lab. Please power these on now.
- PLABDC01 (Domain Controller - Windows Server 2016)
- PLABWIN10 (Workstation - Windows 10)
Task 1 - Verify that Network Connection is Enabled
Once again, two computers are considered connected to each over when they can successfully communicate with each other over the network. You can verify a successful connection by pinging one computer from the other.
In this task, you will ping the PLABDC01 computer from the PLABWIN10 computer to verify that communication between them is successful. Once you have done this, you will create a simple firewall rule using Windows Firewall with Advanced Security.
To do so, perform the following steps:
Step 1
Connect to the PLABDC01 device and right-click the network icon in the system tray and select Open Network and Sharing Center.
 Figure 3.1 Screenshot of the PLABDC01 desktop: Context menu (that appears by right-clicking the network icon) > Open Network and Sharing Center menu-options are displayed on the PLABDC01 Windows desktop.
Step 2
On Network and Sharing Center, click Windows Firewall on the lower left pane.
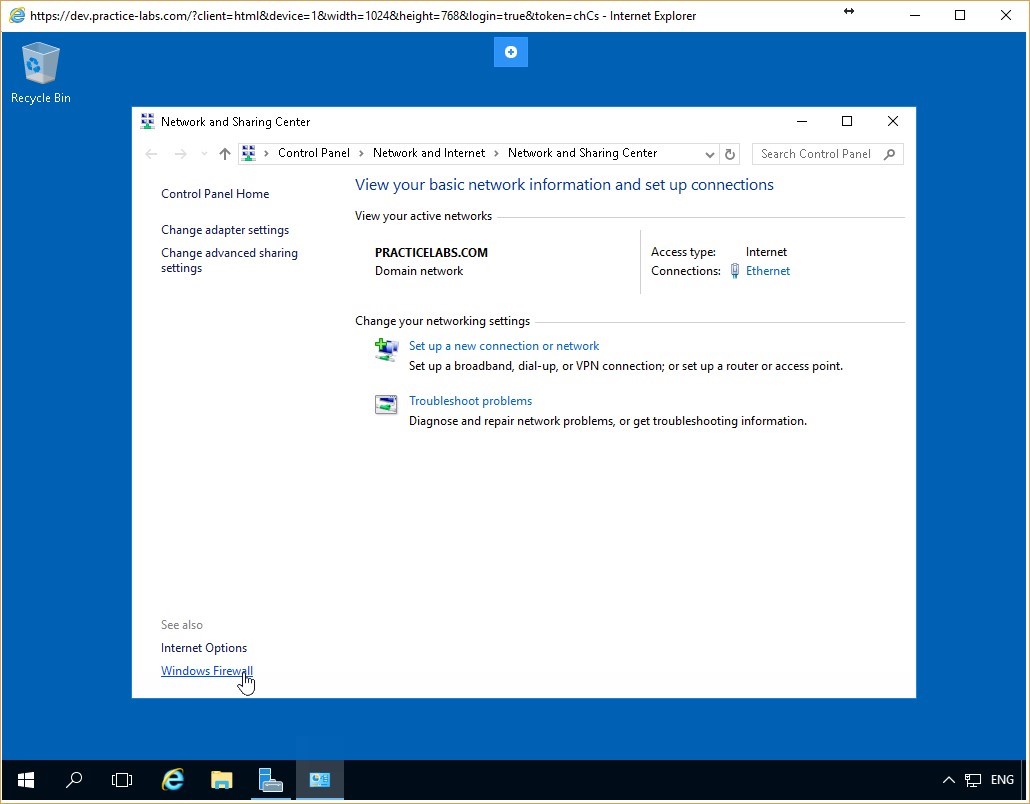 Figure 3.2 Screenshot of the PLABDC01 desktop: Network and Sharing Center window is displayed showing the Windows Firewall link highlighted.
Step 3
On the Windows Firewall window, click the Use recommended settings button in the Update your Firewall settings dialog box.
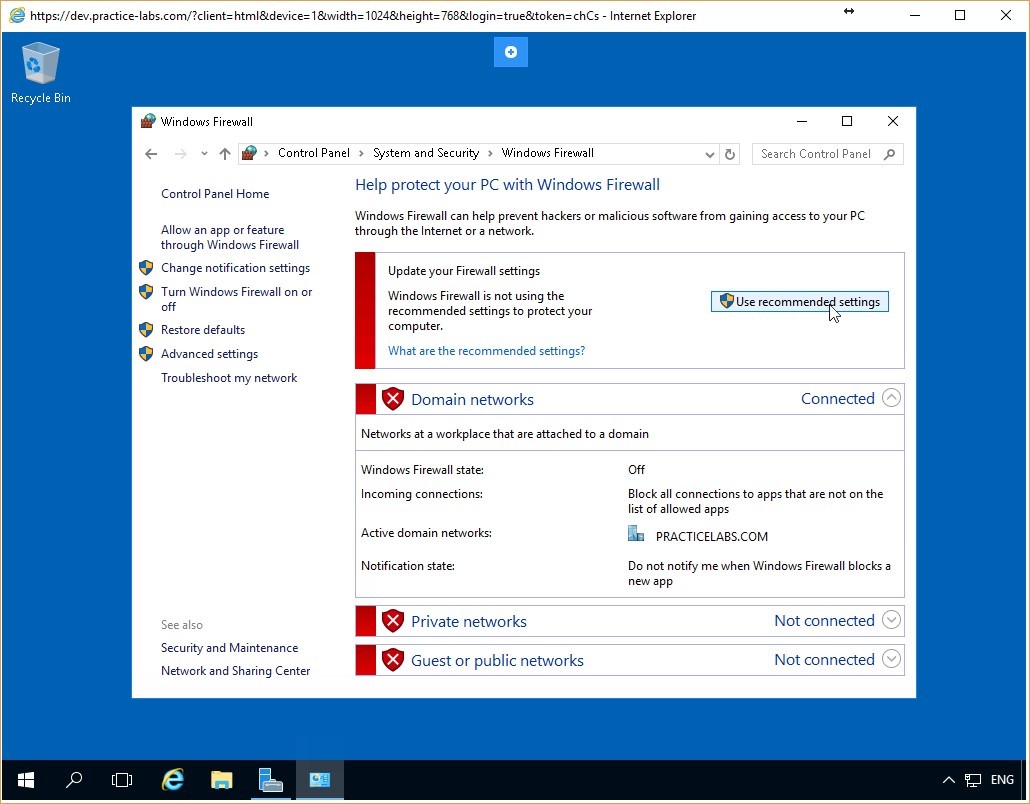 Figure 3.3 Screenshot of the PLABDC01 desktop: Windows Firewall window is displayed showing the Use recommended settings button highlighted.
Step 4
Notice that the firewall is now activated for all the three network profiles - Domain networks, Home or work (private) networks, and Public networks.
Leave the Windows Firewall window open.
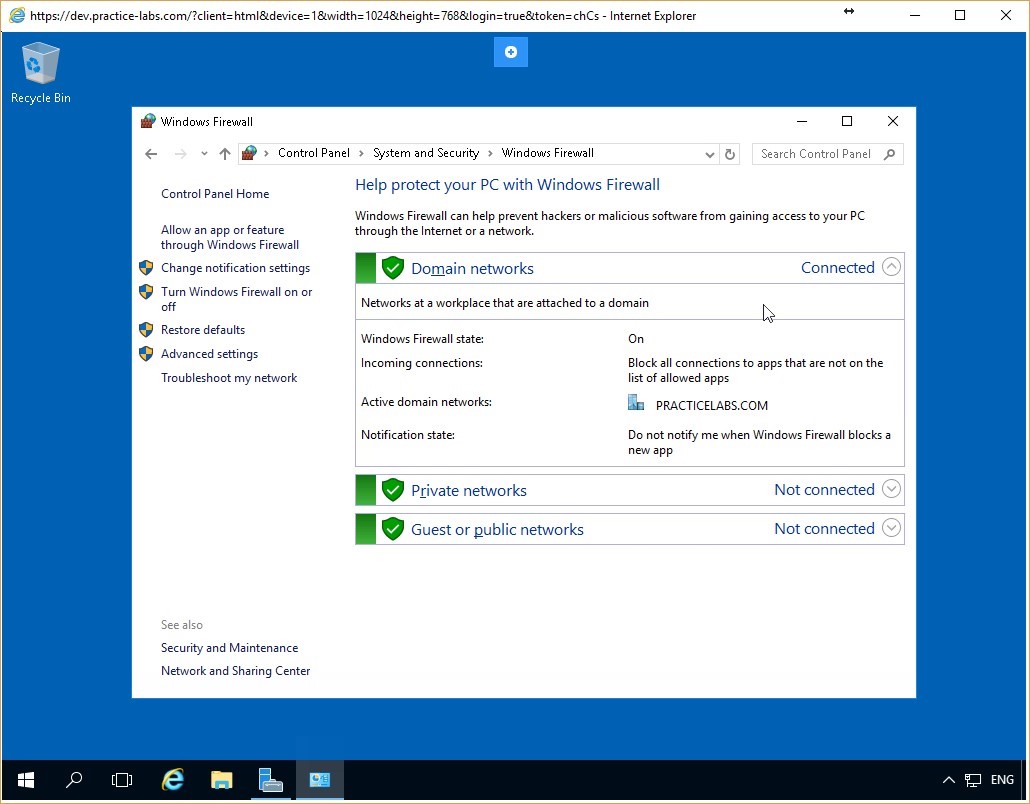 Figure 3.4 Screenshot of the PLABDC01 desktop: Windows Firewall window is displayed showing firewall activated for all the listed network profiles.
Step 5
Connect to PLABWIN10 device. Click Start, type cmd, and press Enter.
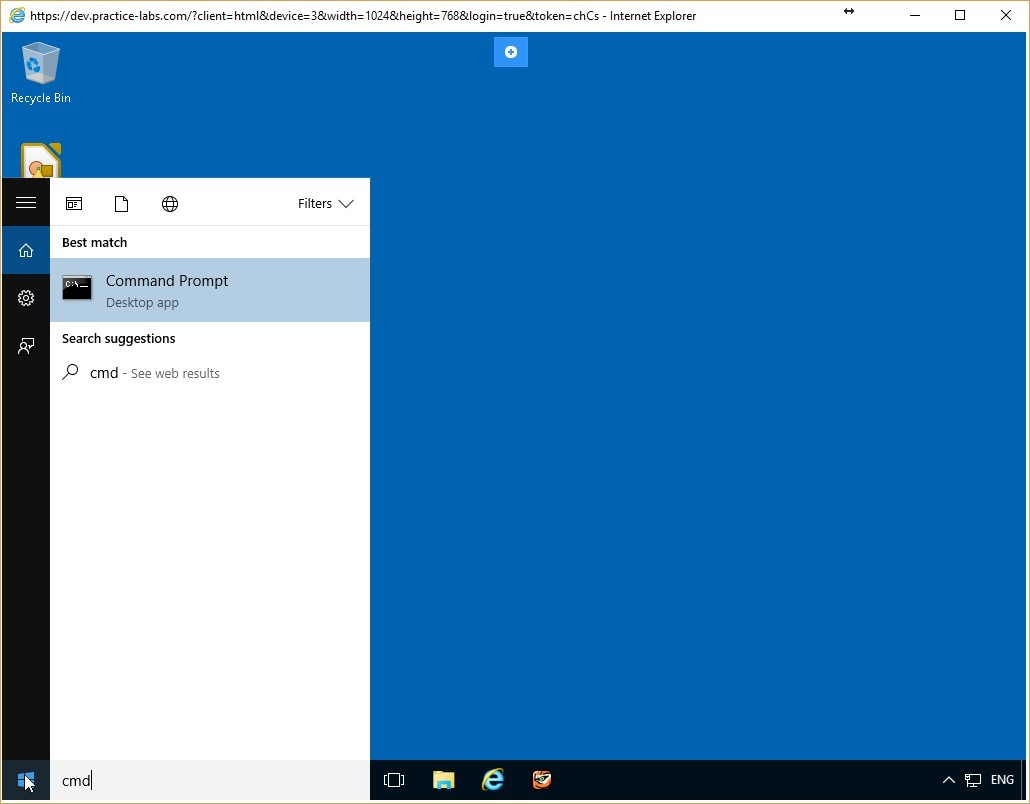 Figure 3.5 Screenshot of the PLABWIN10 desktop: Command Prompt option is highlighted on the Start menu.
Step 6
On the Command Prompt, type the following command:
ping plabdc01
Press Enter.
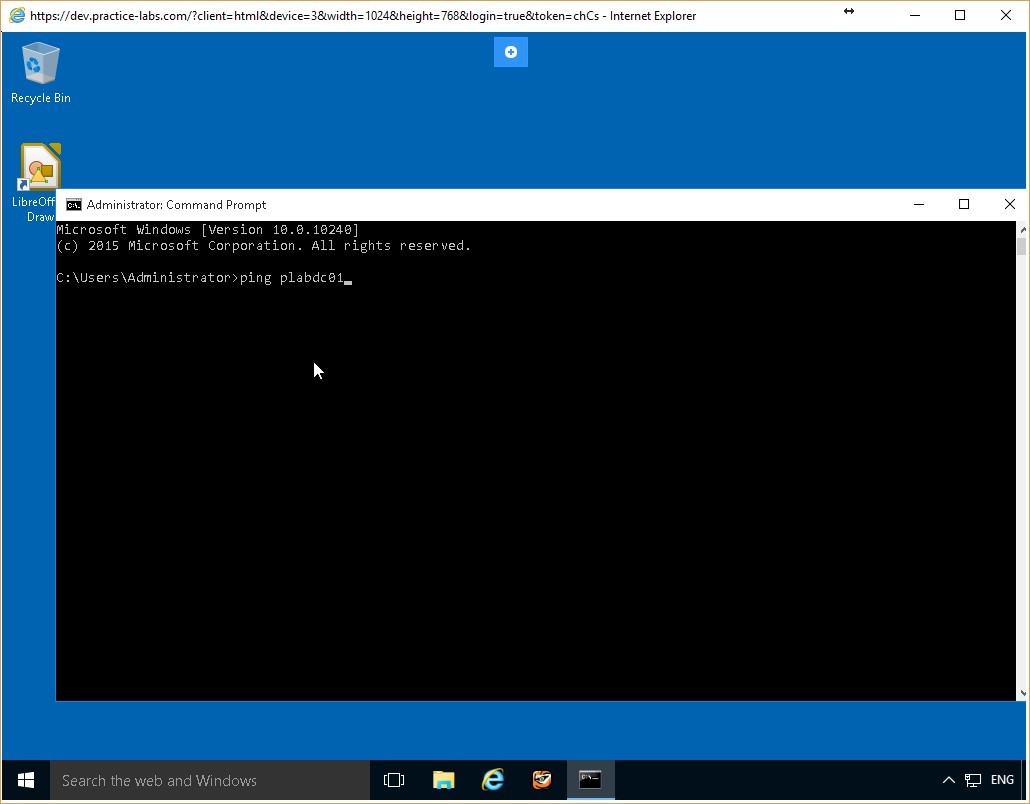 Figure 3.6 Screenshot of the PLABWIN10 desktop: Administrator Command Prompt window is displayed showing the command to ping a server-name typed-in.
Step 7
The PLABDC01 device responds to the ping request from the PLABWIN10 device.
Leave the command prompt window open.
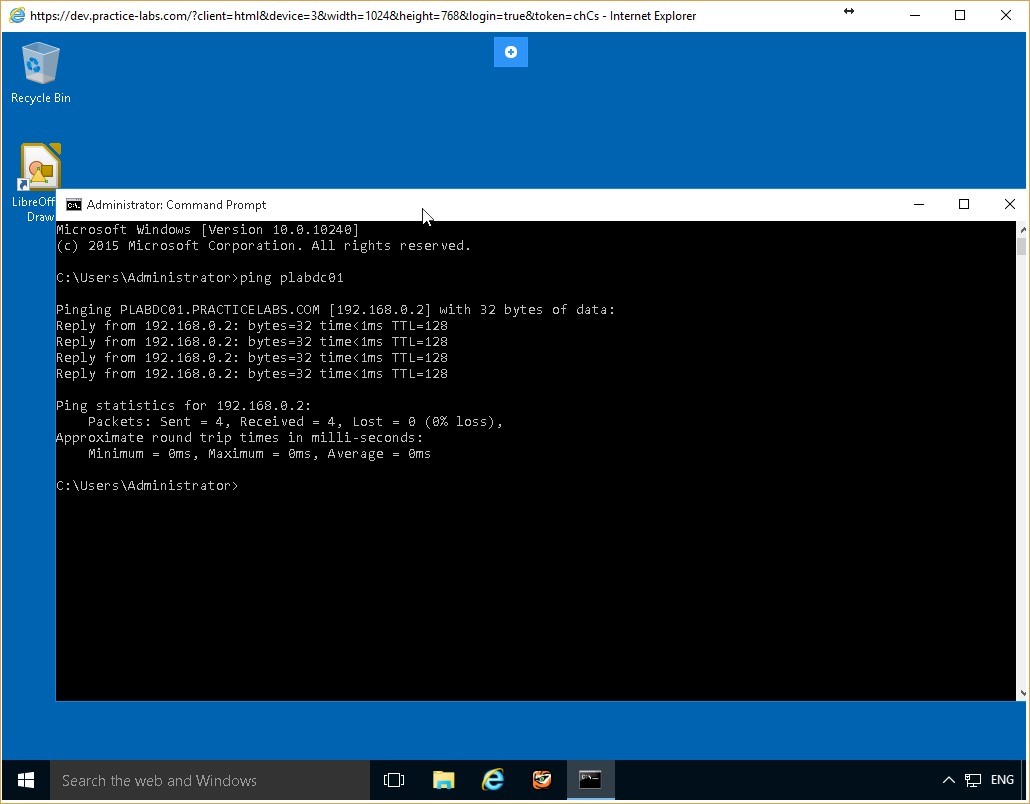 Figure 3.7 Screenshot of the PLABWIN10 desktop: Administrator Command Prompt window is displayed showing system-response to the command typed-in in the previous step.
Task 2 - Create a Firewall Rule Using Windows Firewall with Advanced Security
You can create firewall rules using the Windows Firewall with Advanced Security feature. In this task, you will create a simple firewall rule to block ICMP packets from reaching the PLABDC01 device.
To create a firewall rule using Windows Firewall with Advanced Security, perform the following steps:
Step 1
Connect to PLABDC01. On the Windows Firewall window, click Advanced Settings in the left pane.
 Figure 3.8 Screenshot of the PLABDC01 desktop: Advanced settings link is highlighted on the Windows Firewall window.
Step 2
On the Windows Firewall with Advanced Security window, click the Inbound Rules node from the console tree on the left pane.
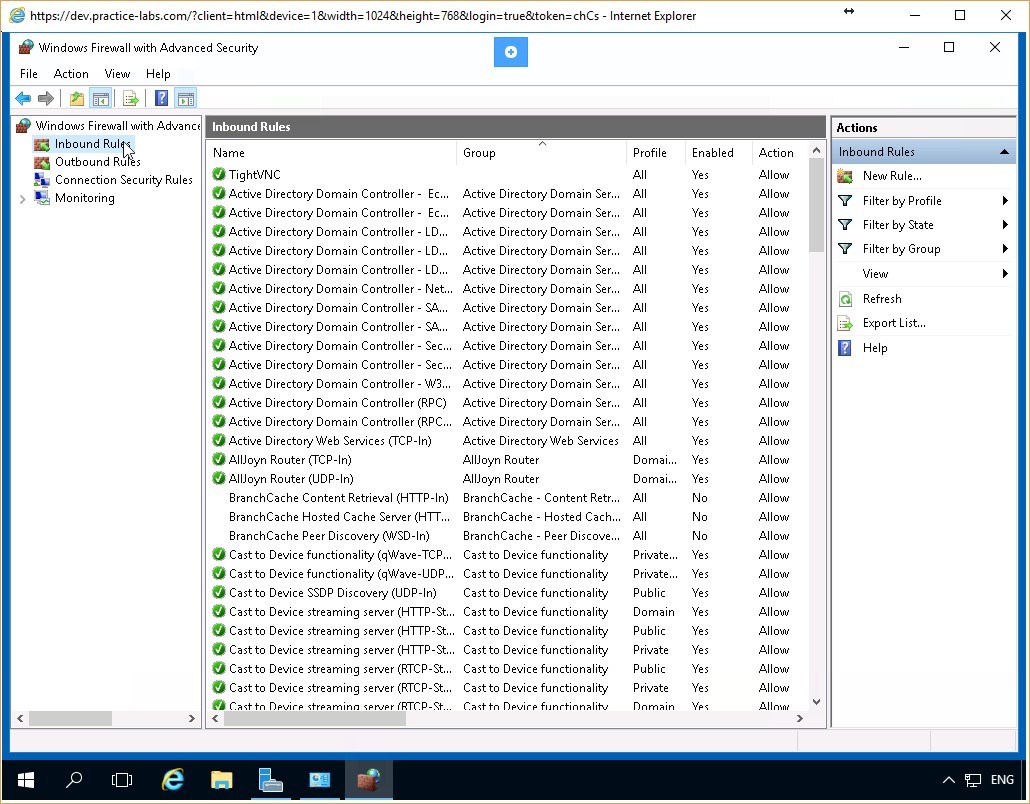 Figure 3.9 Screenshot of the PLABDC01 desktop: Windows Firewall with Advanced Security window is displayed showing the Inbound Rules node on the navigation pane at the left highlighted.
Step 3
Inbound Rules pane in the middle of the window displays the details of various firewall inbound rules.
Scroll down the Inbound Rules pane to find the File and Printer Sharing (Echo Request-ICMPv4-In) rule.
Note: You may need to expand the column in order to view the full name of the Inbound Rule.
Right-click the rule and select Properties.
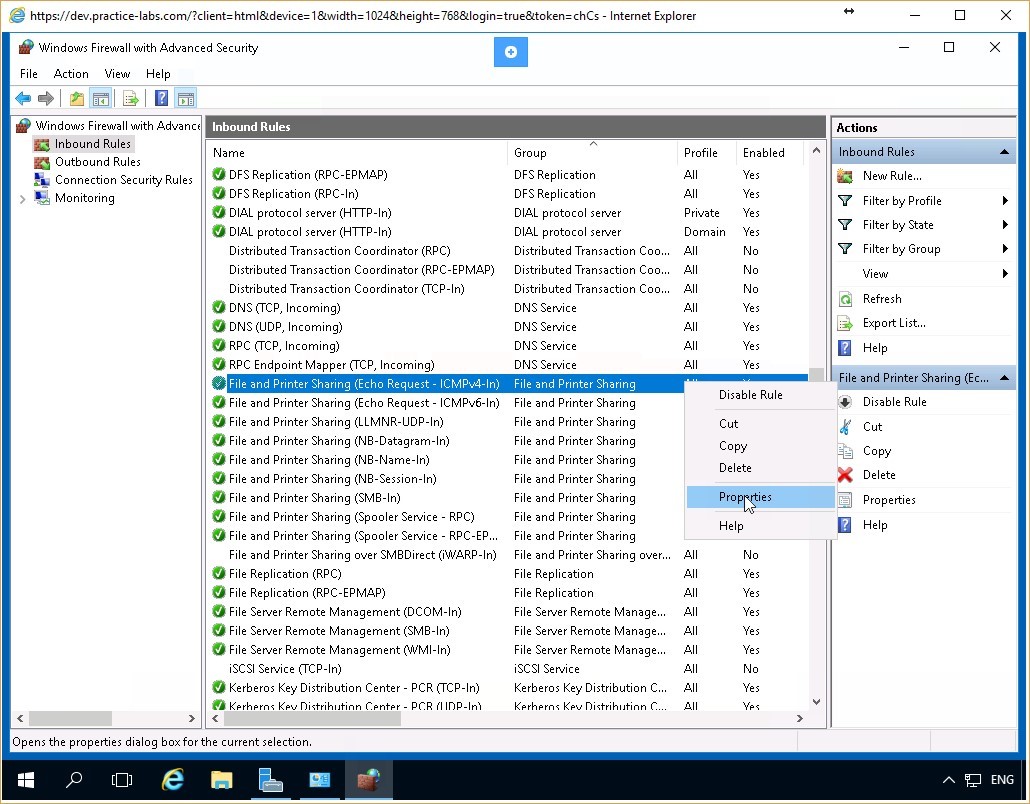 Figure 3.10 Screenshot of the PLABDC01 desktop: Context menu (that appears on right-clicking a listed rule) > Properties menu-options are displayed on the Inbound Rules pane of the Windows Firewall with Advanced Security window.
Step 4
On the File and Printer Sharing (Echo Request-ICMPv4-In) Properties dialog box, ensure that the General tab is selected.
In the Action section, select the Block the connection radio button and click Apply and then click OK.
 Figure 3.11 Screenshot of the PLABDC01 desktop: General tab on the File and Printer Sharing (Echo Request - ICMPv4 - In) Properties dialog box is displayed showing the required settings performed and the Apply and OK buttons highlighted.
Step 5
Notice that the File and Printer Sharing (Echo Request-ICMPv4-In) rule displays a blocked icon on the left.
Leave the Windows Firewall with Advanced Security window open.
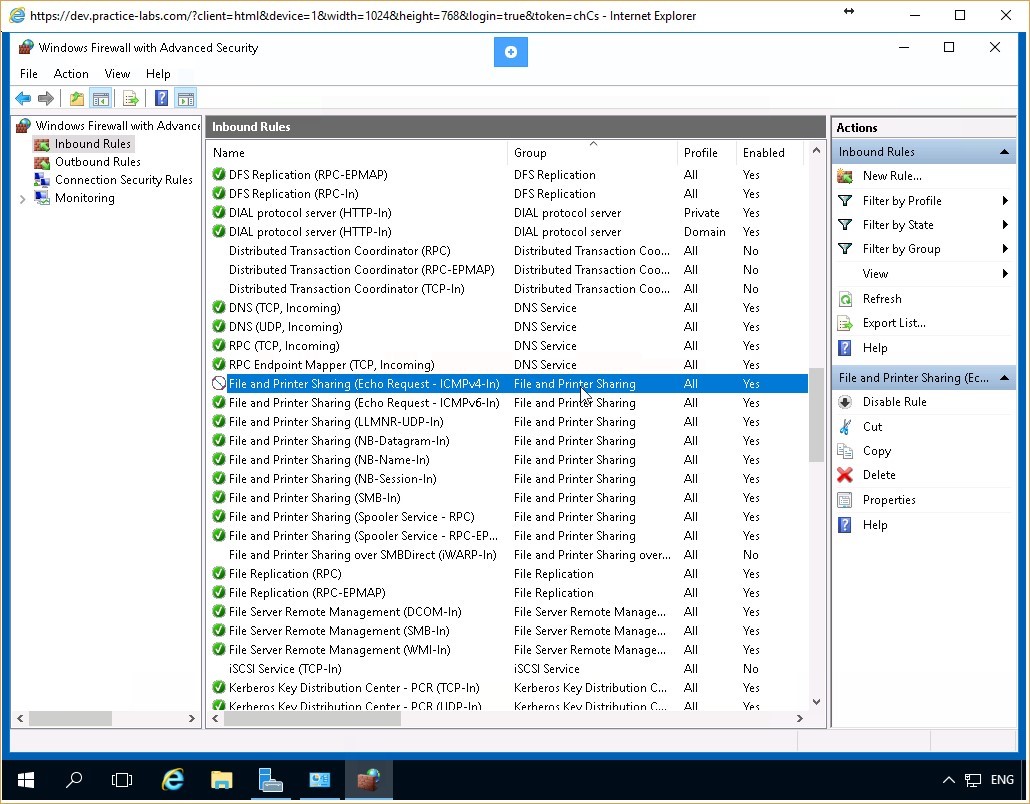 Figure 3.12 Screenshot of the PLABDC01 desktop: the specified inbound rule is shown blocked on the Inbound Rules pane of the Windows Firewall with Advanced Security window.
Task 3 - Test the Firewall Rule Created
In this task, you will test the effect of the rule created using the Windows Firewall with Advanced Security feature.
To test the firewall rule using Windows Firewall with Advanced Security, perform the following steps:
Step 1
Return to the PLABWIN10 device. On the Command Prompt, type the following command:
ping plabdc01
Press Enter.
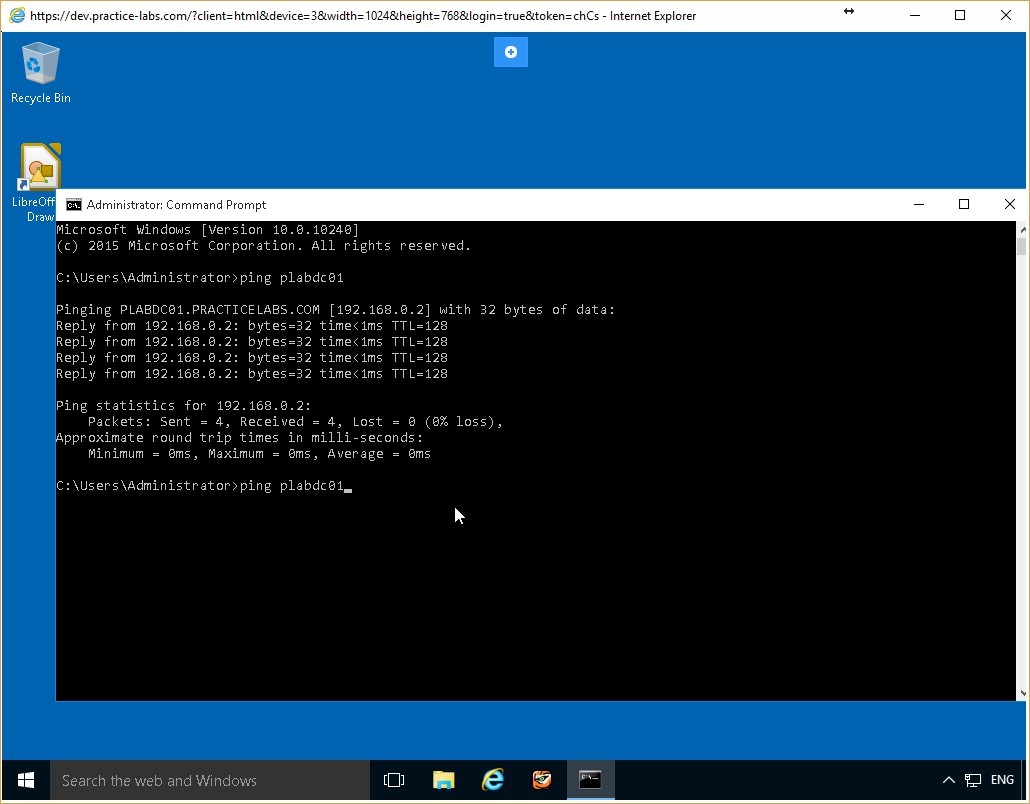 Figure 3.13 Screenshot of the PLABWIN10 desktop: Administrator Command Prompt window is displayed showing the command to ping a server-name typed-in.
Step 2
Notice that the ping request has timed out. There is no response from the PLABDC01 server. Therefore, you can conclude that the firewall rule is operating correctly.
Leave the command prompt window open.
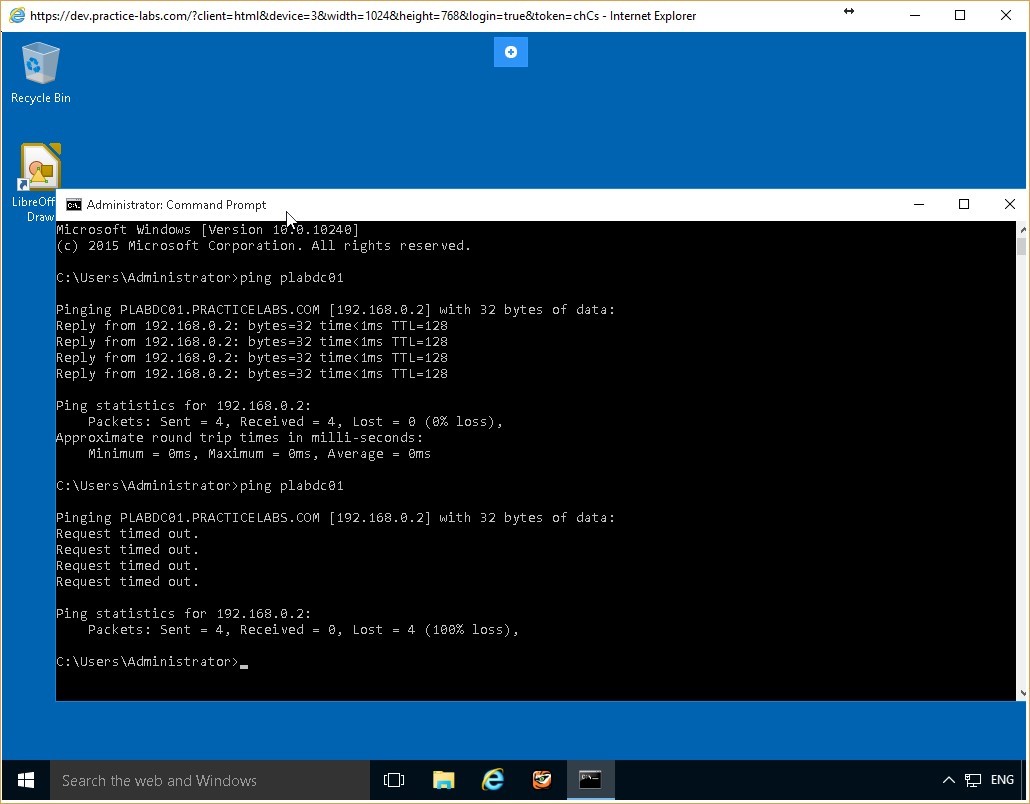 Figure 3.14 Screenshot of the PLABWIN10 desktop: Administrator Command Prompt window is displayed showing system-response to the command typed-in in the previous step.
Task 4 - Reconfigure the Firewall Rule
Firewall rules can be easily reconfigured. This helps re-configure the computer in accordance with the evolving network environment. In this task, you will re-configure PLABDC01 to respond to the ping requests.
To reconfigure the firewall rule, perform the following steps:
Step 1
Return to the PLABDC01 device. On the Windows Firewall with Advanced Security window, in the Inbound Rules pane, right-click File and Printer Sharing (Echo Request-ICMPv4-In) and select Properties.
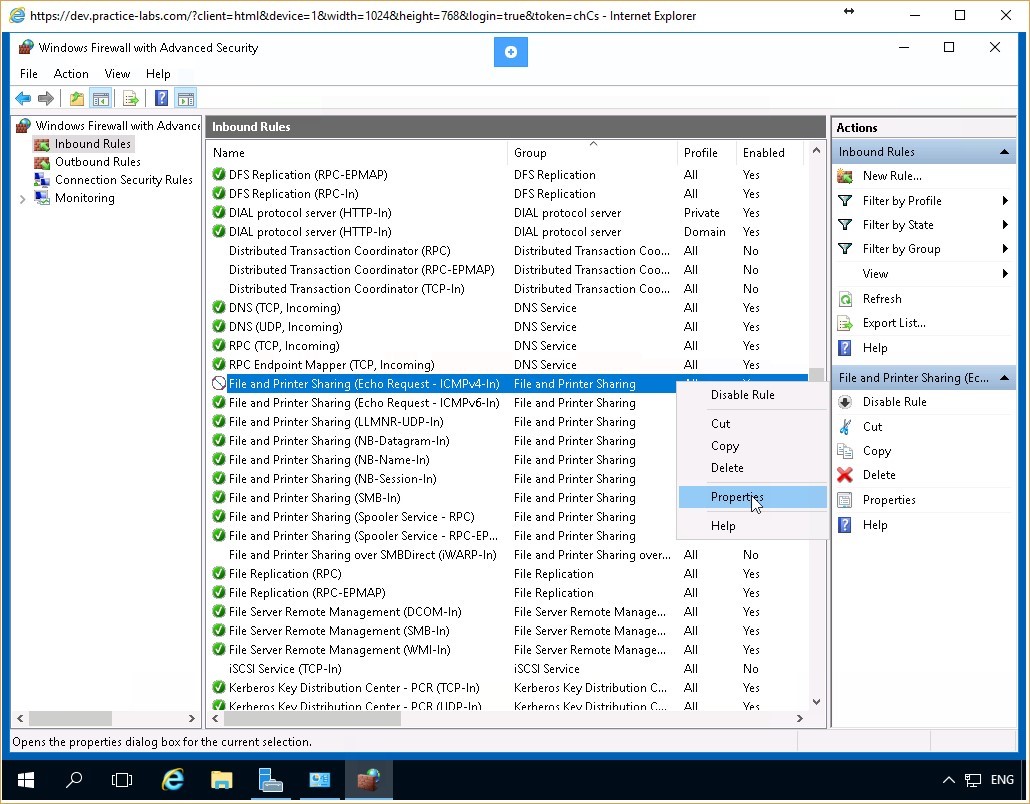 Figure 3.15 Screenshot of the PLABDC01 desktop: Context menu (that appears on right-clicking a listed rule) > Properties menu-options are displayed on the Inbound Rules pane of the Windows Firewall with Advanced Security window.
Step 2
On the File and Printer Sharing (Echo Request-ICMPv4-In) Properties dialog box, ensure that the General tab is selected.
In the Action section, select the Allow the connection radio button and click Apply and then click OK.
 Figure 3.16 Screenshot of the PLABDC01 desktop: General tab on the File and Printer Sharing (Echo Request - ICMPv4 - In) Properties dialog box is displayed showing the required settings performed and the Apply and OK buttons highlighted.
Step 3
Notice that the File and Printer Sharing (Echo Request-ICMPv4-In) rule displays an allowed icon on the left. Close the Windows Firewall with Advanced Security and the Windows Firewall windows.
 Figure 3.17 Screenshot of the PLABDC01 desktop: the specified inbound rule is shown allowed on the Inbound Rules pane of the Windows Firewall with Advanced Security window.
Step 4
Return to the PLABWIN10 device. On the Command Prompt window, type:
ping plabdc01
Press Enter.
 Figure 3.18 Screenshot of the PLABWIN10 desktop: Administrator Command Prompt window is displayed showing the command to ping a server-name typed-in.
Step 5
The PLABDC01 responds successfully to the ping request. You have successfully reconfigured the firewall rule so that the device successfully receives and responds to ping requests.
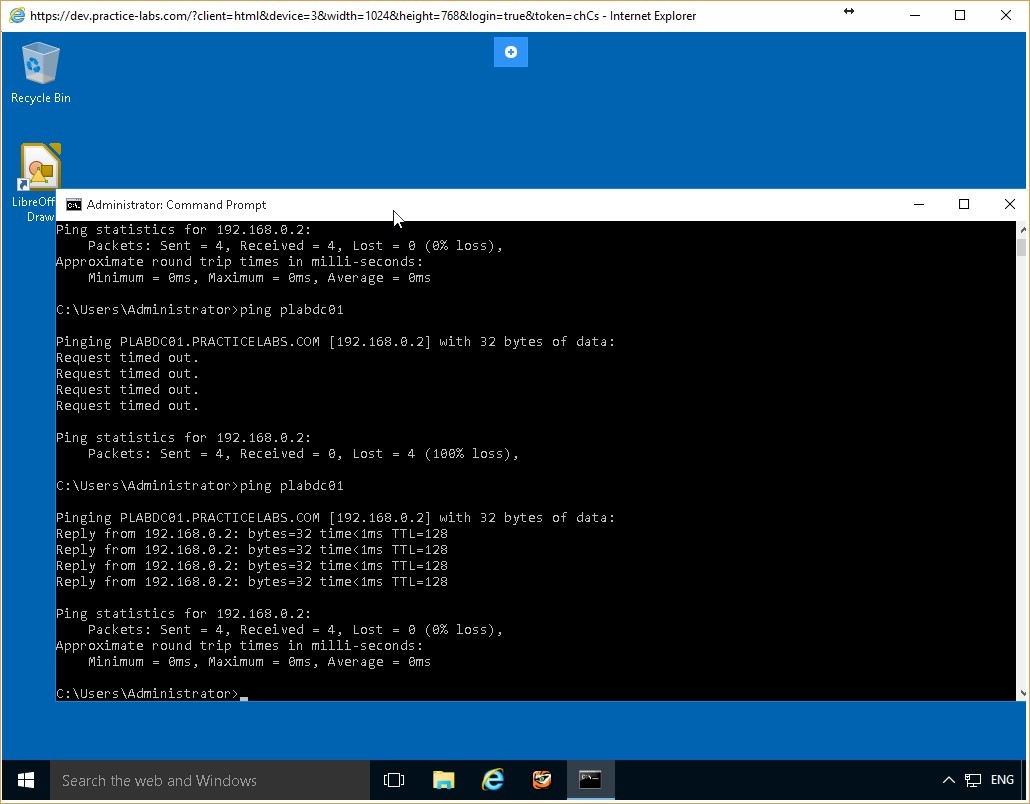 Figure 3.19 Screenshot of the PLABWIN10 desktop: Administrator Command Prompt window is displayed showing system-response to the command typed-in in the previous step.
Leave the devices you have powered on in their current state and proceed to the next exercise.
Figure 3.19 Screenshot of the PLABWIN10 desktop: Administrator Command Prompt window is displayed showing system-response to the command typed-in in the previous step.
Leave the devices you have powered on in their current state and proceed to the next exercise.
Exercise 4 - Configuring Firewall Rules from the Command Line Interface
The Command Line Interface, (CLI), is one of the methods of communicating with the operating system or other software such as applications. With the CLI, you issue commands and receive responses in the format of text lines, delineated from each other by command prompts. CLI commands are powerful and can achieve more with each command, however, they may not be as intuitive as a GUI, and you must remember the commands, the syntax, and the context to use them correctly.
To better understand this technology, also refer to your course material or use your preferred search engine to research this topic in detail.
Learning Outcomes
After completing this exercise, you will be able to:
- Configure Firewall Rules from the Command Line Interface
Your Devices
You will be using the following devices in this lab. Please power these on now.
- PLABDC01 (Domain Controller - Windows Server 2016)
- PLABWIN10 (Workstation - Windows 10)

Task 1 - Configure the firewall so that Inbound Ping Packets are Blocked
You can use the CLI commands to configure a firewall on a computer. To test the effectiveness of the firewall rules created, you must first confirm the current state of the computer. In this task, you will first configure the firewall such that incoming ping packets to the PLABDC01 computer are blocked.
To configure this, perform the following steps:
Step 1
Connect to the PLABDC01 device. Right-click the network icon in the system tray and select Open Network and Sharing Center.
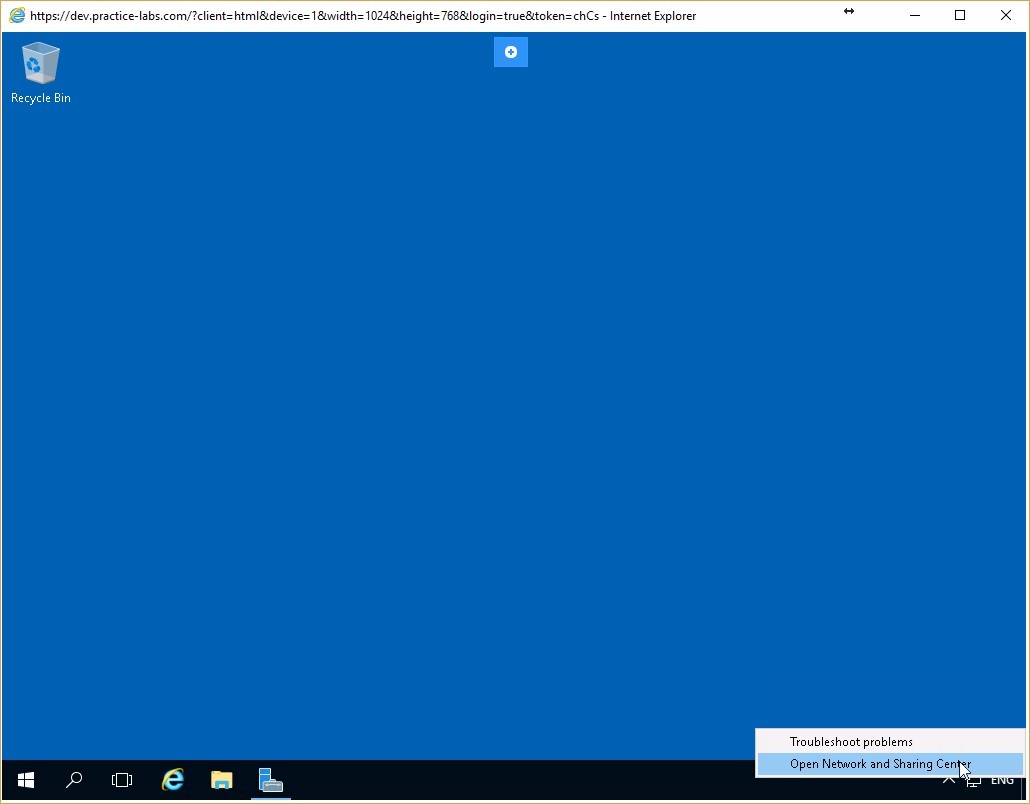 Figure 4.1 Screenshot of the PLABDC01 desktop: Context menu (that appears by right-clicking the network icon) > Open Network and Sharing Center menu-options are displayed on the PLABDC01 desktop.
Step 2
On Network and Sharing Center, click Windows Firewall on the lower left pane.
 Figure 4.2 Screenshot of the PLABDC01 desktop: Network and Sharing Center window is displayed showing the Windows Firewall link highlighted.
Step 3
On the Windows Firewall window, confirm that the firewall is activated for all the three network profiles - Domain networks, Home or work (private) networks, and Public networks.
 Figure 4.3 Screenshot of the PLABDC01 desktop: Windows Firewall window is displayed showing firewall activated for all the listed network profiles.
Step 4
Now, follow the same steps, as done in the earlier exercise of this module to access the File and Printer Sharing (Echo Request-ICMPv4-In) Properties dialog box:
Click on the Advanced settings option on the left and then on the Inbound Rules. Scroll down to the File and Printer Sharing (Echo Request-ICMPv4-In) Properties entry, right click it and click Properties.
In the Action section of the General tab, ensure that the Block the connection radio button is selected. Click Apply and then OK.
Minimize the Windows Firewall with Advanced Security and the Windows Firewall windows.
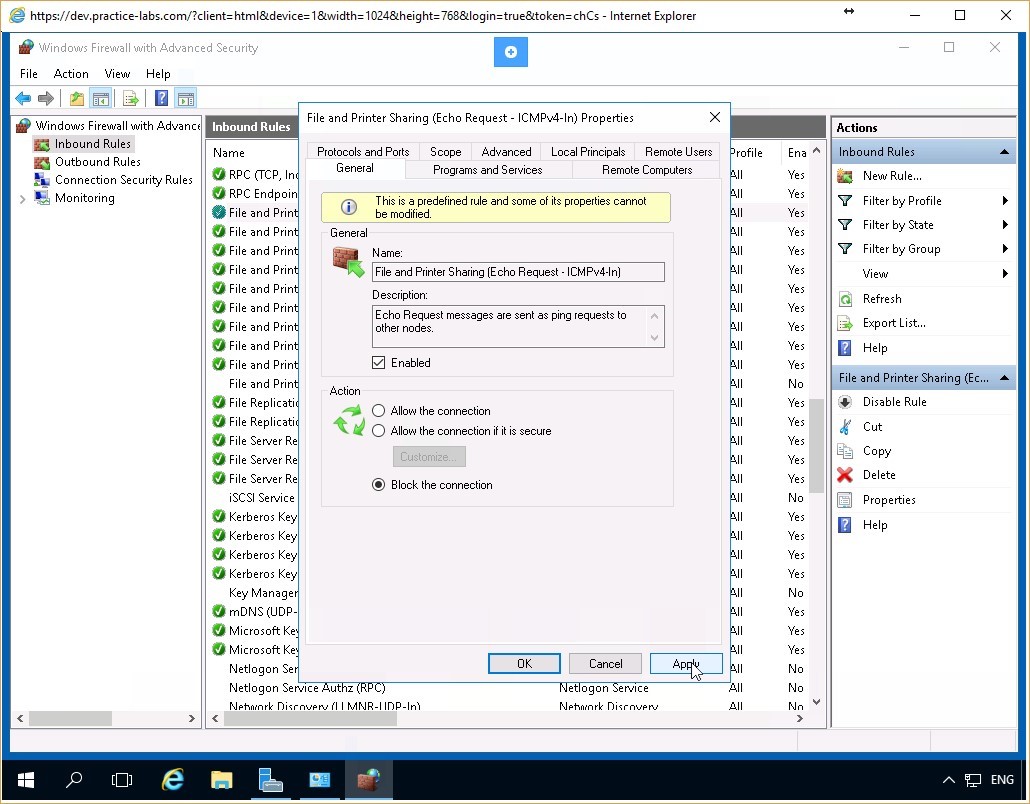 Figure 4.4 Screenshot of the PLABDC01 desktop: General tab on the File and Printer Sharing (Echo Request - ICMPv4 - In) Properties dialog box is displayed showing the required settings performed and the Apply and OK buttons highlighted.
Step 5
Connect to the PLABWIN10 device. On the Command Prompt window type the following command:
ping plabdc01
Press Enter.
 Figure 4.5 Screenshot of the PLABWIN10 desktop: Administrator Command Prompt window is displayed showing the command to ping a server-name typed-in.
Step 6
Notice that the ping request is timed out. There is no response from the PLABDC01 server. This confirms that the incoming packets to PLABDC01 are blocked.
Leave the command prompt window open.
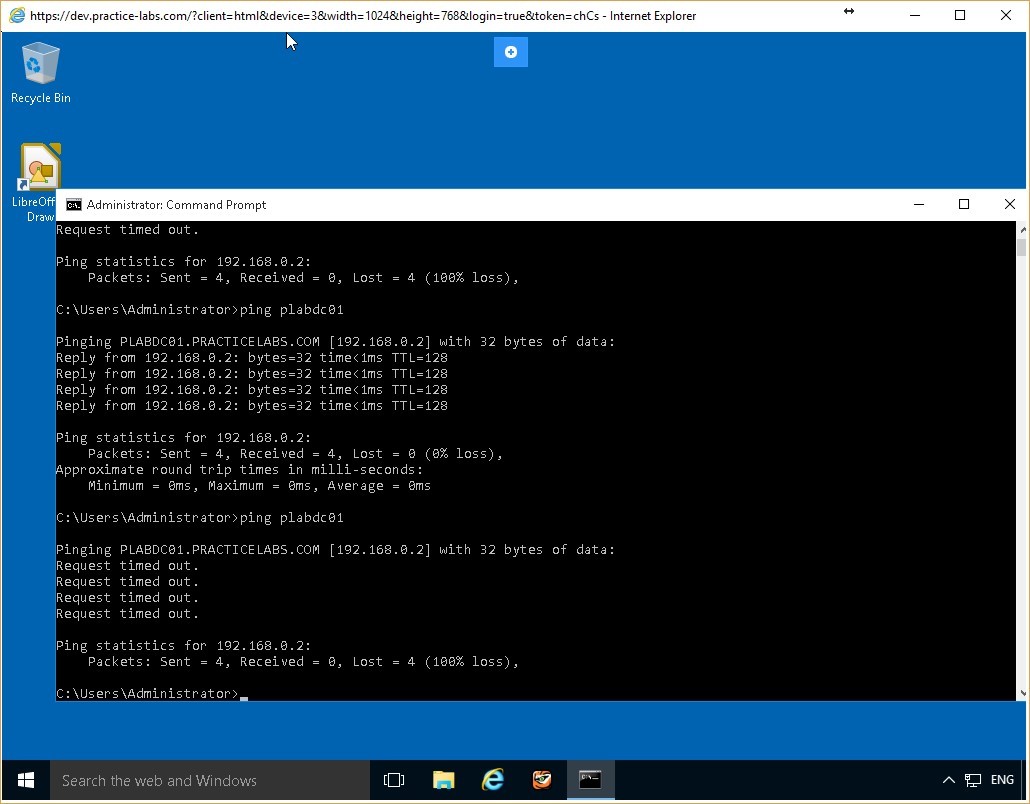 Figure 4.6 Screenshot of the PLABWIN10 desktop: Administrator Command Prompt window is displayed showing system-response to the command typed-in in the previous step.
Task 2 - Use CLI Commands to Configure the Firewall
Use CLI commands to configure the firewall on the PLABDC01 computer. In this task, you will use CLI commands to switch off the firewall for all profiles on the PLABDC01 computer.
To use CLI commands to configure the firewall, perform the following steps:
Step 1
Connect to PLABDC01, click Start, type cmd, and press Enter.
 Figure 4.7 Screenshot of the PLABDC01 desktop: Command Prompt menu-option is highlighted on the Start menu.
Step 2
The Command Prompt window appears. Type the following command:
netsh advfirewall set allprofiles state off
Press Enter.
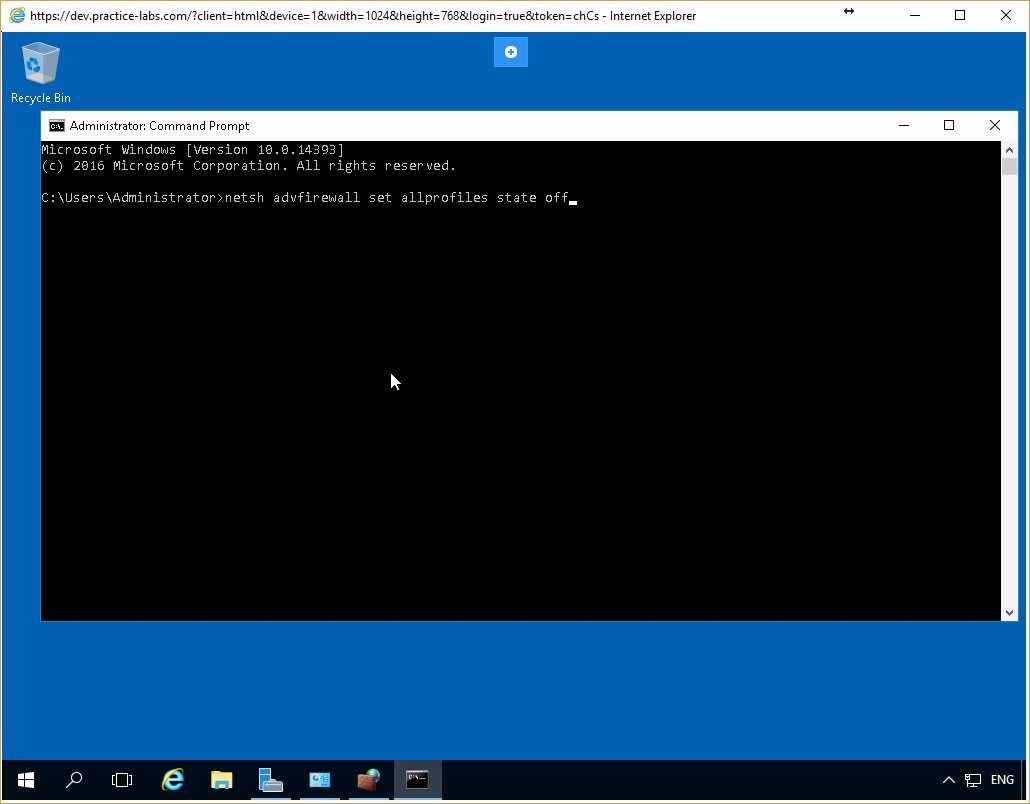 Figure 4.8 Screenshot of the PLABDC01 desktop: Administrator Command Prompt window is displayed showing the command to switch off the firewall for all the network profiles typed-in.
Step 3
If the command was issued correctly, you would receive an OK. on the command line. This informs you that the firewall has been successfully switched off for all the network profiles on PLABDC01.
Minimize the command prompt window.
 Figure 4.9 Screenshot of the PLABDC01 desktop: Administrator Command Prompt window is displayed showing system-response to the command typed-in in the previous step.
Task 3 - Verify the Efficacy of the Firewall Rule
After defining the firewall rule using the CLI command, you verify whether the commands modify the firewall as specified. In this task, you will test whether the firewall on the PLABDC01 computer is switched off, as specified by the CLI command.
To verify the efficacy of the firewall rule, perform the following steps:
Step 1
Right-click the network icon on the system tray. Select Network and Sharing Center, and then select Windows Firewall to display the Windows Firewall window.
The firewall is now switched off for all the profiles on the PLABDC01 computer - Domain networks, Home or work (private) networks, and Public networks.
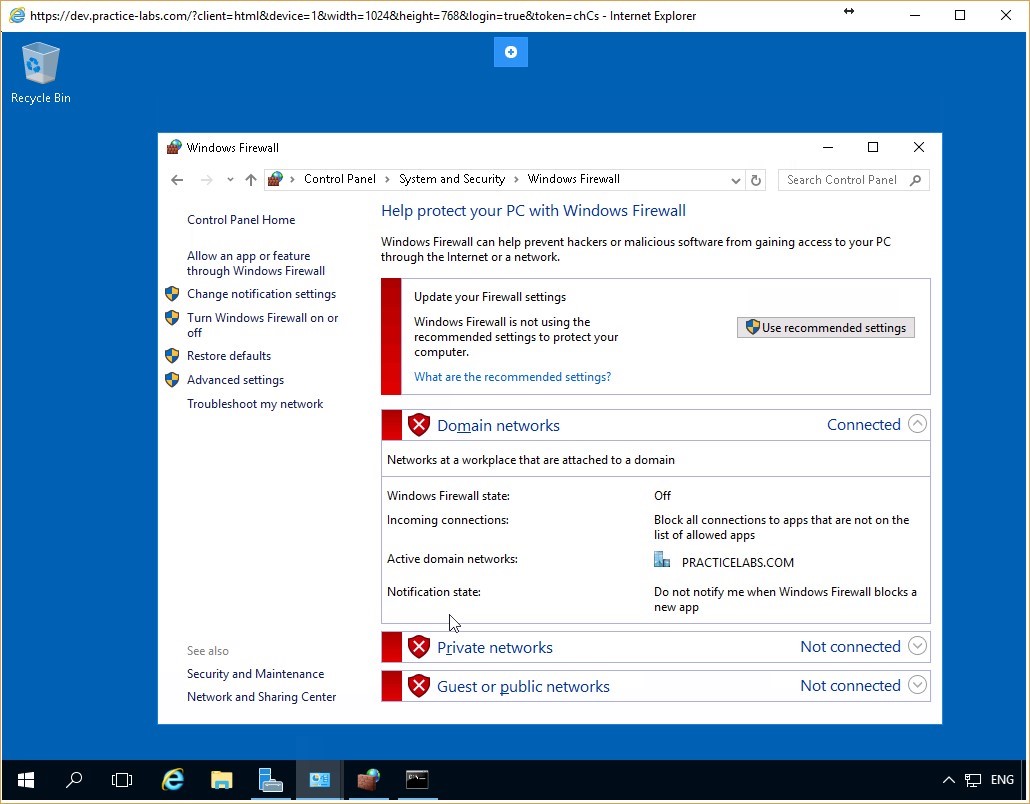 Figure 4.10 Screenshot of the PLABDC01 desktop: Windows Firewall window is displayed showing the firewall switched off for all the listed network profiles.
Step 2
Switch back to PLABWIN10. On the Command Prompt, type the following command:
ping plabdc01
Press Enter.
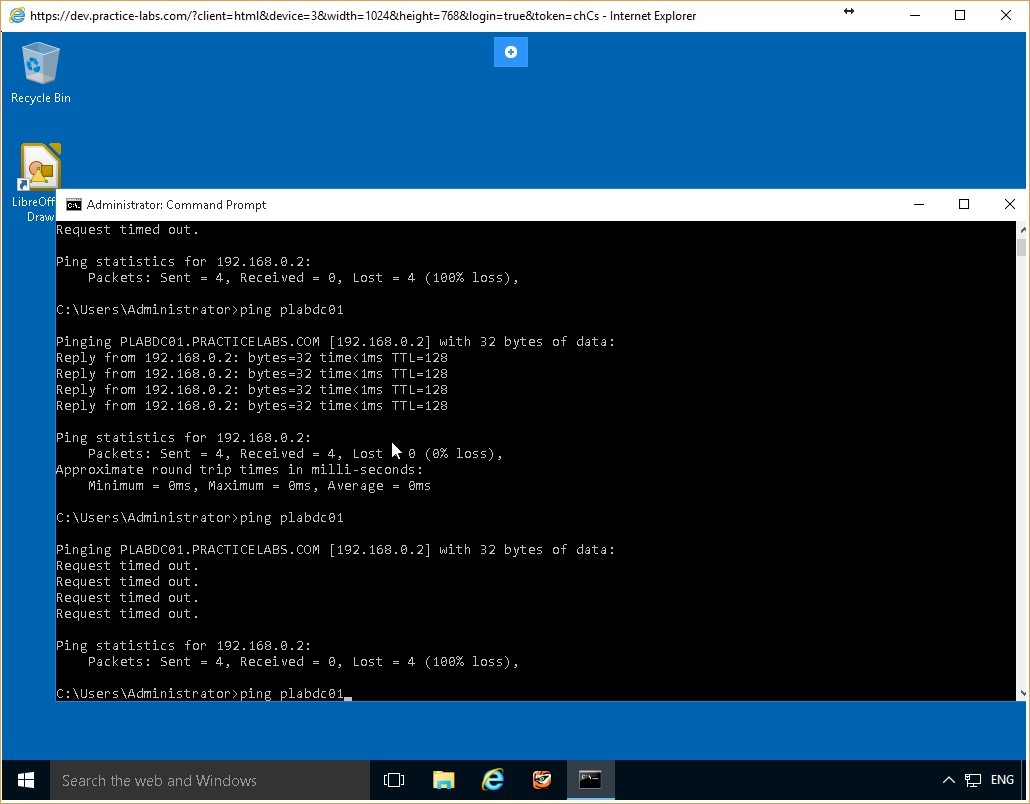 Figure 4.11 Screenshot of the PLABWIN10 desktop: Administrator Command Prompt window is displayed showing the command to ping a server-name typed-in.
Step 3
The ping command receives a response from PLABDC01. This is the case even though there is still a rule blocking the File and Printer Sharing service.
This is because the CLI command switched off the firewall for all the profiles. When the firewall is deactivated, none of its rules are in effect.
 Figure 4.12 Screenshot of the PLABWIN10 desktop: Administrator Command Prompt window is displayed showing system-response to the command typed-in in the previous step.
Task 4 - Reconfigure the Firewall Using CLI
You can use CLI commands to reconfigure the firewall rules. In this task, you will use CLI commands to switch on the firewall on the PLABDC01 computer. In addition, you will verify that the firewall is switched on.
To reconfigure the firewall using CLI command, perform the following steps:
Step 1
Switch back to PLABDC01. Access the command prompt and type the following command:
netsh advfirewall set allprofiles state on
Press Enter.
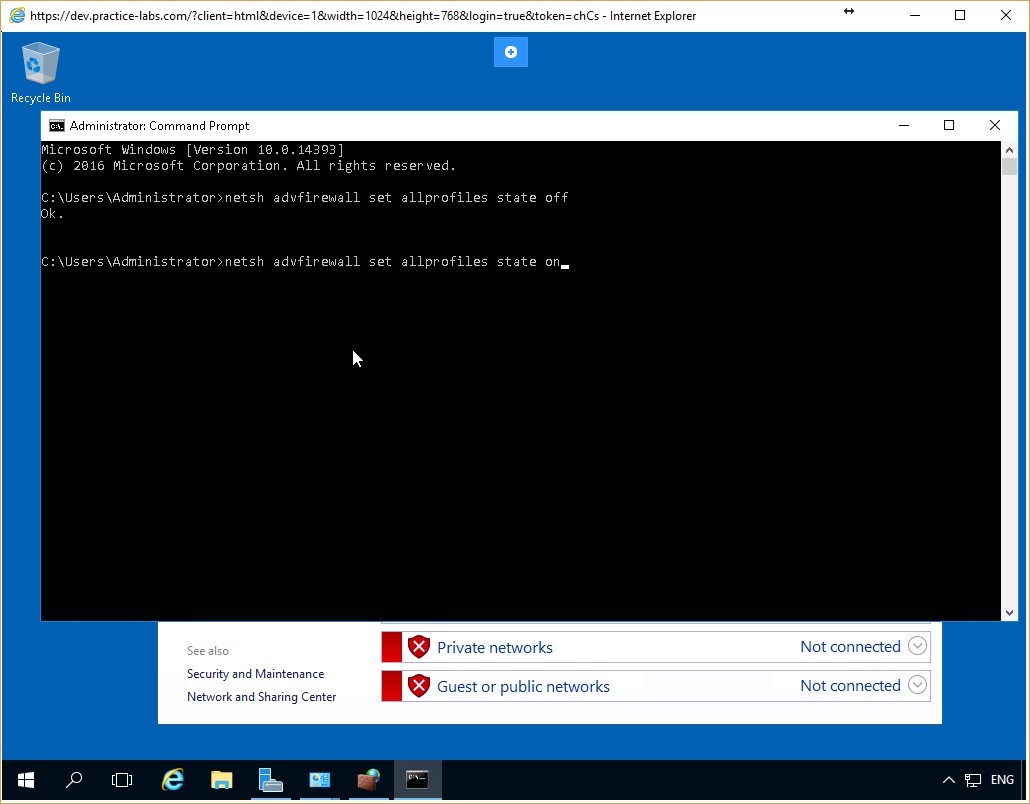 Figure 4.13 Screenshot of the PLABDC01 desktop: Administrator Command Prompt window is displayed showing the command to switch on the firewall for all the network profiles typed-in.
Step 2
You receive the OK. response once again from the computer. This informs you that the firewall is switched on for all the profiles on PLABDC01.
Close the Command Prompt window.
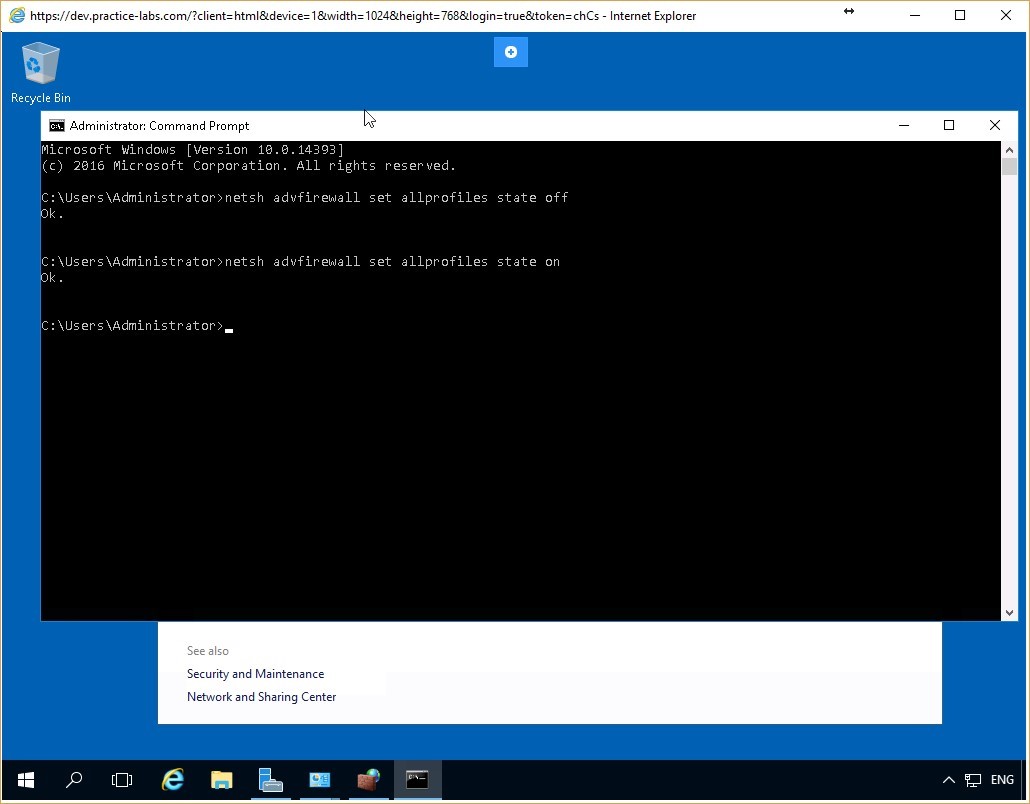 Figure 4.14 Screenshot of the PLABDC01 desktop: Administrator Command Prompt window is displayed showing system-response to the command typed-in in the previous step.
Step 3
Access the Windows Firewall window and verify that the firewall is switched on for all the profiles. The firewall has been reconfigured using the CLI command.
In addition, access the Windows Firewall with Advanced Security window to confirm that the inbound packets to File and Printer Sharing service are still blocked.
 Figure 4.15 Screenshot of the PLABDC01 desktop: Windows Firewall window is displayed showing the firewall switched on for all the listed network profiles and the File and Printer Sharing inbound rule is shown blocked on the Windows Firewall with Advanced Security.
Step 4
Switch back to PLABWIN10. On the Command Prompt, again type the following command:
ping plabdc01
Press Enter.
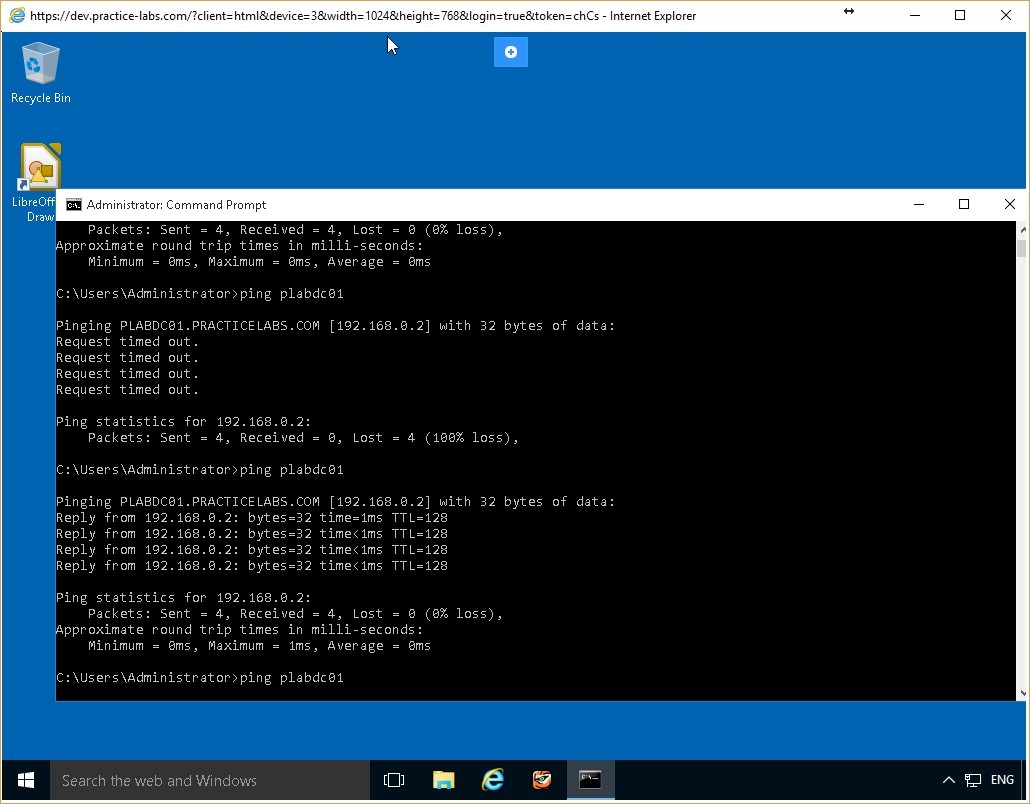 Figure 4.16 Screenshot of the PLABWIN10 desktop: Administrator Command Prompt window is displayed showing the command to ping a server-name typed-in.
Step 5
Notice that now the request is timed out. This is because the firewall is now switched on using the CLI command and the firewall rules configured for individual services are once again in effect.
 Figure 4.17 Screenshot of the PLABWIN10 desktop: Administrator Command Prompt window is displayed showing system-response to the command typed-in in the previous step.
Keep all devices that you have powered on in their current state and proceed to the next exercise.
Figure 4.17 Screenshot of the PLABWIN10 desktop: Administrator Command Prompt window is displayed showing system-response to the command typed-in in the previous step.
Keep all devices that you have powered on in their current state and proceed to the next exercise.
Review
Well done, you have completed the Implement a Host-based Firewall Practice Lab.
Summary
You completed the following exercises:
- Exercise 1 - Preliminary Tasks
- Exercise 2 - Configuring Firewall Rules Using Windows Firewall
- Exercise 3 - Configuring Firewall Rules using Windows Firewall with Advanced Security
- Exercise 4 - Configuring Firewall Rules from the Command Line Interface
You should now be able to:
- Configure Firewall Rules Using Windows Firewall
- Configure Firewall Rules Using Windows Firewall with Advanced Security
- Configure Firewall Rules Using Remote Access
- Configure Firewall Rules from the Command Line Interface
Shutdown all virtual machines used in this lab. Alternatively, you can log out of the lab platform.