Southern New Hampshire University | SNHU-CYB220: Network Security
Managing Virtual Machine Settings
Exercises
- Introduction
- Exercise 1 - Configure Dynamic Memory and Smart Paging
- Exercise 2 - Configure Guest Integration Services
- Exercise 3 - Create Generation 2 Virtual Machine
- Summary
Introduction
The Managing Virtual Machine Settings module provides you with the instruction and server hardware to develop your hands on skills in the defined topics. This module includes the following exercises:
- Configure Dynamic Memory and Smart Paging
- Configure Guest Integration Services
- Create Generation 2 Virtual Machines
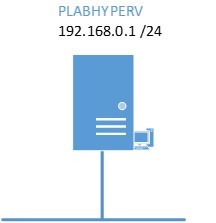
Lab Diagram
During your session, you will have access to the following lab configuration
Connecting to your Lab
In this module, you will be working on the following equipment to carry out the steps defined in each exercise.
- PLABHYPERV (HYPER-V Server)
To start, simply choose a device and click Power on. In some cases, the devices may power on automatically.
For further information and technical support, please see our Help and Support page.
Copyright Notice
This document and its content is copyright of Practice-IT - © Practice-IT 2016. All rights reserved. Any redistribution or reproduction of part or all of the contents in any form is prohibited other than the following:
1. You may print or download to a local hard disk extracts for your personal and non-commercial use only.
2. You may copy the content to individual third parties for their personal use, but only if you acknowledge the website as the source of the material. You may not, except with our express written permission, distribute or commercially exploit the content. Nor may you transmit it or store it in any other website or other form of electronic retrieval system.
Exercise 1 - Configure Dynamic Memory and Smart Paging
Dynamic memory is a feature in Hyper-V where a guest virtual machine has the flexibility to increase its allocated memory on-demand thereby enhancing its performance.
Smart Paging is another feature enhancement in Hyper-V. This ensures successful virtual machine restart operations. In some scenarios, a virtual machine may not have enough memory available than required to restart, in this case, Hyper-V will require more memory to restart the virtual machine. Typically, each virtual machine with a specific operating system requires a specific amount of start-up memory. If you allocate less memory in the Minimum RAM field, then the virtual machine will not start. The restart of the virtual machine will fail. In Windows Server 2012, Smart Paging is used by Hyper-V to restart the virtual machine.
The Smart Paging uses the hard disk as additional and temporary memory when more memory is required to restart a virtual machine. However, because the hard disk access is slower than the direct memory access, there is a performance issue with the virtual machines. Hyper-V is now designed to use Smart Paging in the following conditions:
- When you restart the virtual machine
- When there is no physical memory available
- Reclaim of memory from other virtual machines is not possible
Smart Paging will not be used in the following conditions:
- You are starting the virtual machine, but not restarting
- Memory oversubscription is required
- There is a failover over of a virtual machine in Hyper-V clusters
In this exercise, you will perform the tasks required to configure virtual machine memory and smart paging.
Please refer to your course material or use your favorite search engine to research for more information about this topic.
Task 1 - Configure Dynamic Memory and Smart Paging
To configure dynamic memory and smart paging, perform the following steps:
Step 1
Ensure you have powered on the required devices indicated in the Introduction.
On PLABHYPERV device, Server Manager Dashboard is open.
Click Tools menu and then select Hyper-V Manager.
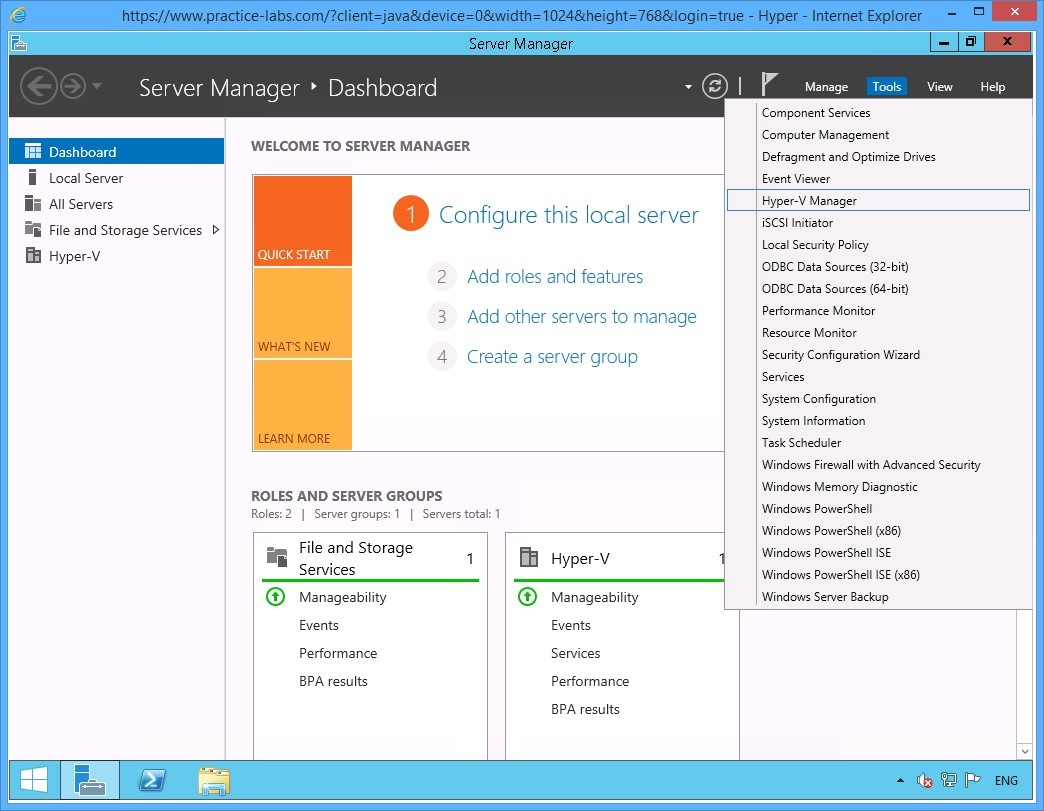 Figure 1.1 Screenshot of the device PLABHYPERV: Server Manager is displayed, with the tools menu open and the Hyper-V Manager option highlighted.
Step 2
The Hyper-V Manager console is displayed.
Locate the Virtual Machine section in the middle pane and right-click on the PLABWIN802 device.
Select Settings.
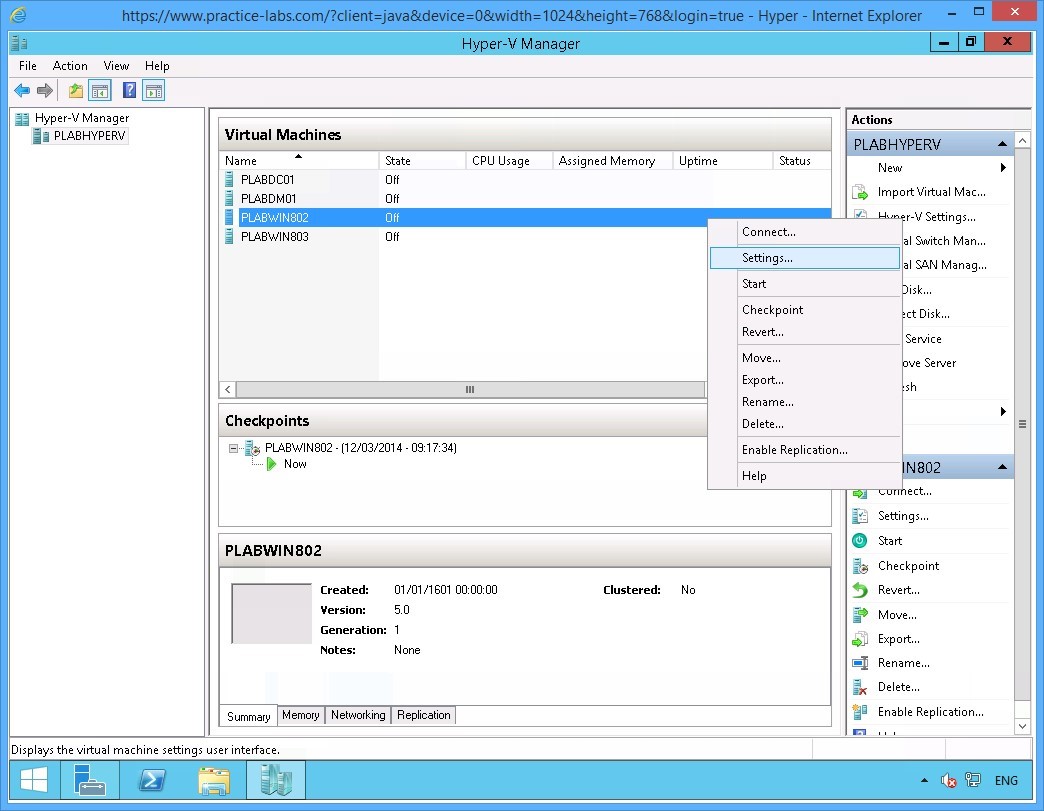 Figure 1.3 Screenshot of the device PLABHYPERV: The context menu (that appears on right-clicking the name of a virtual machine) > Settings menu-options are displayed on the Hyper-V Manager console.
Step 3
The Settings for PLABWIN802 on PLABHYPERV dialog box is displayed.
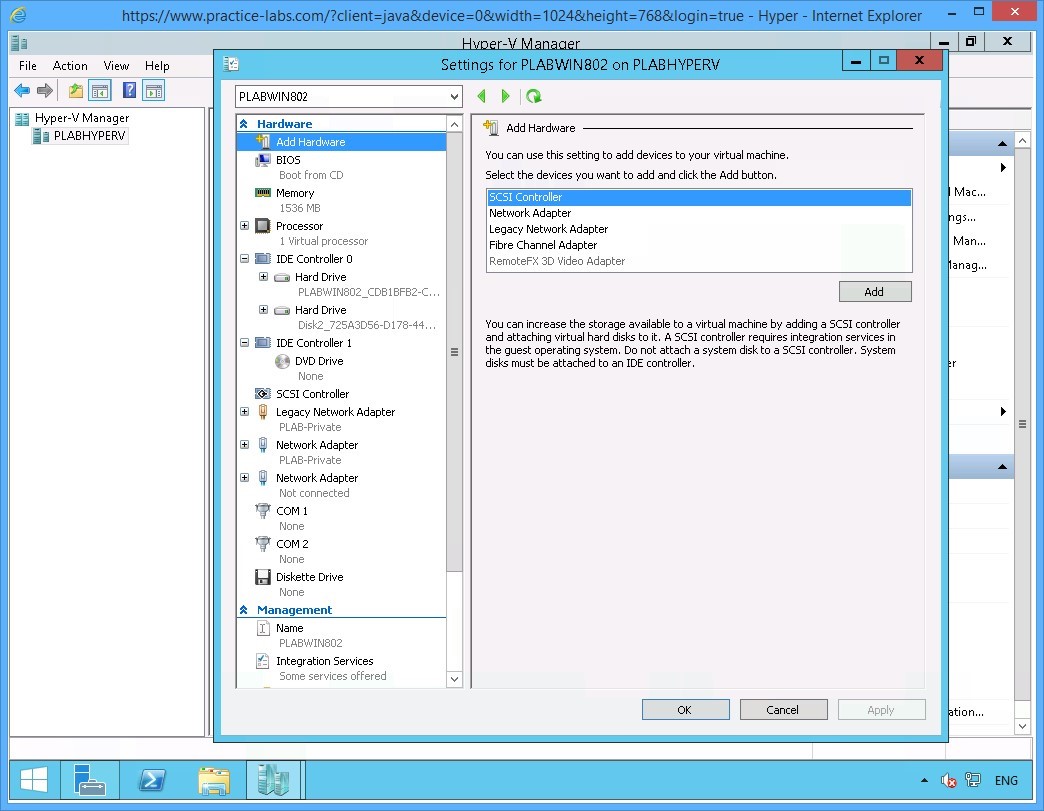 Figure 1.4 Screenshot of the device PLABHYPERV: The Settings for PLABWIN802 on PLABHYPERV dialog box is displayed showing the default settings.
Step 4
In the left pane, click Memory.
The Memory content details are displayed in the right pane.
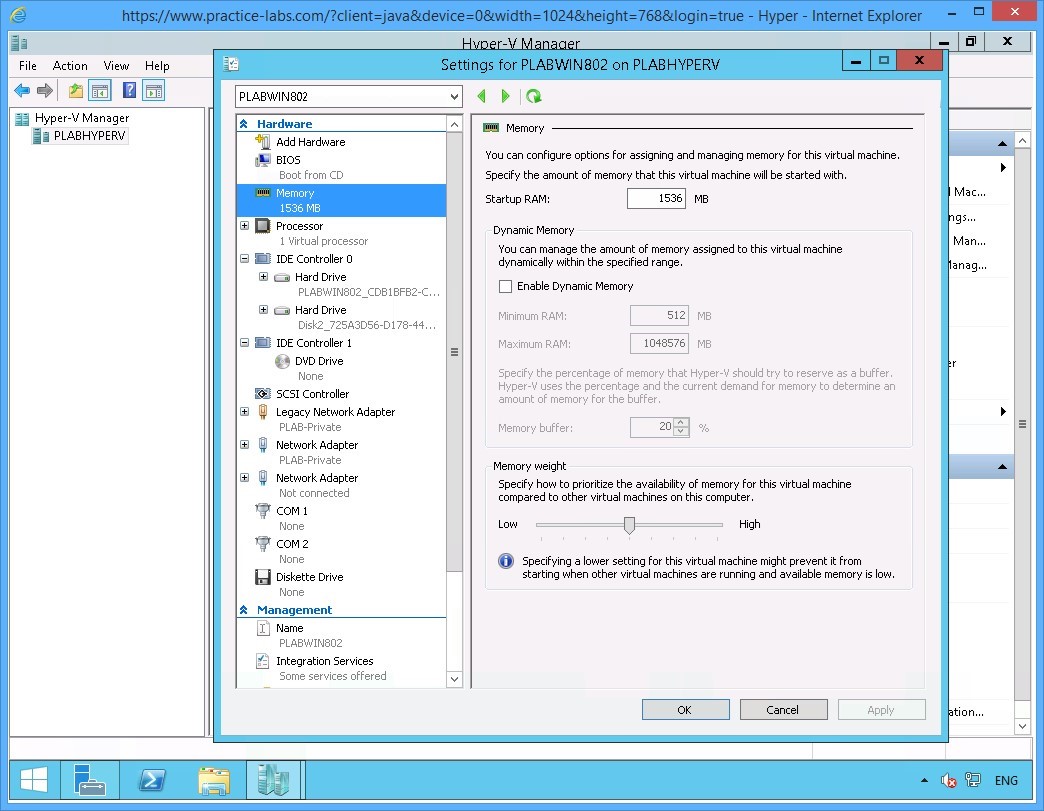 Figure 1.5 Screenshot of the device PLABHYPERV: The Settings for PLABWIN802 on PLABHYPERV dialog box is displayed showing the required selections performed on the navigation pane at the left and the corresponding details listed on pane at the right.
Step 5
In the Dynamic Memory section, select Enable Dynamic Memory.
Note that Minimum RAM and Maximum RAM fields are enabled.
You can keep the default values in the Minimum RAM and Maximum RAM fields.
Examine the other features that describe Memory buffer and Memory weight. Keep the default specifications for these two unchanged.
Click OK.
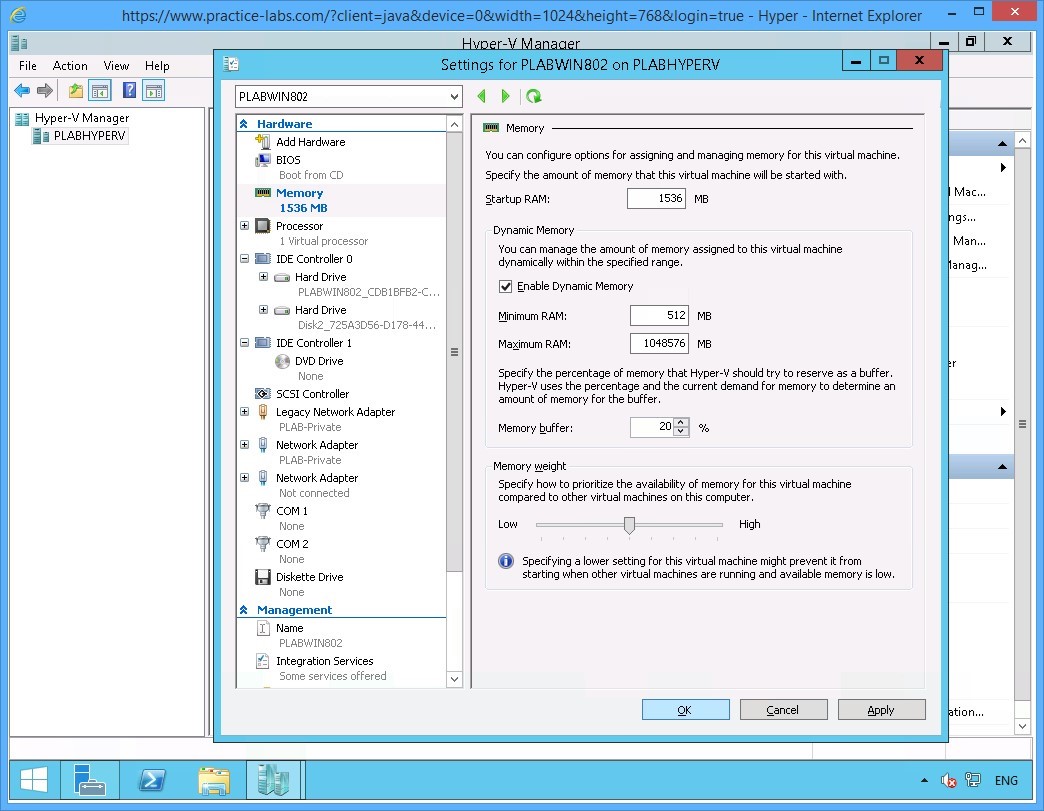 Figure 1.6 Screenshot of the device PLABHYPERV: The Settings for PLABWIN802 on PLABHYPERV dialog box is displayed showing the required settings performed on the details pane at the right.
Step 6
Locate the Management section and scroll down. Select Smart Paging File Location.
Click OK.
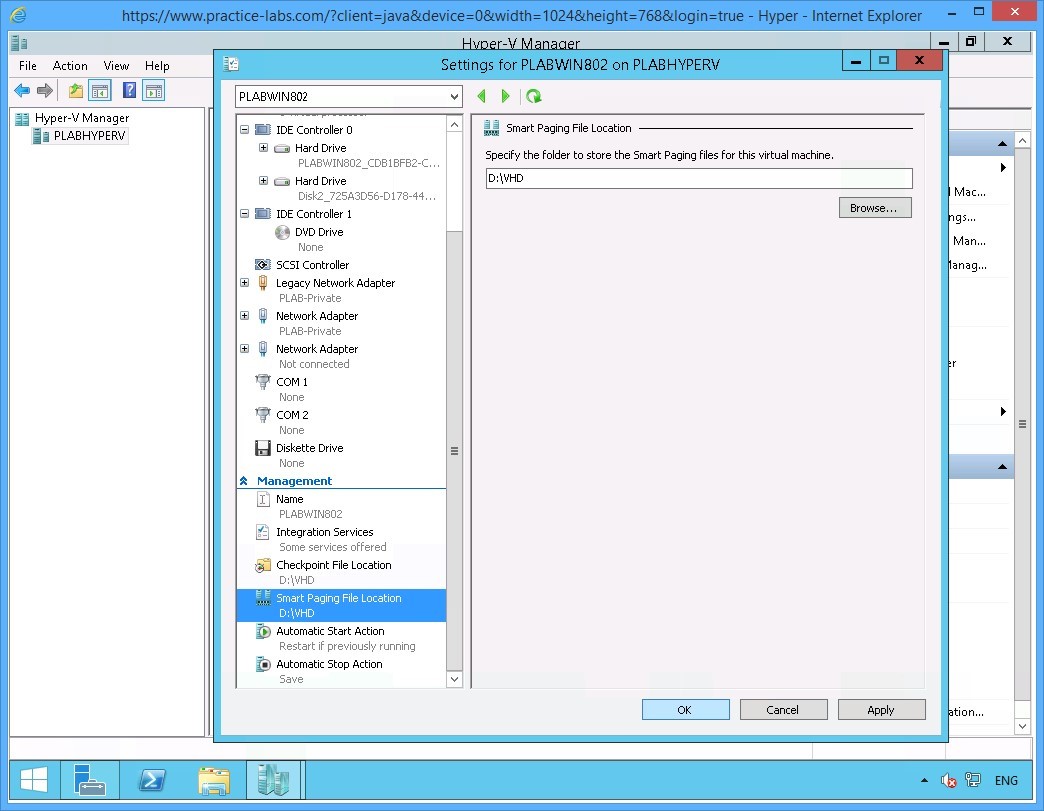 Figure 1.7 Screenshot of device PLABHYPERV: The Settings for PLABWIN802 on PLABHYPERV dialog box is displayed showing the required selections made on the navigation pane at the left and the required settings performed on the details pane at the right.
Step 7
Keep Hyper-V Manager console open for the next activity.
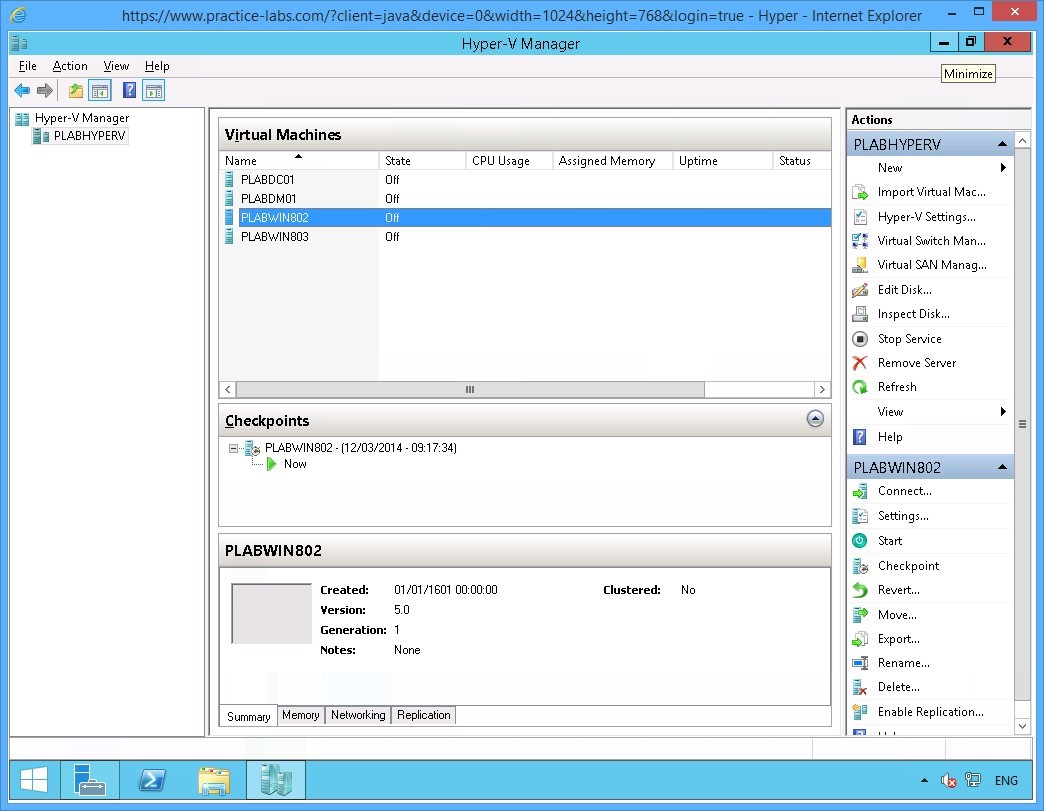 Figure 1.8 Screenshot of the device PLABHYPERV: The Hyper-V Manager console is displayed on the PLABHYPERV desktop.
Keep all devices powered on in their current state and proceed to the next task.
Task 2 - Power on Virtual Machines
In preparation for Hyper-V Resource Metering task, you will power on two virtual machines from which you will collect system usage statistics.
To power on the required virtual machines, perform the following steps:
Step 1
On PLABHYPERV device, the Hyper-V Manager console is open.
Under the Virtual Machines section, right-click PLABDC01 and select Start...
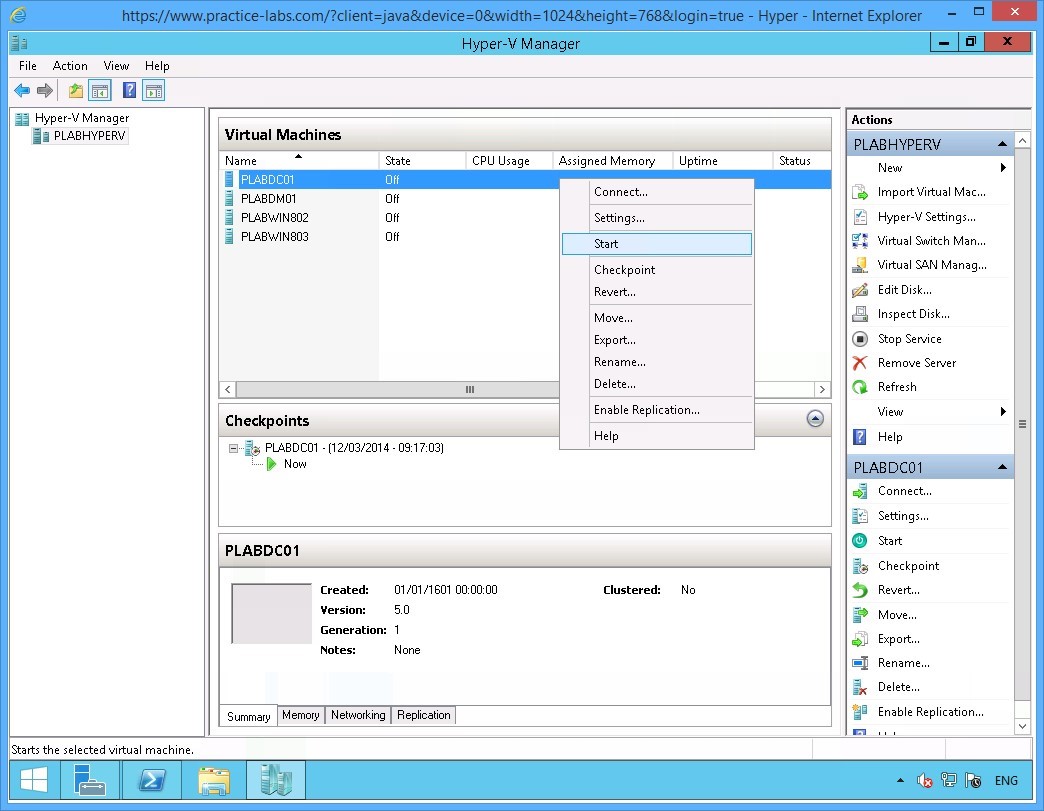 Figure 1.9 Screenshot of the device PLABHYPERV: The context menu (that appears on right-clicking the name of a virtual machine) > Start menu-options are displayed on the Hyper-V Manager console.
Step 2
Similarly, right-click PLABWIN802 and select Start.
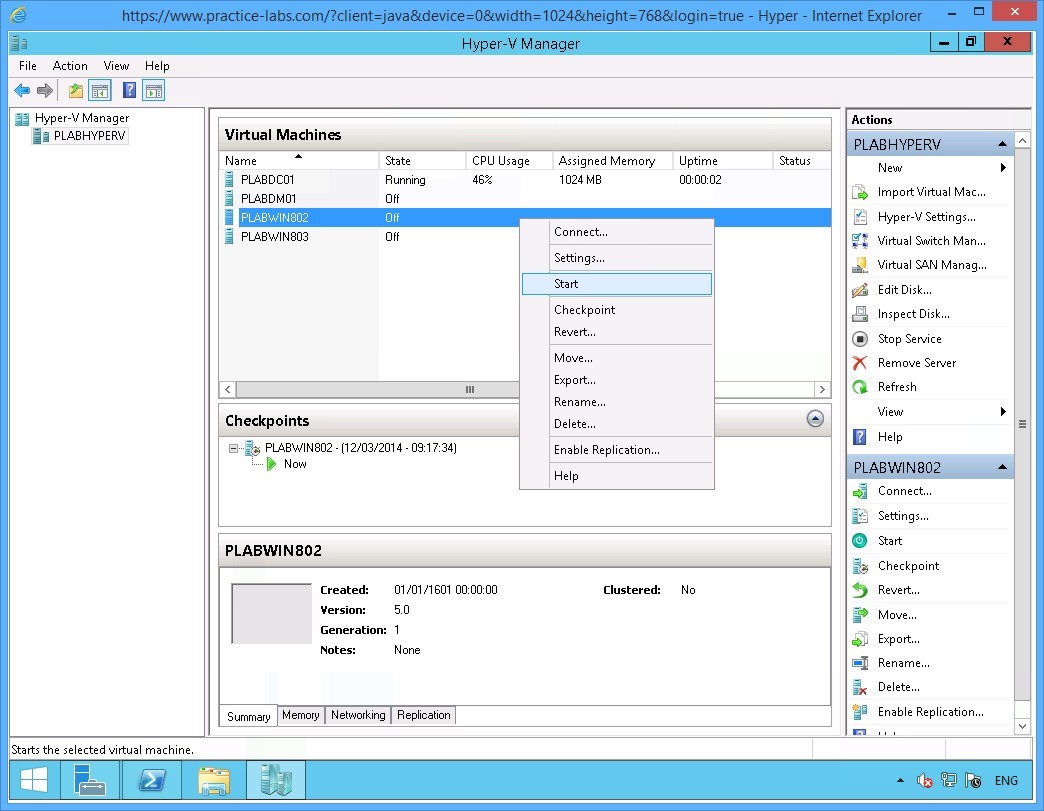 Figure 1.10 Screenshot of the device PLABHYPERV: The context menu (that appears on right-clicking the name of a virtual machine) > Start menu-options are displayed on the Hyper-V Manager console.
Step 3
When PLABDC01 and PLABWIN802 are completely powered on, minimize Hyper-V Manager window.
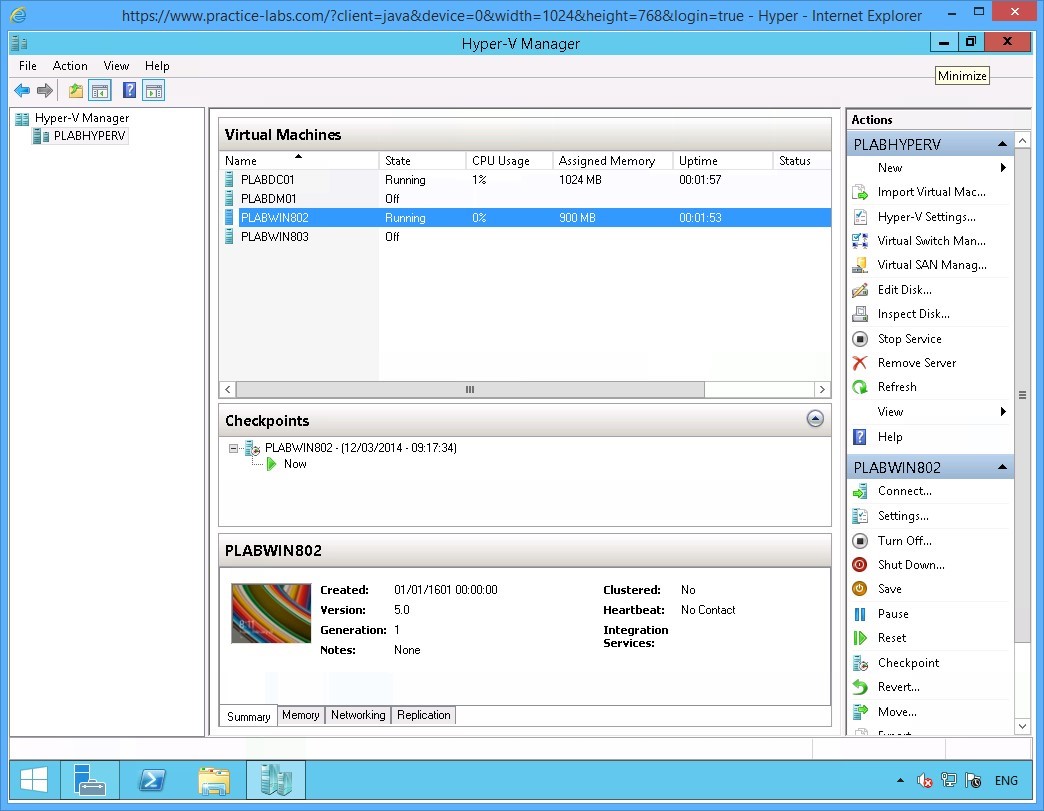 Figure 1.11 Screenshot of the device PLABHYPERV: The Hyper-V Manager console showing the specified machines running is displayed on the PLABHYPERV desktop.
Keep all devices powered on in their current state and proceed to the next task.
Task 3 - Enable Resource Metering
Service providers that host virtual machines for external organizations implement resource metering that monitor usage of their infrastructure. The collected statistics by resource metering feature measures the amount of data used by a customer and used by service providers for issuing chargebacks.
There is no graphical user interface for enabling resource metering in Hyper-V. Therefore, you will be using Windows PowerShell to enable this feature.
To configure Resource Metering, perform the following steps:
Step 1
On PLABHYPERV device, click Windows PowerShell icon on the taskbar.
Important: Windows PowerShell commands are not case-sensitive. In addition, you can use the auto-complete feature by typing the first few letters of the command then press TAB. You can make working on PowerShell easier, by typing more specific PowerShell command. For example, type get-vmnet then pressing TAB a few times to find the command that you want to execute. Windows PowerShell parameters which are preceded by a “-“ (dash) supports auto-complete feature as well.
 Figure 1.12 Screenshot of the device PLABHYPERV: The PLABHYPERV desktop is displayed with the Windows PowerShell icon on taskbar highlighted.
Step 2
On the Windows PowerShell prompt, type:
Get-VM *| Enable-VMResourceMetering
Press Enter.
The command will collect all the virtual machines in PLABHYPERV and enable them for resource metering. If you want to enable resource metering for a specific virtual machine, replace * with -ComputerName hostname. For example, Get-VM -ComputerName PLABWIN802 | Enable-VMResourceMetering.
 Figure 1.13 Screenshot of the device PLABHYPERV: The Administrator: Windows PowerShell window is displayed with the required command typed-in.
Step 3
Resource Metering is now enabled. Notice that you did not get a confirmation when the feature was turned on.
 Figure 1.14 Screenshot of the device PLABHYPERV: The Administrator: Windows PowerShell window is displayed listing system response to the command typed-in in the previous step.
Step 4
To verify resource monitoring on the guest virtual machines, type:
Get-VM | Format-Table Name,State,ResourceMeteringEnabled
Press Enter.
Step 5
A formatted list indicating the Virtual machine names, State and Resource Metering Enabled is displayed.
Keep Windows PowerShell window open for the next activity.
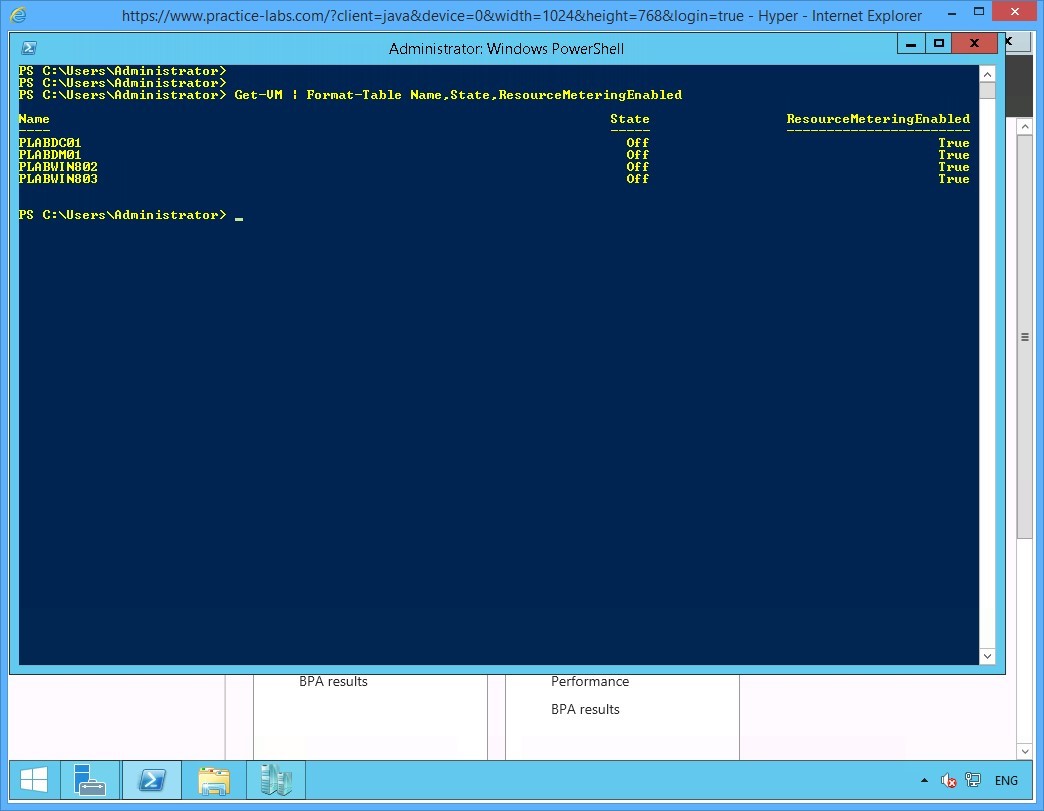 Figure 1.16 Screenshot of the device PLABHYPERV: The Administrator: Windows PowerShell window is displayed listing system response to the command typed-in in the previous step
Keep the devices you have powered on in their current state and proceed to the next task.
Task 4 - Explore Resource Metering Options
After you have enabled resource metering for the virtual machines, you will use a number of commands to explore Hyper-V resource monitoring feature.
To explore the feature of Hyper-V resource metering, perform the following steps:
Step 1
On PLABHYPERV device, Windows PowerShell is open.
By default, Hyper-V resource metering feature collects metrics every hour. In this lab initially, you are testing resource metering. To change resource metering interval to occur every minute, type:
Set-VMHost -ResourceMeteringSaveInterval 00:01:00
Press Enter.
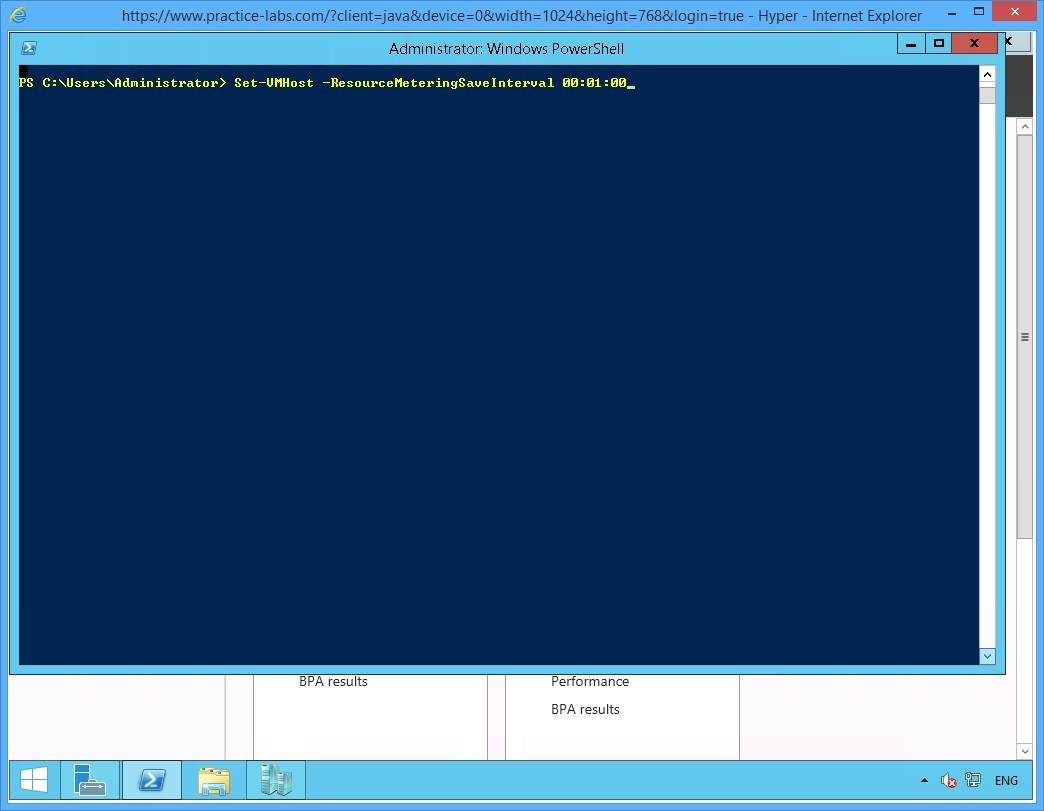 Figure 1.17 Screenshot of the device PLABHYPERV: The Administrator: Windows PowerShell window is displayed with the required command typed-in.
Step 2
To get the statistics about the virtual machines on PLABHYPERV, type:
Get-VM | Measure-VM
Press Enter.
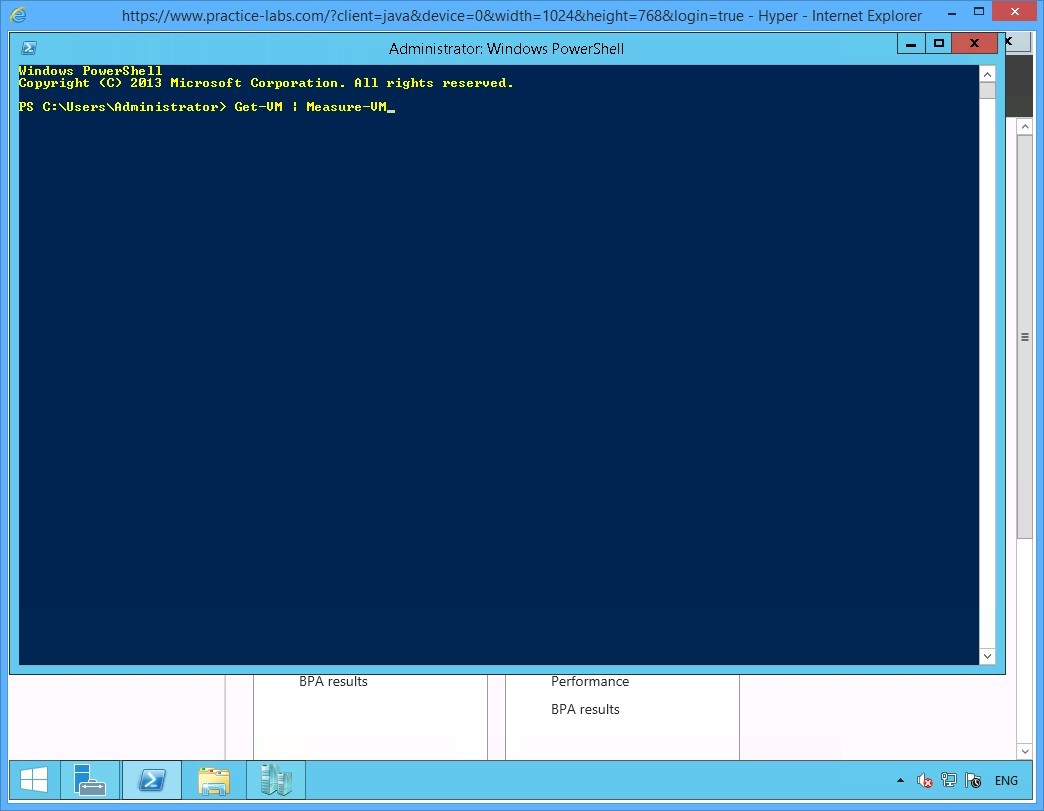 Figure 1.18 Screenshot of the device PLABHYPERV: The Administrator: Windows PowerShell window is displayed with the required command typed-in.
Step 3
Since PLABDC01 and PLABWIN802 are powered on, the devices will log statistics about their respective system usage.
The displayed system usage metrics are dynamically updated based on the system activity on the guest virtual machines.
Hyper-V resource metering records the following information:
AvgCPU (Mhz) / Average CPU Usage - indicates the current CPU utilization of the virtual machine.
AvgRAM (M) / Average Memory in Mbytes - indicate the current memory utilization of the virtual machine.
MaxRAM (M) /Maximum Memory in Mbytes - is the maximum memory that can be used by the virtual machine.
MinRAM (M) / Minimum Memory in Mbytes - is the minimum memory that can be used by the virtual machine. Notice that PLABWIN802 has different values for AvgRAM (M) and MinRAM (M) because this virtual machine was enabled for Dynamic Memory.
TotalDisk (M) - is the maximum disk allocation in MB for the virtual disks of each virtual machine.
NetworkInbound (M) and NetworkOutbound (M) - is network traffic measured in MB. This network traffic is generated when the virtual machines communicate either among themselves or with the Hyper-V host or to an external network.
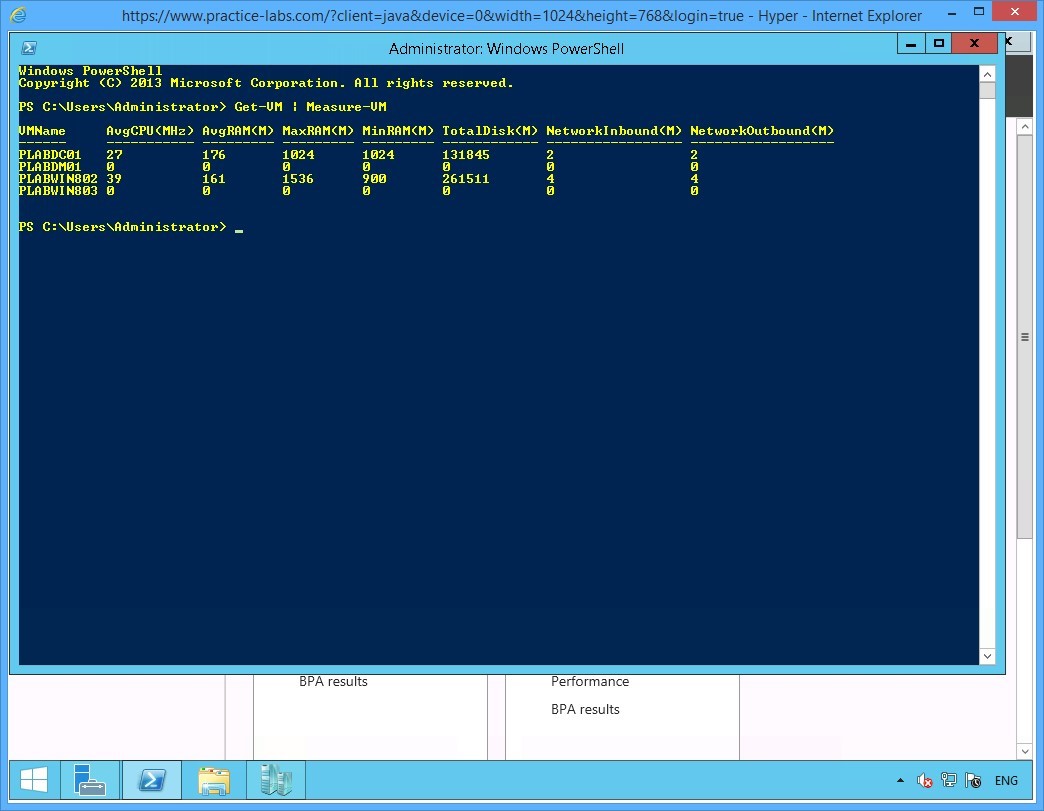 Figure 1.19 Screenshot of the device PLABHYPERV: The Administrator: Windows PowerShell window is displayed listing system response to the command typed-in in the previous step.
Step 4
To collect information about PLABWIN802’s average CPU and average RAM, type:
Get-VM -Name PLABWIN802 | Measure-VM | Select-Object VMName,AVGCpu, AVGRam
Press Enter.
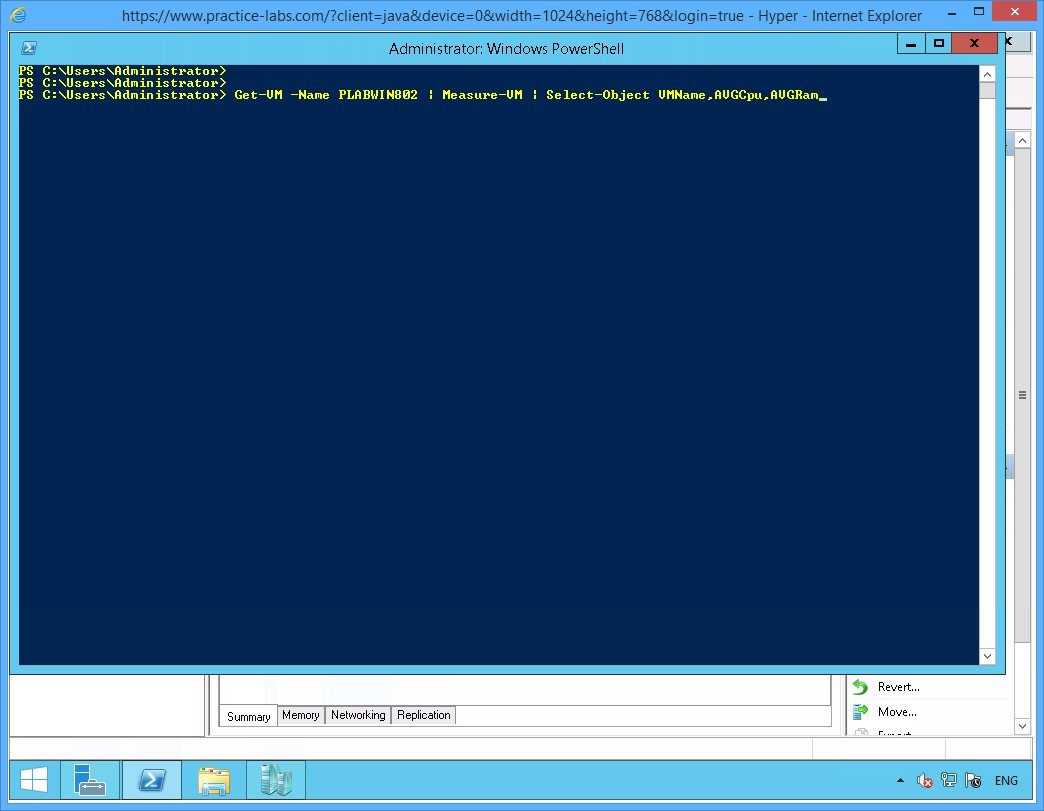 Figure 1.20 Screenshot of the device PLABHYPERV: The Administrator: Windows PowerShell window is displayed with the required command typed-in.
Step 5
The current average CPU and average memory usage for the PLABWIN802 device are shown.
 Figure 1.21 Screenshot of the device PLABHYPERV: The Administrator: Windows PowerShell window is displayed, the output shows VM name is PLABWIN802. Avg CPU is 107 and Avg RAM is 908.
Step 6
To collect an extensive list of virtual machine metrics, type:
Get-VM -Name PLABDC01 | Measure-VM | Select-Object *
Press Enter.
 Figure 1.22 Screenshot of the device PLABHYPERV: The Administrator: Windows PowerShell window is displayed with the required command typed-in.
Step 7
An extended list of virtual machine metrics is now displayed.
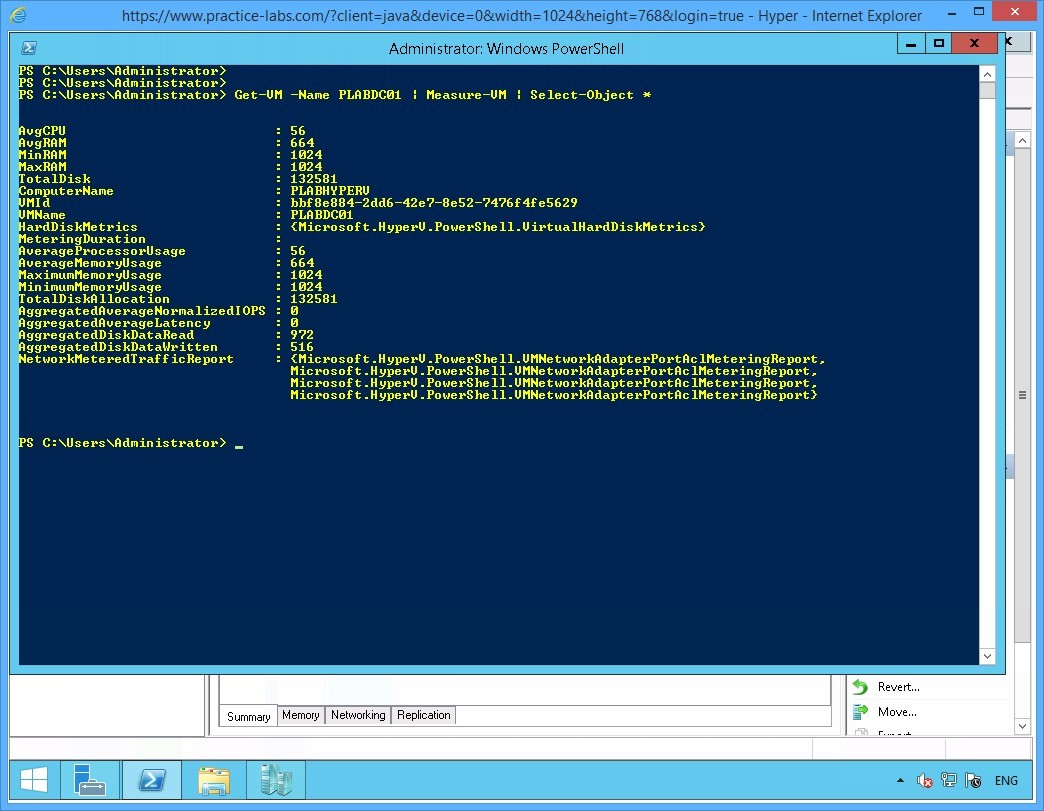 Figure 1.23 Screenshot of the device PLABHYPERV: The Administrator: Windows PowerShell window is displayed listing system response to the command typed-in in the previous step.
Step 8
Once resource metering is enabled on Hyper-V, it will continuously collect data unless you reset it.
To reset the resource metering for all virtual machines, type:
Get-VM * | Reset-VMResourceMetering
Press Enter.
 Figure 1.24 Screenshot of the device PLABHYPERV: The Administrator: Windows PowerShell window is displayed with the required command typed-in.
Step 9
Like before, you will not get a confirmation when you run some Windows PowerShell commands.
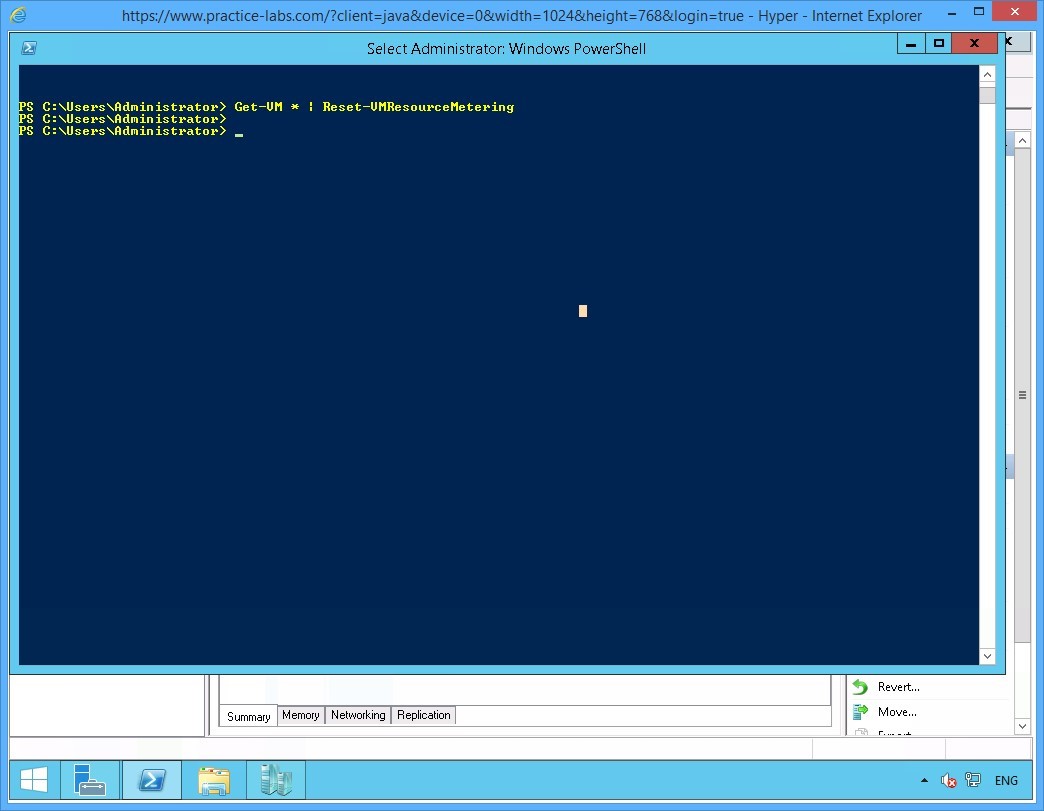 Figure 1.25 Screenshot of the device PLABHYPERV: The Administrator: Windows PowerShell window is displayed listing system response to the command typed-in in the previous step.
Step 10
Collecting metrics on virtual machines use system resources. When you have finished resource metering you must disable the feature.
To turn off resource metering, type:
Get-VM | Disable-VMResourceMetering
Press Enter.
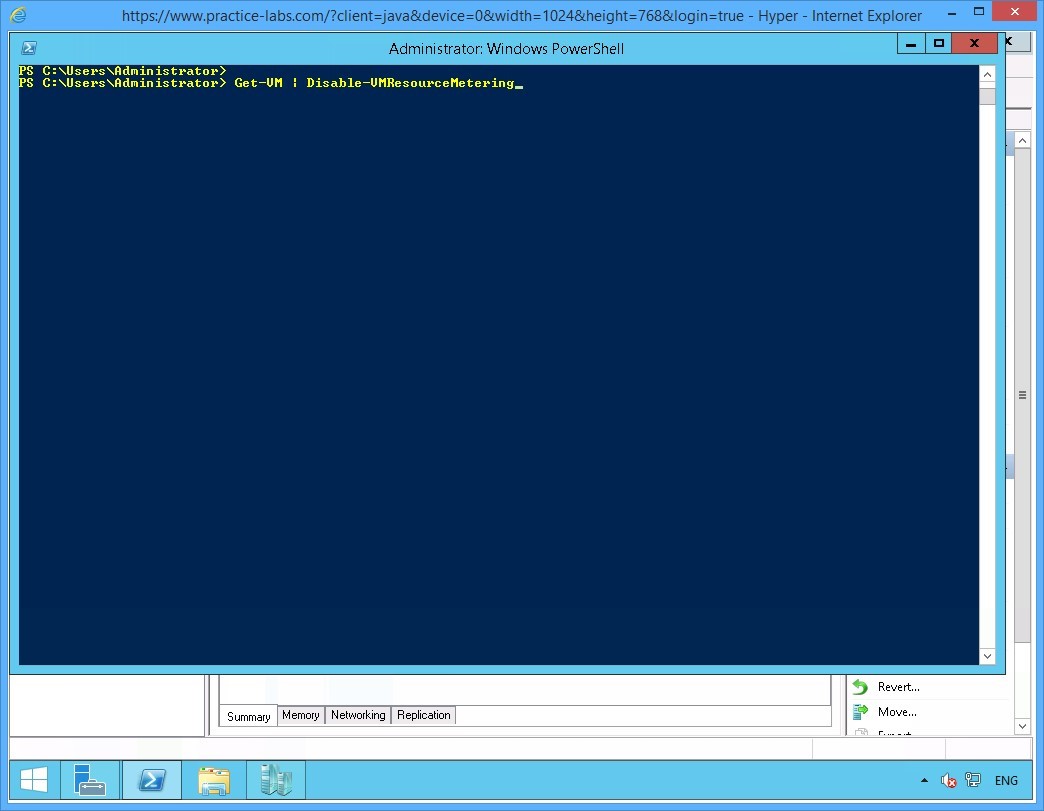 Figure 1.26 Screenshot of the device PLABHYPERV: The Administrator: Windows PowerShell window is displayed with the required command typed-in.
Step 11
Notice that you did not get a confirmation after turning off resource metering.
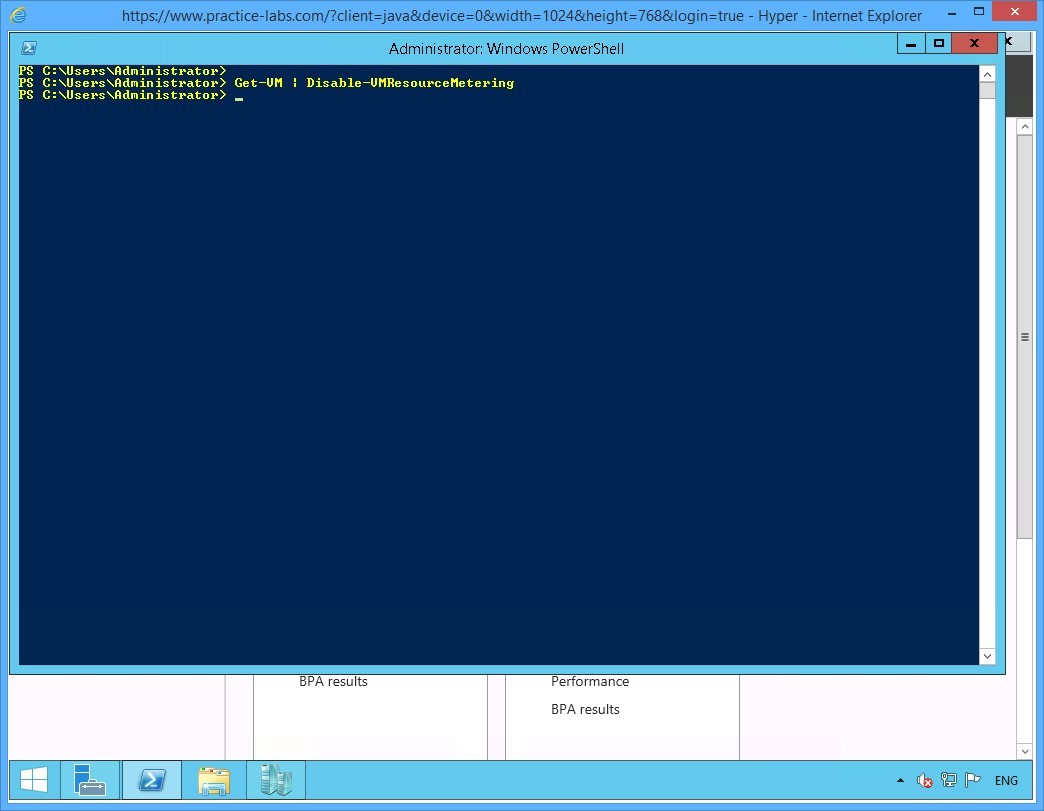 Figure 1.27 Screenshot of the device PLABHYPERV: The Administrator: Windows PowerShell window is displayed listing system response to the command typed-in in the previous step.
Step 12
On the next prompt, to verify if resource metering has been disabled, type:
Get-VM | Format-Table Name,State,ResourceMeteringEnabled
Press Enter.
 Figure 1.28 Screenshot of the device PLABHYPERV: The Administrator: Windows PowerShell window is displayed with the required command typed-in.
Step 13
Notice that resource metering has been turned off for all devices.
Close Windows PowerShell window.
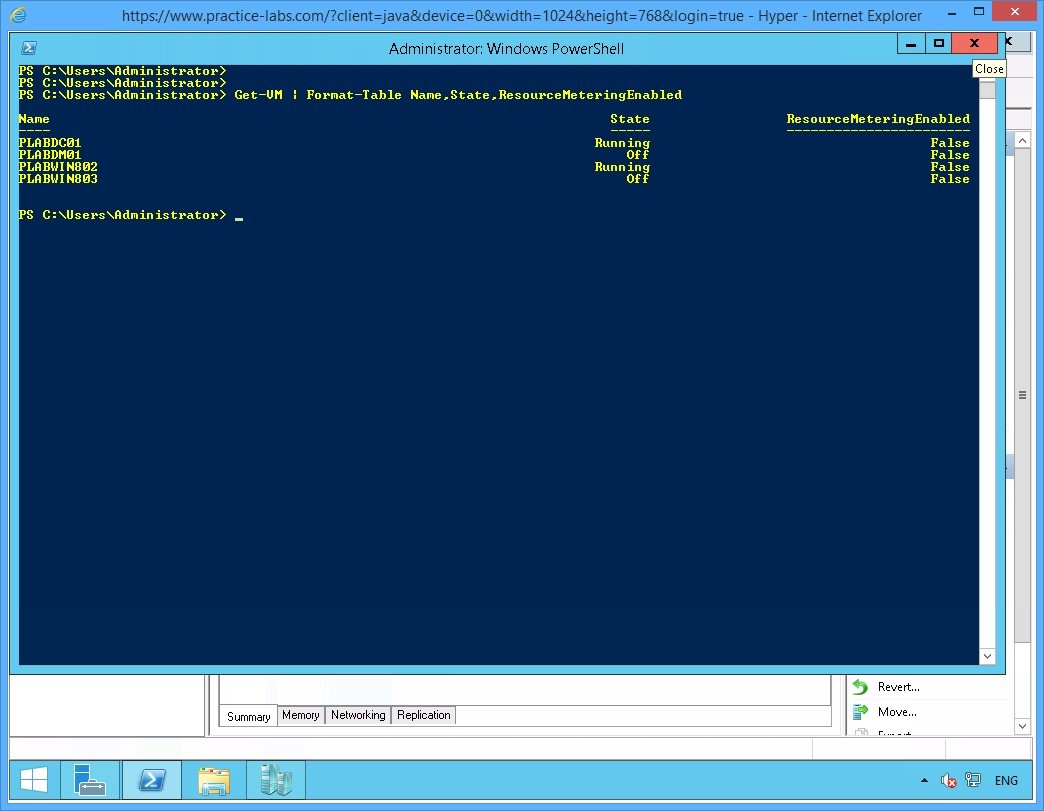 Figure 1.29 Screenshot of the device PLABHYPERV: The Administrator: Windows PowerShell window is displayed listing system response to the command typed-in in the previous step.
Leave the devices you have powered on in their current state and proceed to the next exercise.
Exercise 2 - Configure Guest Integration Services
Hyper-V Integration Services is a set of software installed on a guest virtual machine that streamlines integration between a Hyper-V host and a virtual machine. Features provided by this suite are a seamless movement of pointing devices and use of Hyper-V Action menu (for example, shutdown and time synchronization between guest virtual machines and Hyper-V host). Integration services are pre-installed with newer Windows operating systems.
Please refer to your course material or use your favorite search engine to research for more information about this topic.
Task 1 - Install the Guest Integration Tools
To configure guest integration services, perform the following steps:
Step 1
On PLABHYPERV server, restore Hyper-V Manager console.
 Figure 2.1 Screenshot of device PLABHYPERV. A minimized Hyper-V Manager application window is shown in the taskbar.
Step 2
Recall that you have turned on PLABWIN802 in the last exercise.
Right-click PLABWIN802 device and click Connect.
 Figure 2.2 Screenshot of the device PLABHYPERV: The context menu (that appears on right-clicking the name of a virtual machine) > Connect menu-options are displayed on the Hyper-V Manager console.
Step 3
Note that a new window named PLABWIN802 on PLABHYPERV - Virtual Machine Connection opens.
Click Ctrl+Alt+Delete when the desktop wallpaper is displayed.
Note: Similarly, you can click the desktop wallpaper to sign on.
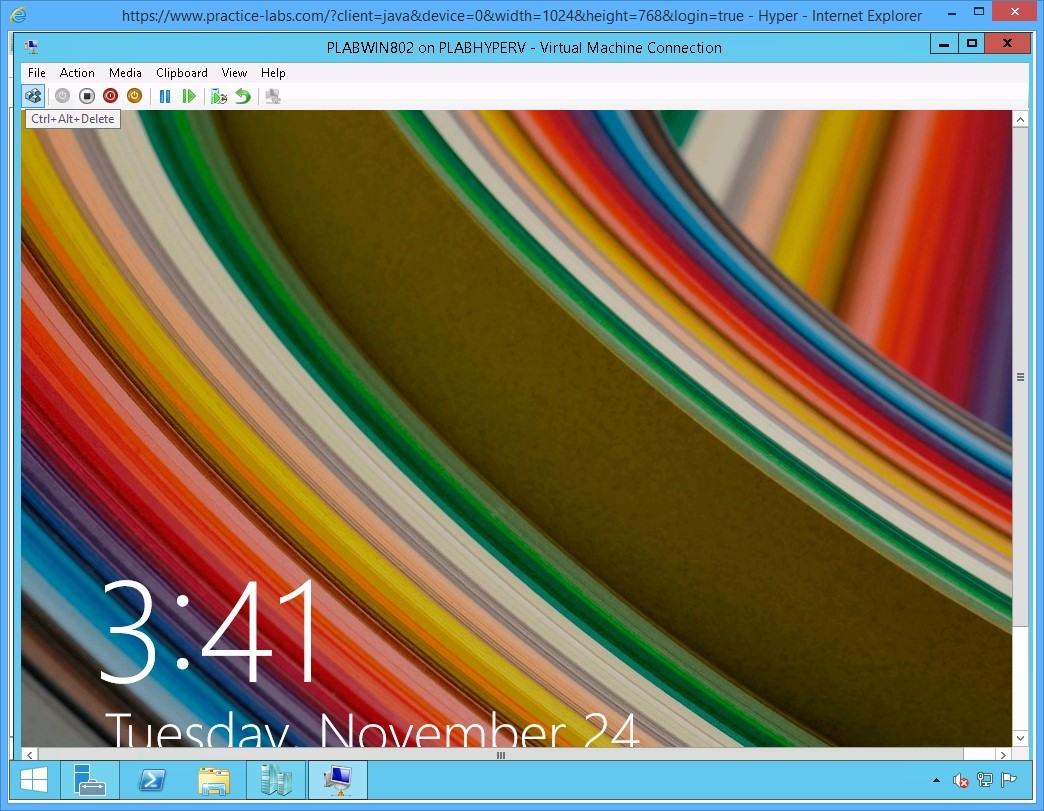 Figure 2.3 Screenshot of the device PLABHYPERV: The PLABWIN802 on PLABHYPERV - Virtual Machine Connection window is displayed with the Ctrl+Alt+Delete icon on the icon bar at the top highlighted.
Step 4
The default user account is PRACTICELABS\Administrator.
On the password box, type:
Passw0rd
Press Enter.
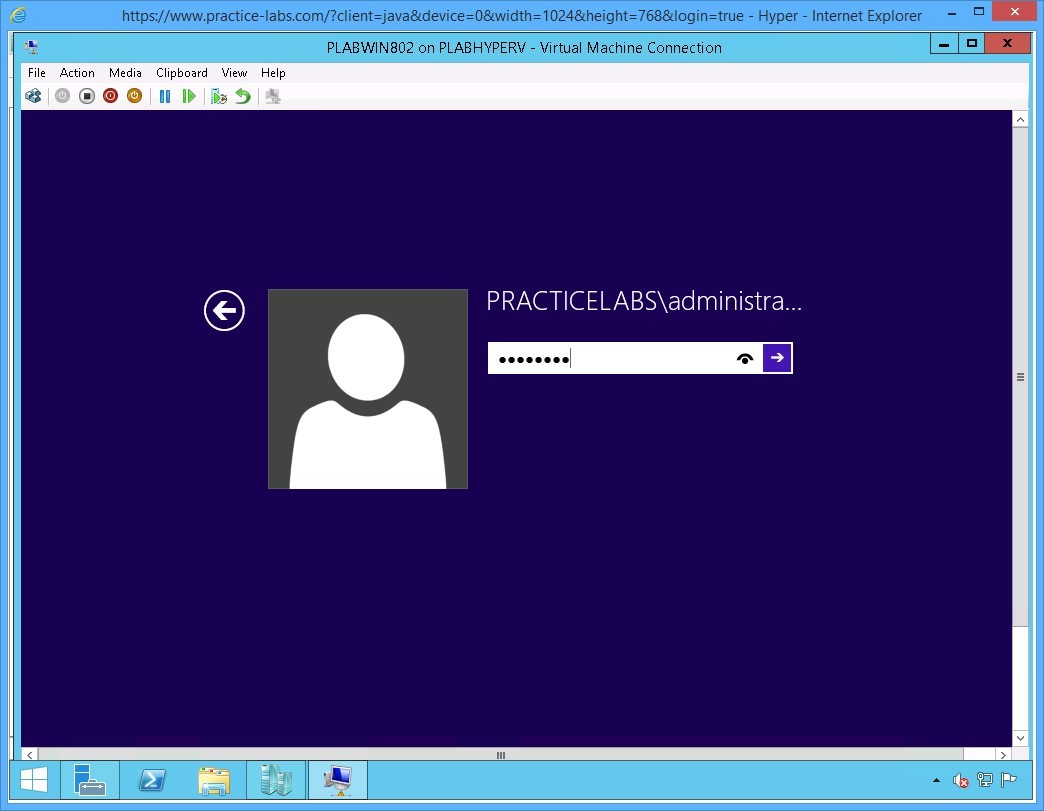 Figure 2.4 Screenshot of the device PLABHYPERV: The PRACTICELABS\administrator login page with the required login credentials typed-in is displayed on the PLABWIN802 on PLABHYPERV - Virtual Machine Connection window.
Step 5
When signed on to PLABWIN802, the Windows Update needs your help ribbon may appear, if it does, click Close.
You will not be updating Windows at this time.
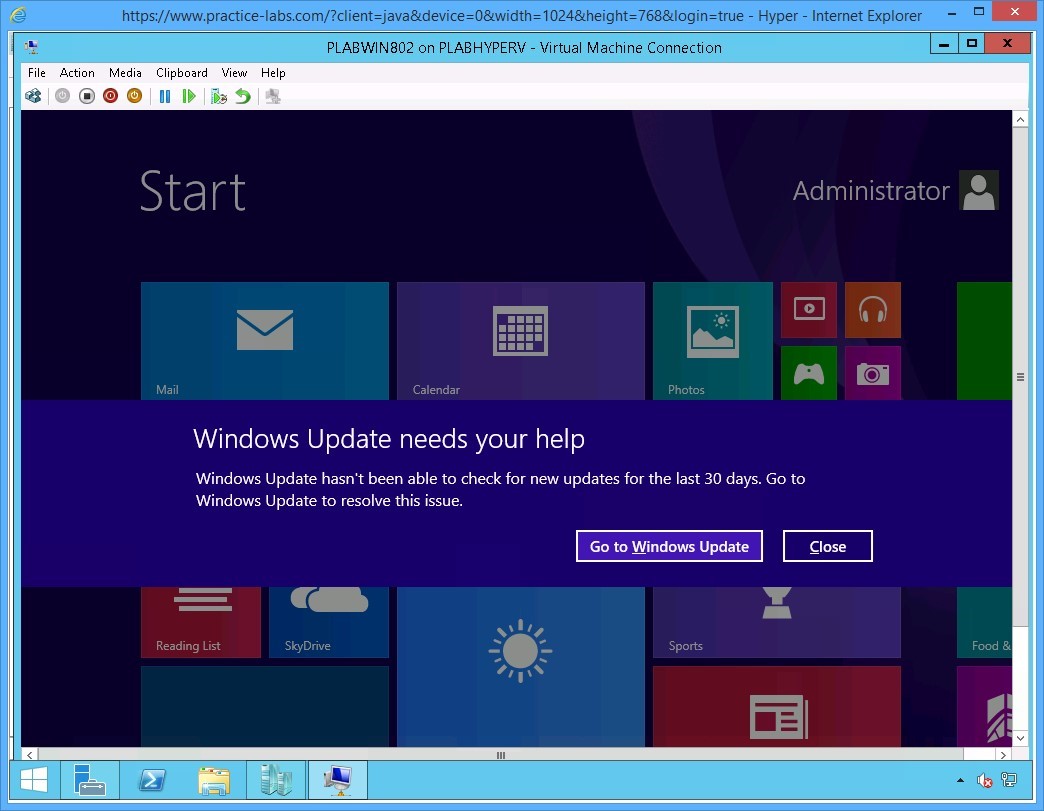 Figure 2.5 Screenshot of the device PLABHYPERV: The PLABWIN802 desktop with the Windows Update needs your help ribbon is displayed on the PLABWIN802 on PLABHYPERV - Virtual Machine Connection window.
Step 6
Access the top menu bar and click Action and select Insert Integration Services Setup Disk.
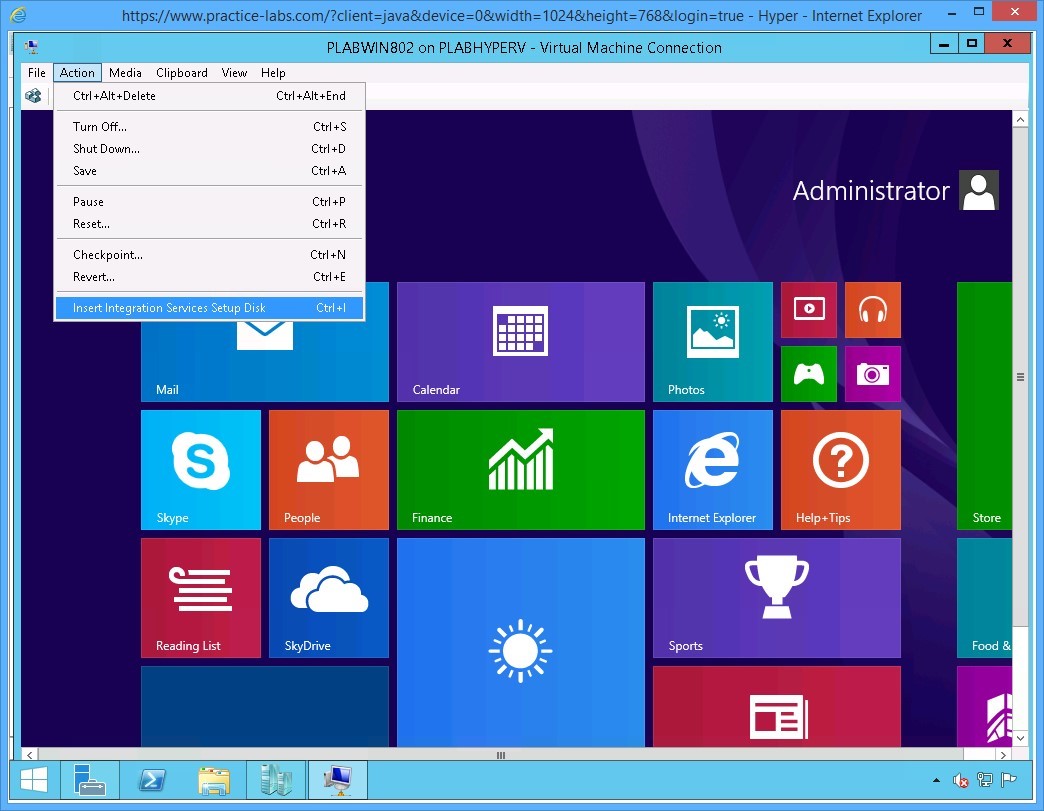 Figure 2.6 Screenshot of the device PLABHYPERV: The PLABWIN802 desktop on the PLABWIN802 on PLABHYPERV-Virtual Machine Connection window is displayed with the Action > Insert Integration Services Setup Disk menu-options selected.
Step 7
Click DVD Drive D Integration Services Setup fly-out menu.
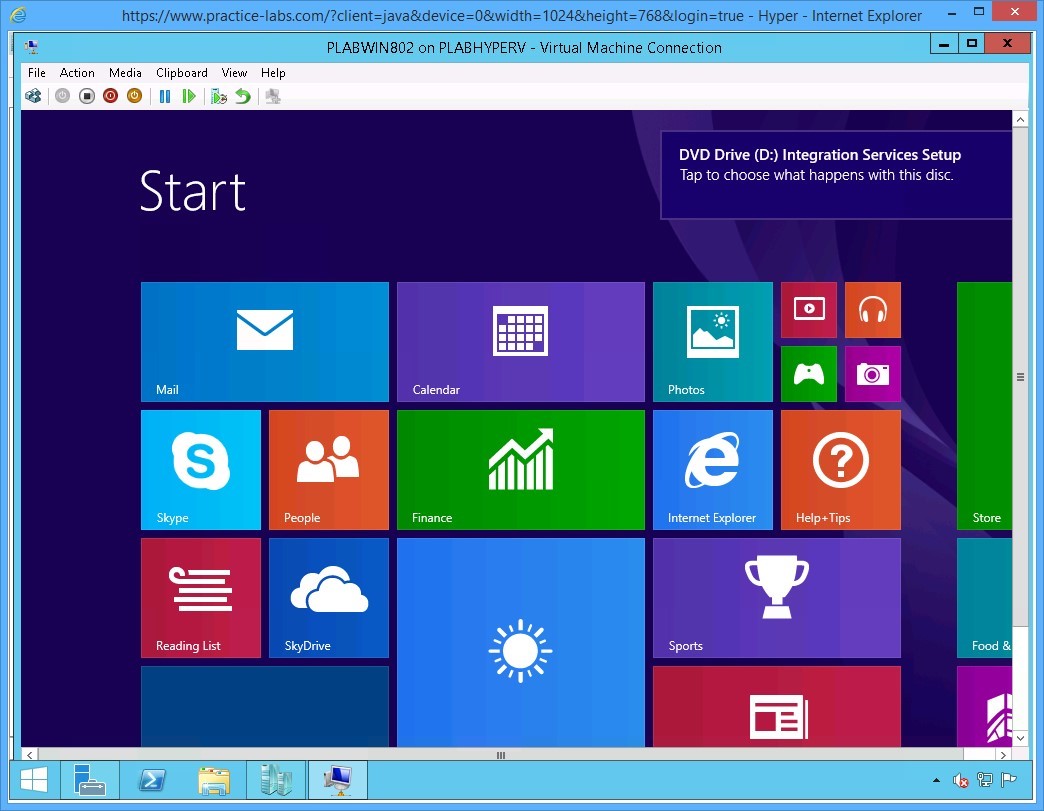 Figure 2.7 Screenshot of the device PLABHYPERV: The PLABWIN802 desktop on the PLABWIN802 on PLABHYPERV-Virtual Machine Connection window is displayed showing the DVD Drive D Integration Services Setup fly-out menu.
Step 8
On the DVD Drive D, Integration Services fly out menu, click Install Hyper-V Integration Services.
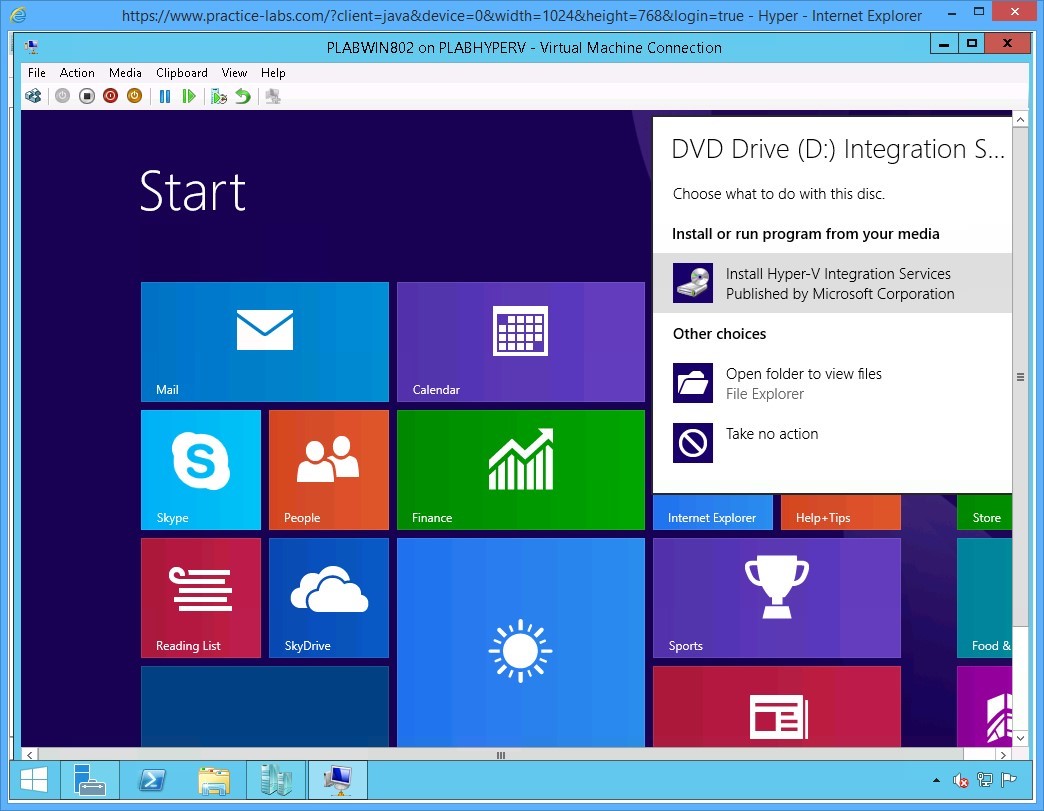 Figure 2.8 Screenshot of the device PLABHYPERV: The PLABWIN802 desktop on the PLABWIN802 on PLABHYPERV-Virtual Machine Connection window is displayed with the DVD Drive D Integration Services Setup > Install Hyper-V Integration Services menu-options selected.
Step 9
An error appears about Hyper-V integration services can only be installed inside of a virtual machine running Hyper-V.
Click OK.
At the moment, you will not be able to use the Hyper-V top menu Action commands like Shutdown.
Important: You will not be able to install Hyper-V integration services on the guest virtual machines. There is a bug when it comes to using Hyper-V Integration services running on vSphere 6 VMware using an Intel processor. VMware has published an update for an AMD processor to fix this error. Please see https://communities.vmware.com/thread/520832 for additional information.
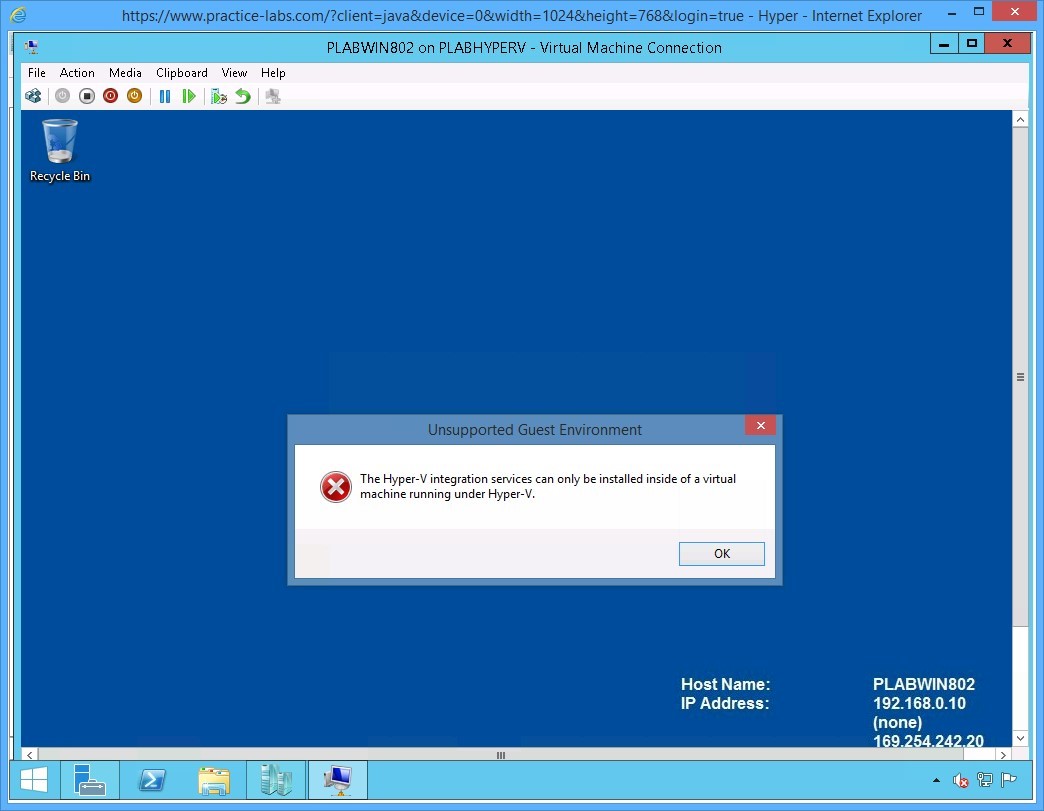 Figure 2.9 Screenshot of the device PLABHYPERV: The PLABWIN802 desktop on the PLABWIN802 on PLABHYPERV- Virtual Machine Connection window is displayed showing the error message about Hyper-V Integration Services.
Step 10
Click File and choose Settings…
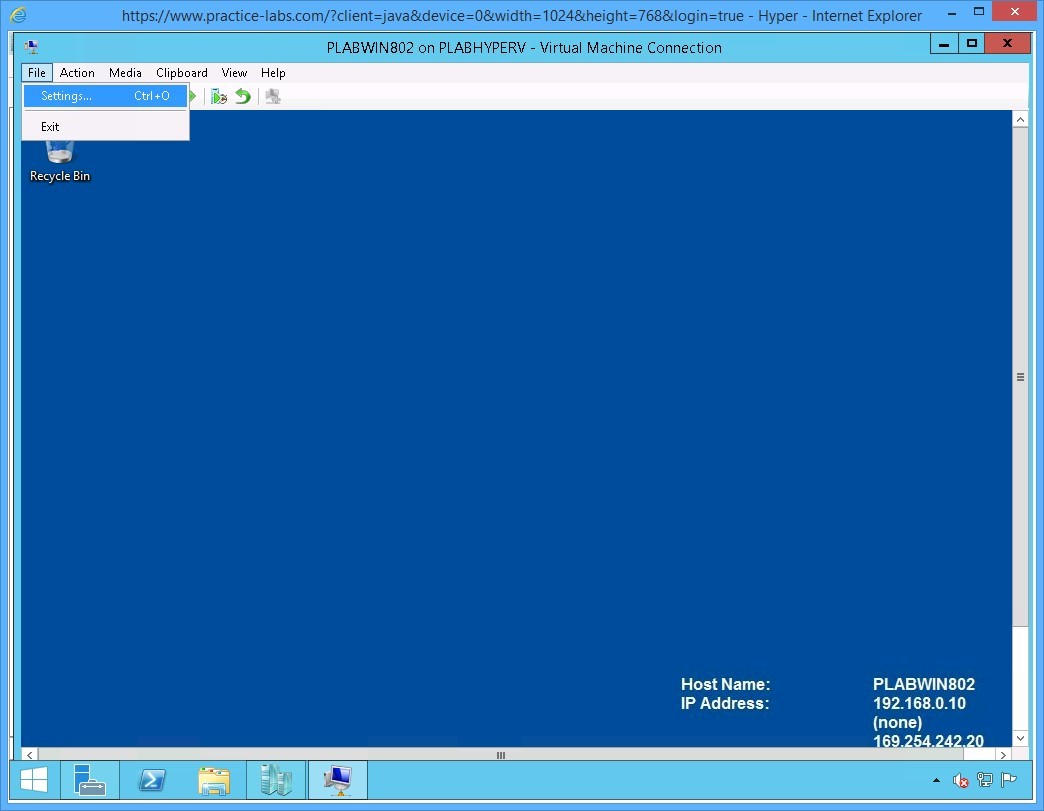 Figure 2.10 Screenshot of the device PLABHYPERV: The PLABWIN802 desktop on the PLABWIN802 on PLABHYPERV-Virtual Machine Connection window is displayed with the File > Settings menu-options selected.
Step 11
On the Settings for PLABWIN802 on PLABHYPERV dialog box, scroll down the left pane and go to Management section.
Select Integration Services.
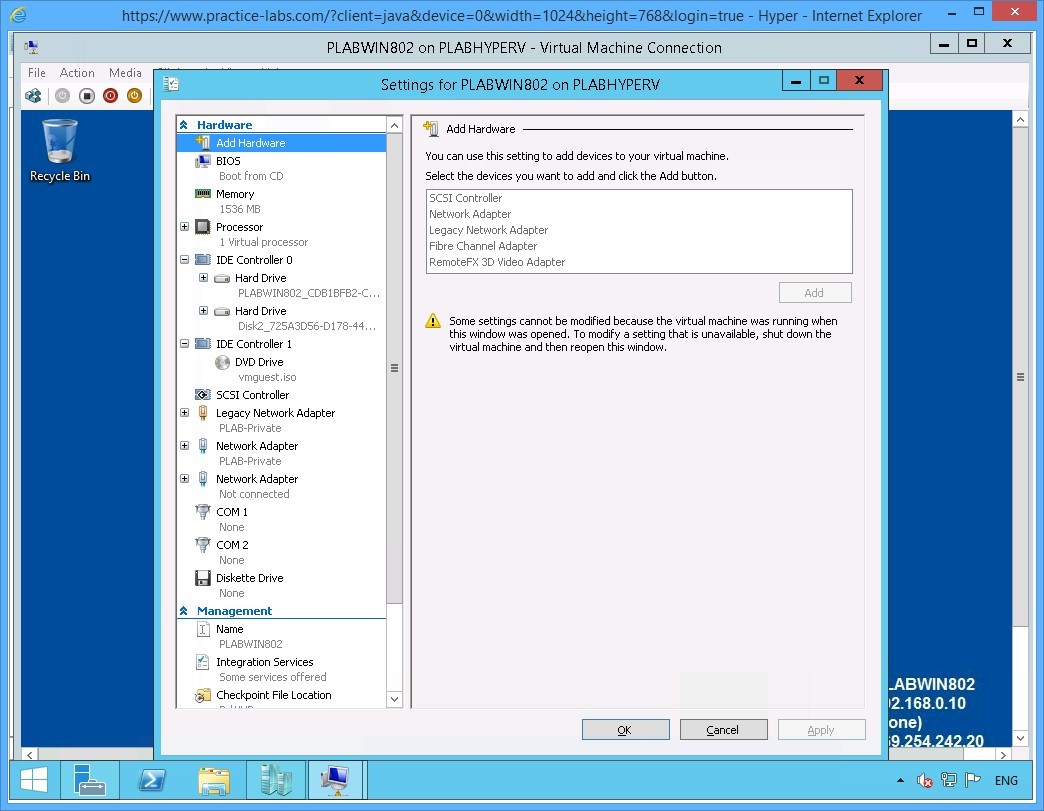 Figure 2.11 Screenshot of the device PLABHYPERV: The Settings for PLABWIN802 on PLABHYPERV dialog box is displayed with the Management > Integration Services options available on the navigation pane at the left.
Step 12
On the Integration Services details pane and click Guest services check box.
Click OK to save changes.
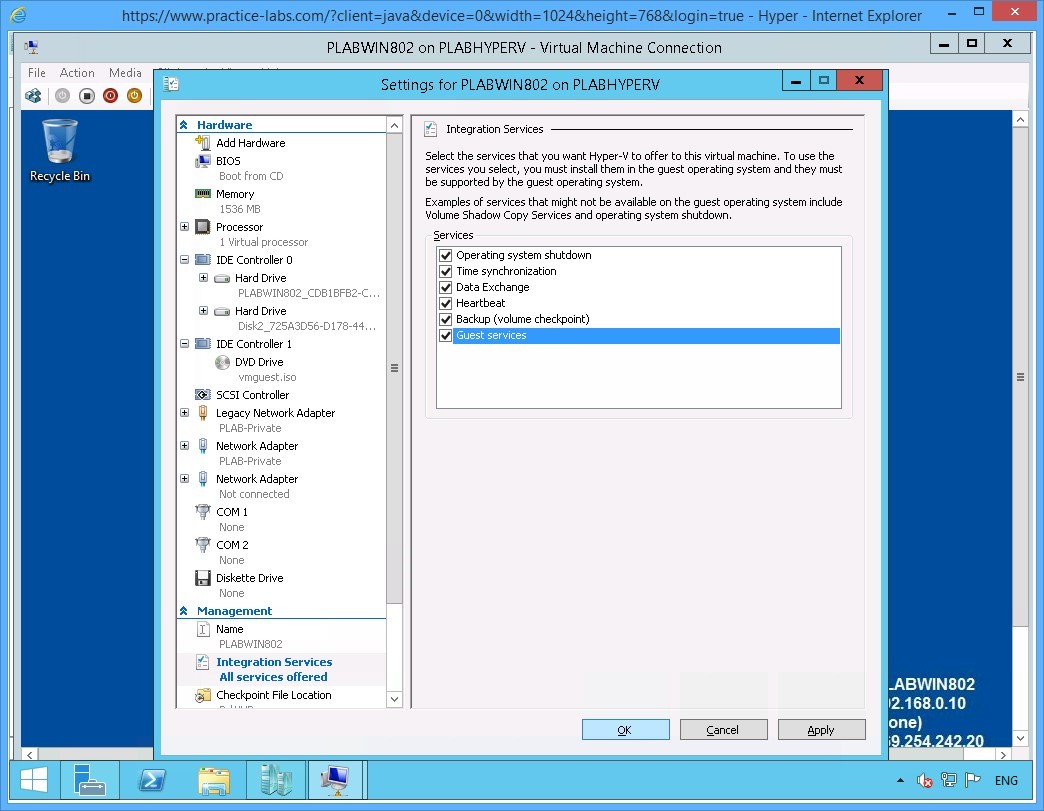 Figure 2.12 Screenshot of the device PLABHYPERV: The Settings for PLABWIN802 on PLABHYPERV dialog box is displayed with the required settings performed on the Integration Services pane at the right and the OK button highlighted.
Step 13
You will be redirected back to PLABWIN802 on PLABHYPERV - Virtual Machine Connection window.
Click View menu and select Full Screen Mode.
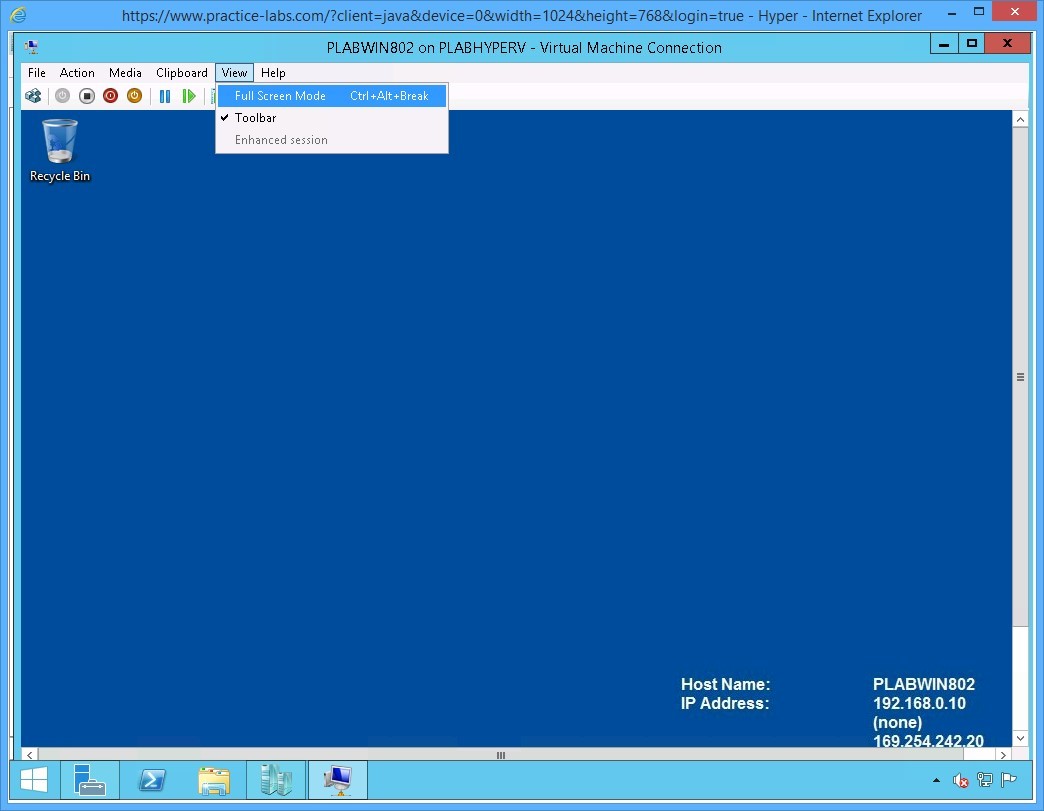 Figure 2.13 Screenshot of the device PLABHYPERV: The PLABWIN802 desktop on the PLABWIN802 on PLABHYPERV-Virtual Machine Connection window is displayed with the View > Full Screen Mode menu-options selected.
Step 14
Notice the PLABWIN802 on localhost connection bar at the top center of the screen.
Right-click Start charm and point to Shut down or sign out and then click Shut down.
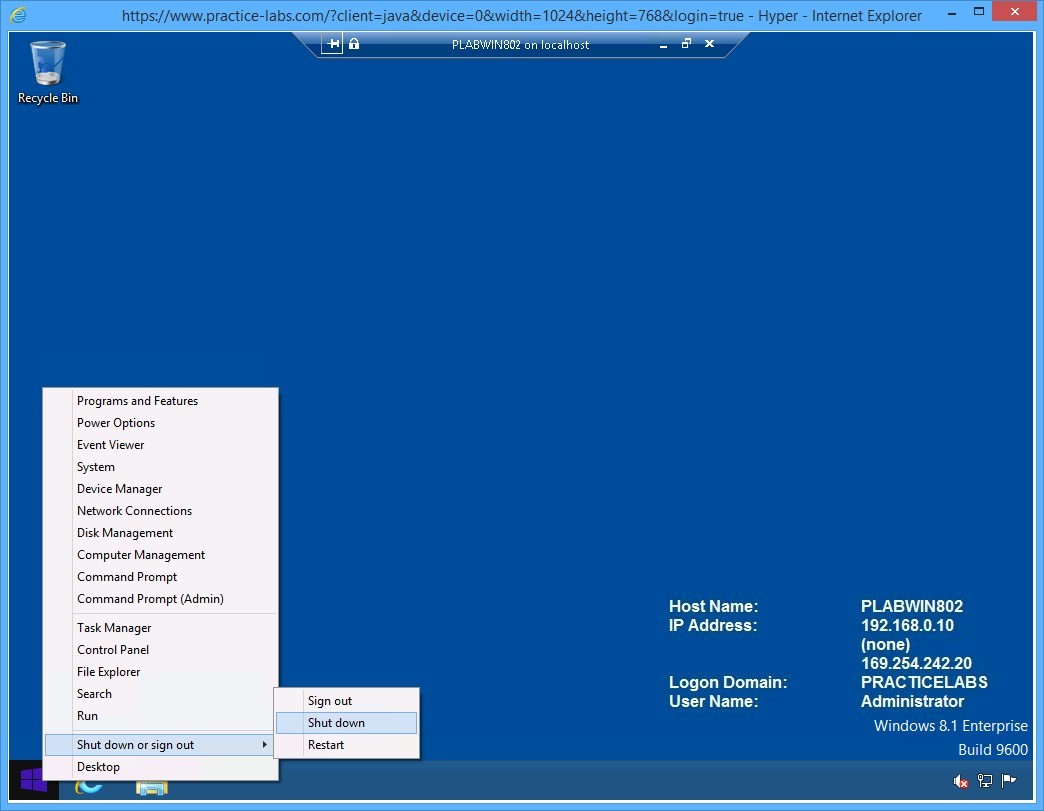 Figure 2.14 Screenshot of the device PLABHYPERV: The PLABWIN802 virtual desktop is displayed with the Start > Shut down or sign out > Shut down menu-options selected.
Step 15
PLABWIN802 shuts down.
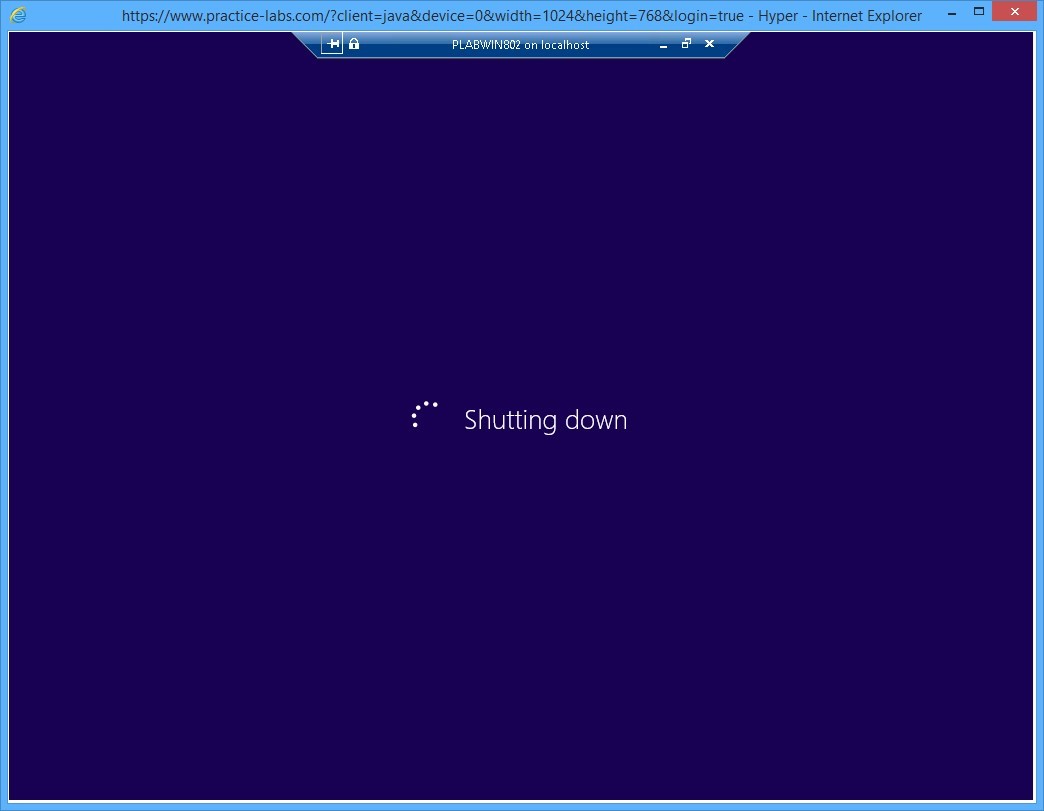 Figure 2.15 Screenshot of the device PLABHYPERV: The PLABWIN802 virtual desktop is displayed showing PLABWIN802 shutting down.
Step 16
When the PLABWIN802 on PLABHYPERV - Virtual Machine Connection window appears, click the Close button.
Important: If the Hyper-V Integration services are successfully installed, you can right-click on the PLABWIN802 device via Hyper-V Manager console and issue the Shutdown command. Similarly, you can issue the Shutdown command from the Action menu of the PLABWIN802 on PLABHYPERV - Virtual Machine Connection window menu bar. At the moment both commands are not supported because of some issues Hyper-V integration services with vSphere 6.0 on the Intel processor
Keep Hyper-V Manager window open for the next exercise.
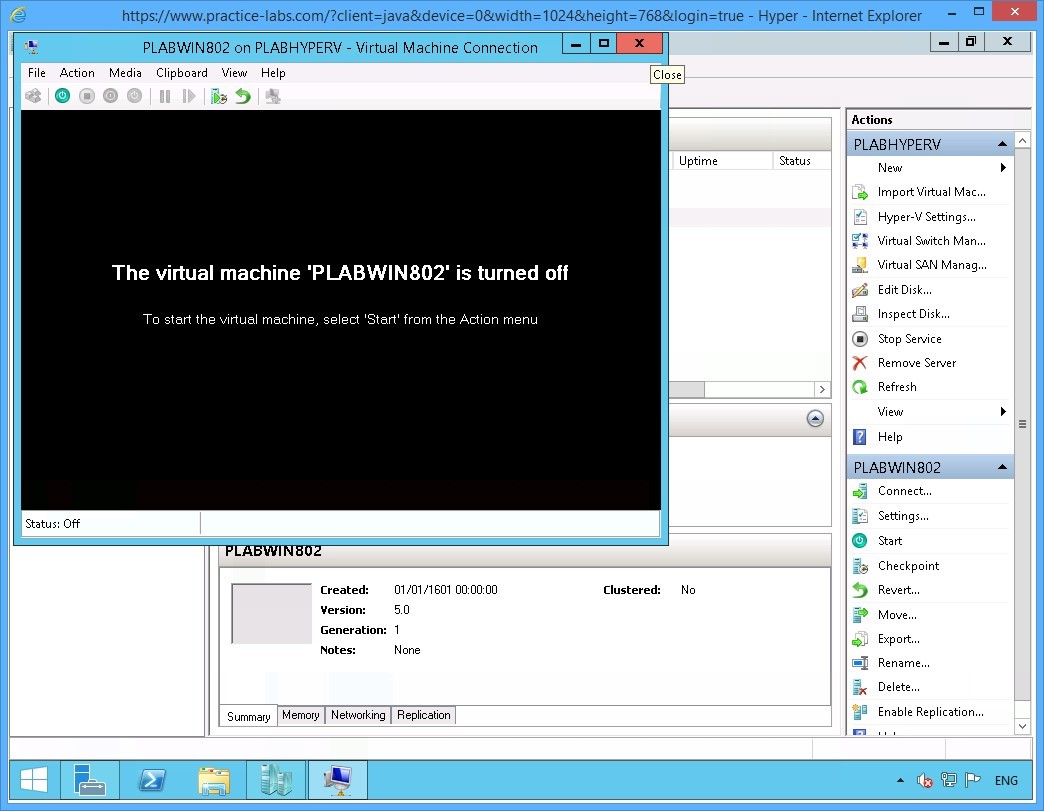 Figure 2.16 Screenshot of the device PLABHYPERV: The PLABWIN802 on PLABHYPERV-Virtual Machine Connection window is displayed showing the message that PLABWIN802 is turned off and the Close button at the top-right corner highlighted.
Keep PLABHYPERV powered on in its current state and proceed to the next exercise.
Exercise 3 - Create Generation 2 Virtual Machine
Generation 2 is the new variant of virtual machines in Windows Server 2012 Hyper-V feature. This new type of virtual machine has support for Unified Extensible Firmware Interface (UEFI) firmware and has reduced support for a majority of legacy devices. Other enhancements included with Generation 2 are PXE boot by using a standard network adapter, boot from a SCSI virtual hard disk, boot from a SCSI virtual DVD, and secure boot.
In this exercise, you will learn how to create Generation 2 virtual machines.
Please refer to your course material or use your favorite search engine to research for more information about this topic.
Task 1 - Create New Virtual Machine
To create a new virtual machine, perform the following steps:
Step 1
On PLABHYPERV host, the Hyper-V Manager console is open.
Right-click PLABHYPERV and select New > Virtual Machine…
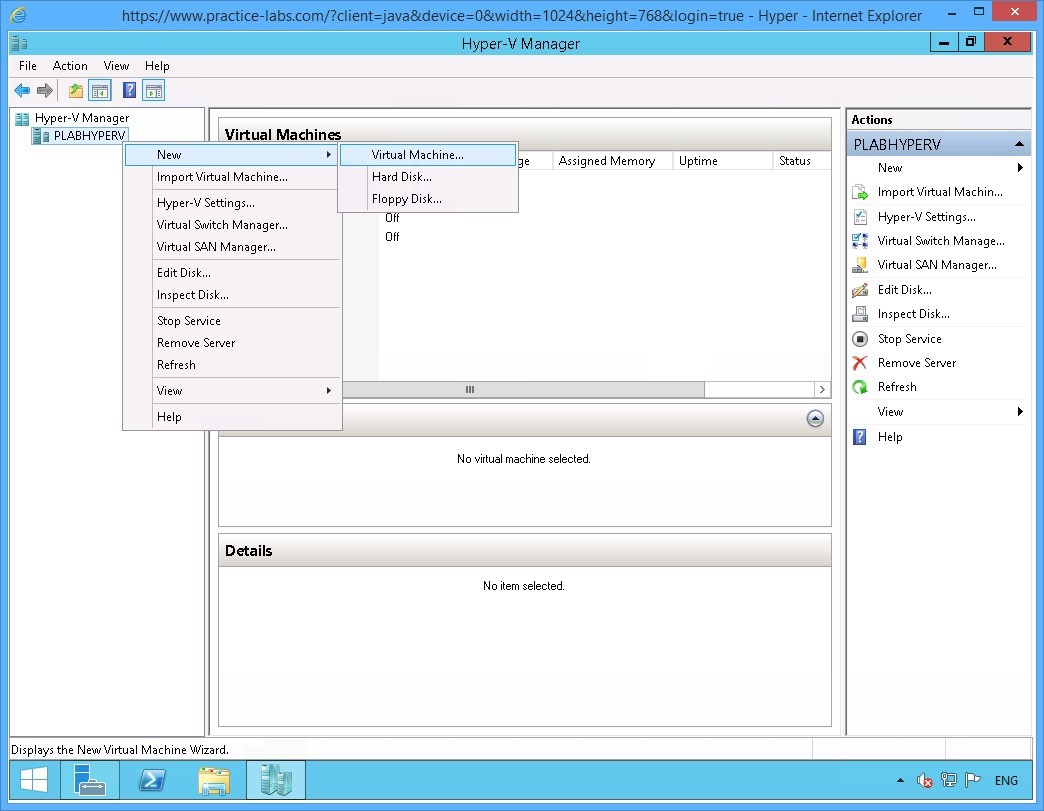 Figure 3.1 Screenshot of the device PLABHYPERV: The context menu (that appears on right-clicking the PLABHYPERV node) > New > Virtual Machine menu-options are displayed on the Hyper-V Manager console.
Step 2
On the Before you begin page, click Next.
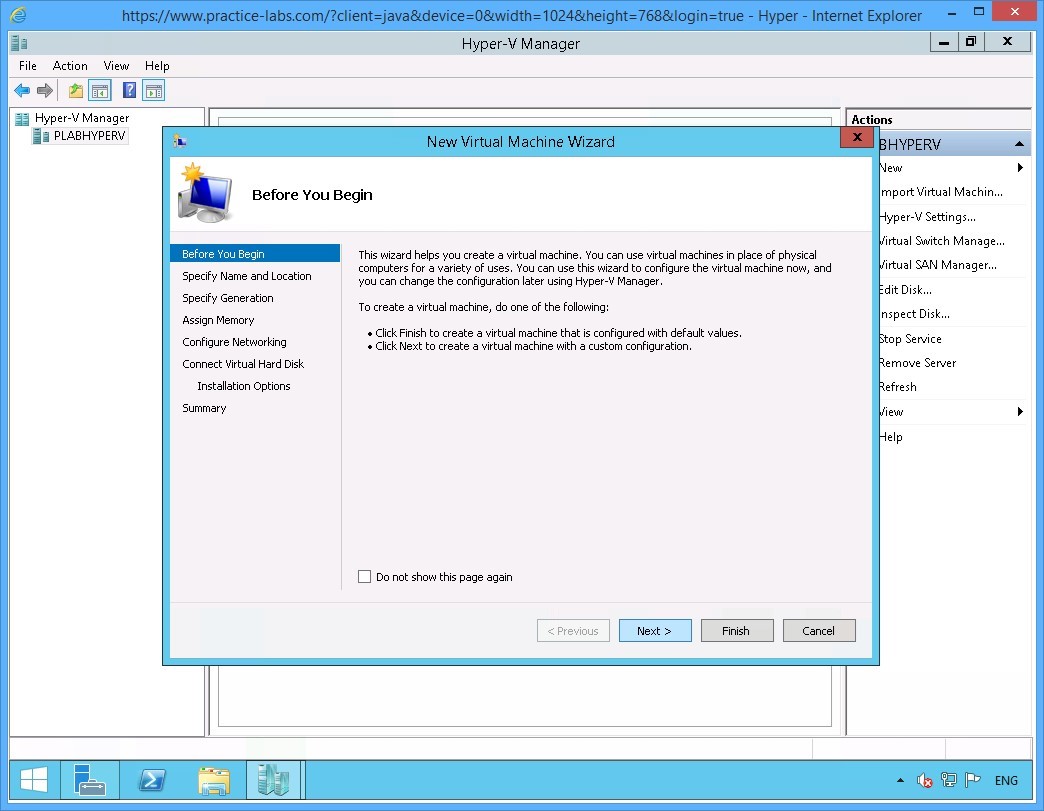 Figure 3.2 Screenshot of the device PLABHYPERV: The Before You Begin page on the New Virtual Machine Wizard is displayed with the Next button highlighted.
Step 3
On the Specify Name and Location page, in the Name textbox, type:
PLABWIN805
Select Store the virtual machine in a different location check box. Keep the Location path unchanged.
Click Next.
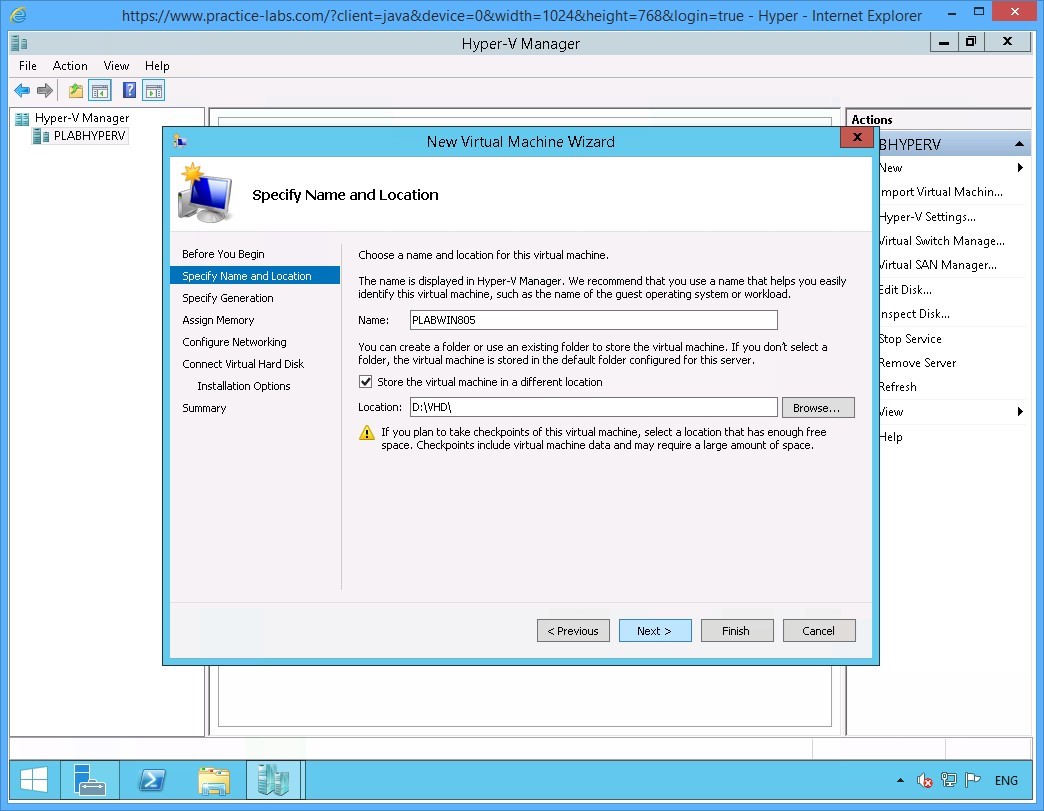 Figure 3.3 Screenshot of the device PLABHYPERV: The Specify Name and Location page on the New Virtual Machine Wizard is displayed with the required settings performed and the Next button highlighted.
Step 4
On the Specify Generation page, select Generation 2 option.
Click Next.
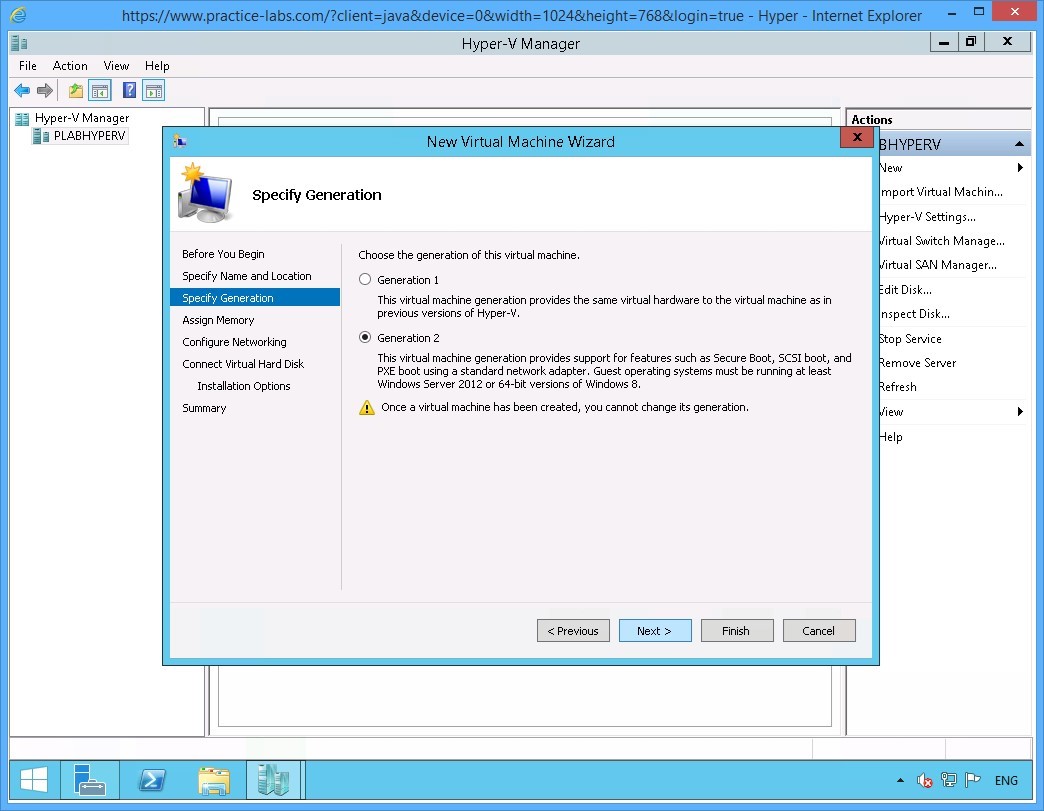 Figure 3.4 Screenshot of the device PLABHYPERV: The Specify Generation page on the New Virtual Machine Wizard is displayed with the required settings performed and the Next button highlighted.
Step 5
On the Assign Memory page, type:
1536
Select Use Dynamic Memory for this virtual machine check box.
Click Next.
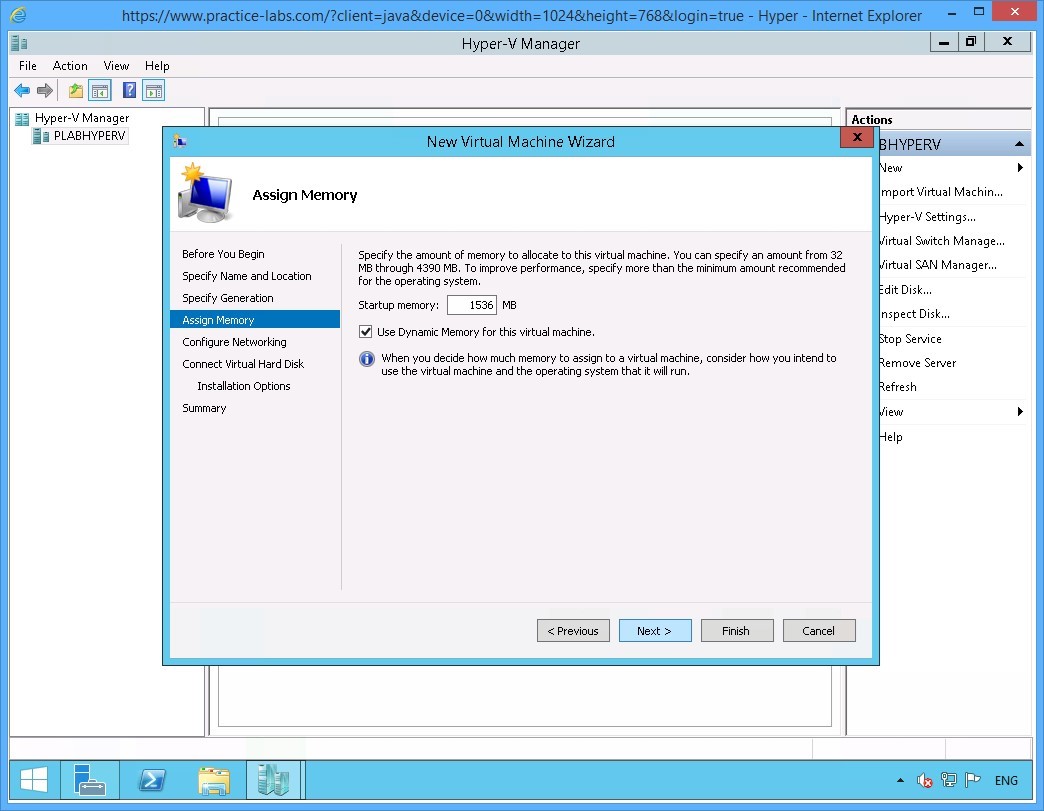 Figure 3.5 Screenshot of the device PLABHYPERV: The Assign Memory page on the New Virtual Machine Wizard is displayed with the required settings performed and the Next button highlighted.
Step 6
On the Configure Networking page, change Connection drop-down list to PLAB-Private.
Click Next.
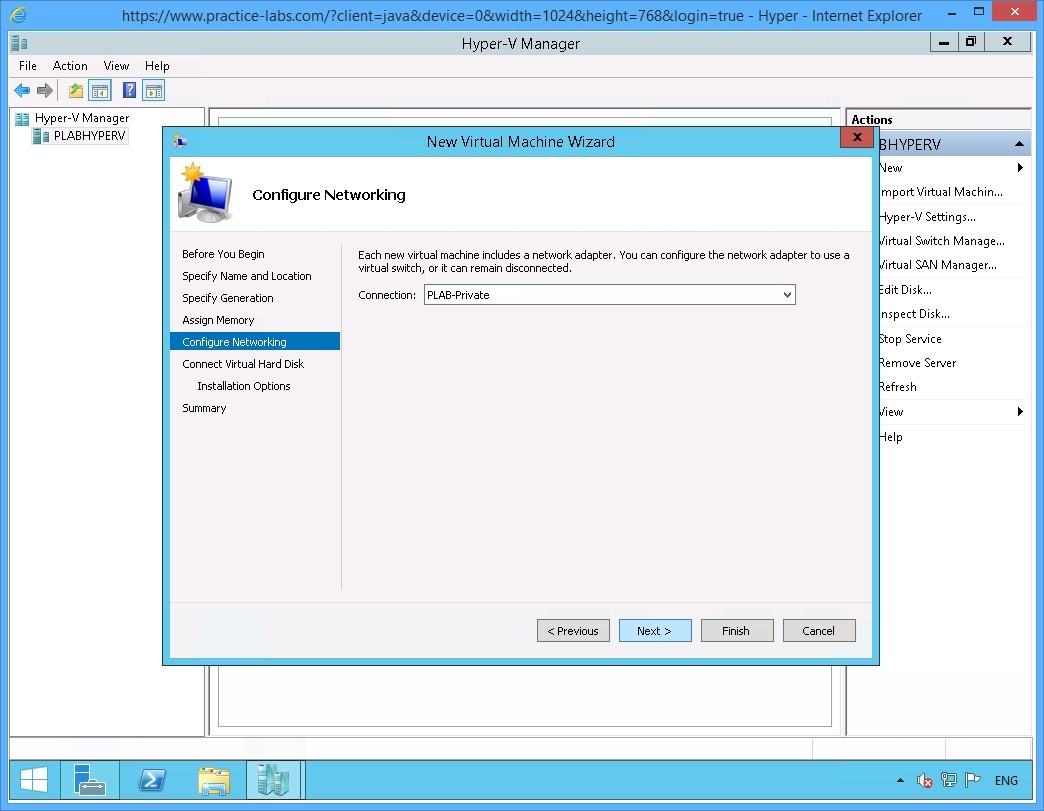 Figure 3.6 Screenshot of the device PLABHYPERV: The Configure Networking page on the New Virtual Machine Wizard is displayed with the required settings performed and the Next button highlighted.
Step 7
On the Connect Virtual Hard Disk page, keep the default settings and click Next.
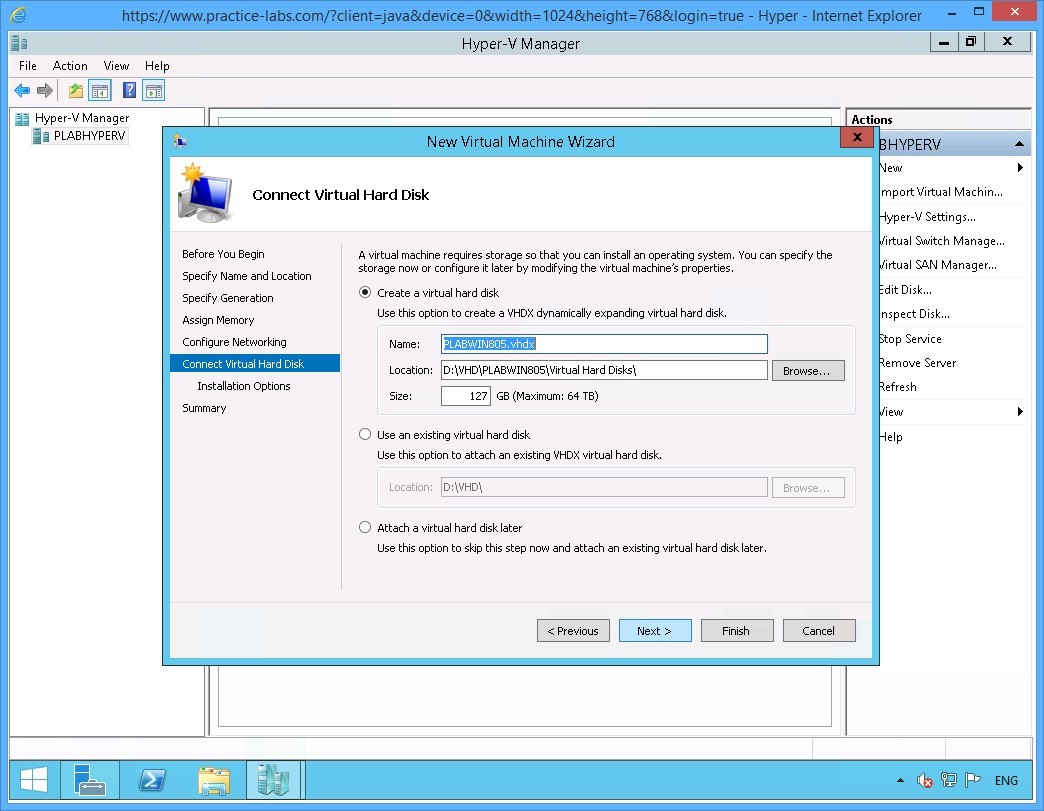 Figure 3.7 Screenshot of the device PLABHYPERV: The Connect Virtual Hard Disk page on the New Virtual Machine Wizard is displayed showing the default settings and the Next button highlighted.
Step 8
On Installation Options, notice that there is no option to mount a physical CD or DVD drive.
Use the default settings and click Next.
 Figure 3.8 Screenshot of the device PLABHYPERV: The Installation Options page on the New Virtual Machine Wizard is displayed showing the default settings and the Next button highlighted.
Step 9
On the Completing the New Virtual Machine Wizard dialog box displays the summary of virtual machine settings.
Click Finish.
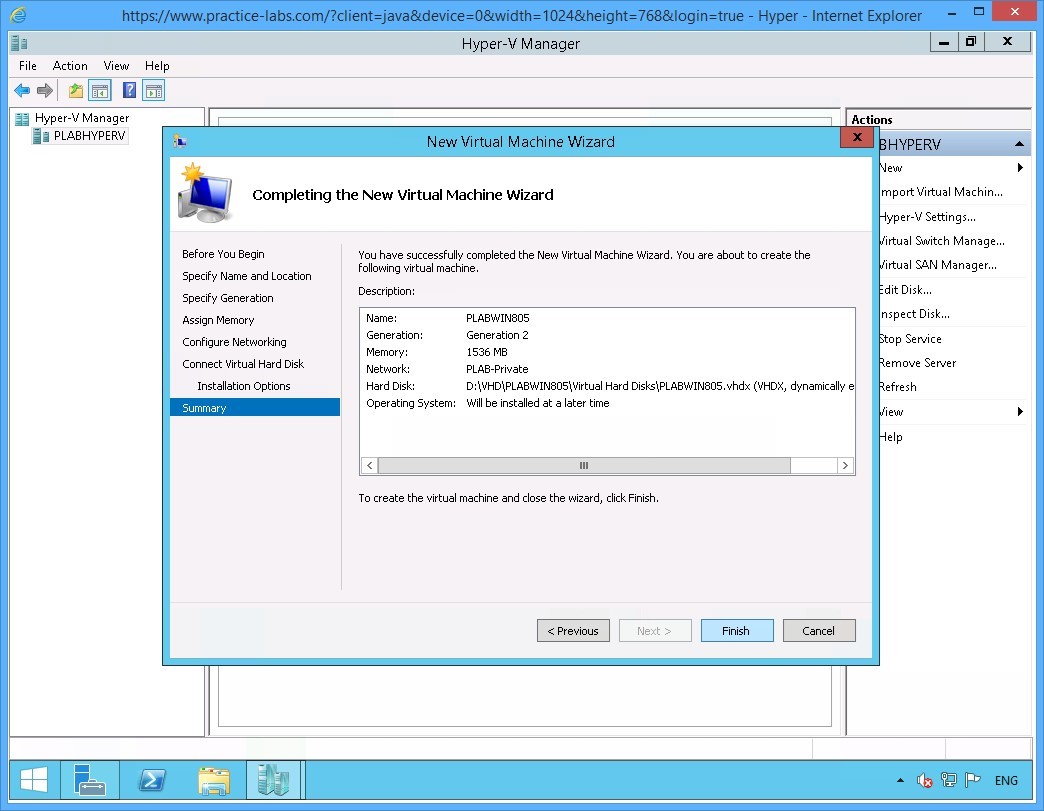 Figure 3.9 Screenshot of the device PLABHYPERV: The completion page on the New Virtual Machine Wizard is displayed listing summary of specifications for the virtual machine to create and the Finish button highlighted.
Step 10
On Hyper-V Manager console right-click PLABWIN805 and select Settings.
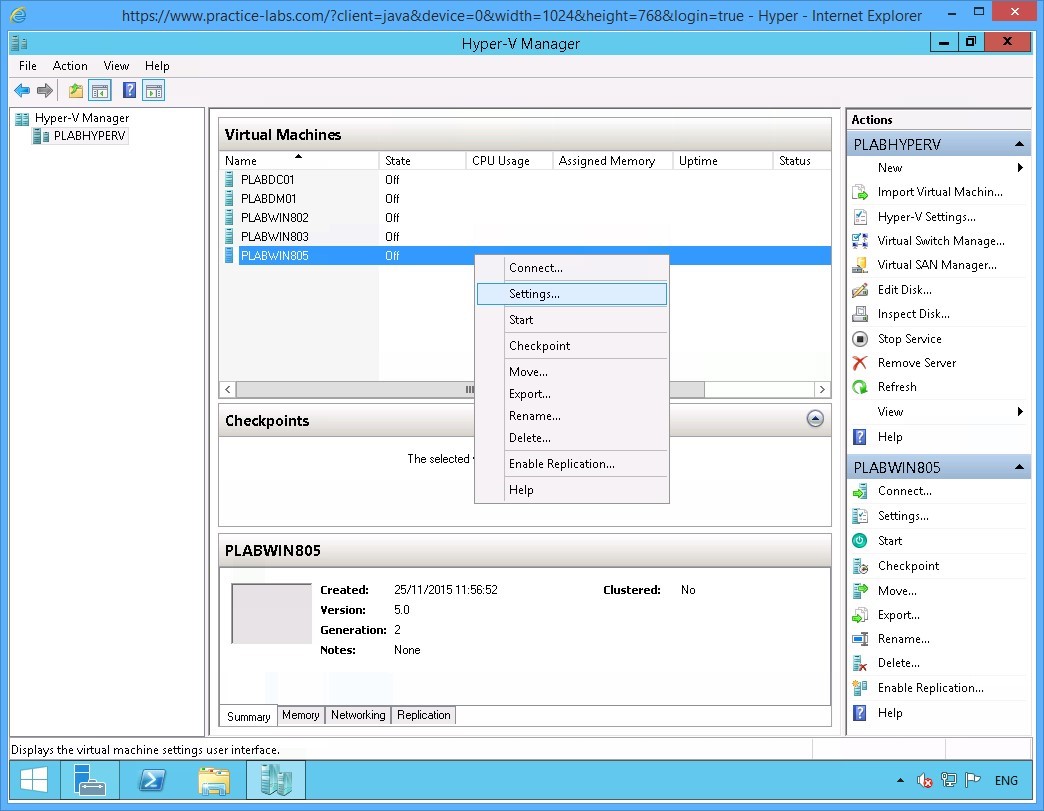 Figure 3.10 Screenshot of the device PLABHYPERV: The context menu (that appears on right-clicking the name of a virtual machine) > Settings menu-options are displayed on the Hyper-V Manager console.
Step 11
The Settings for PLABWIN805 dialog box indicates the settings different from a Generation 1 virtual machine.
Click OK after examining the settings of this virtual machine.
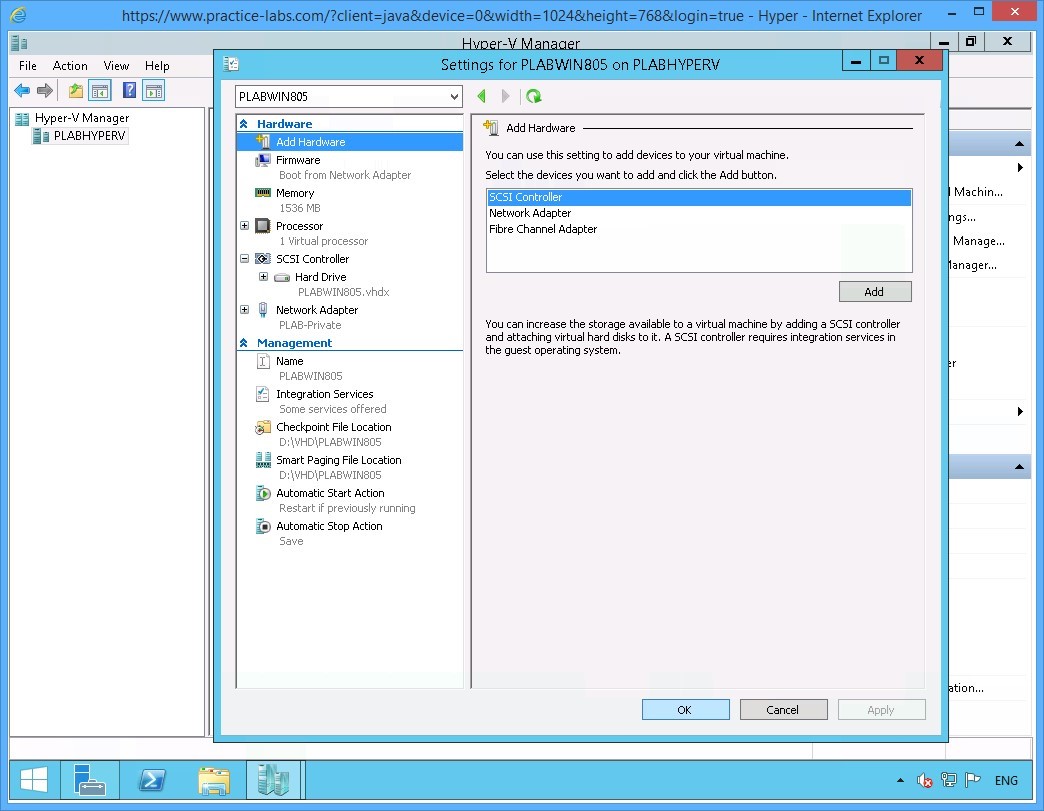 Figure 3.11 Screenshot of the device PLABHYPERV: The Settings for PLABWIN805 on PLABHYPERV dialog box is displayed showing default settings for a generation 2 machine and the OK button highlighted.
Step 12
You are back on Hyper-V Manager console.
Shut down PLABHYPERV to revert this device and its virtual machines to their default state using the Practice Labs web application.
Alternatively, you may sign out of the lab portal to power down all devices.
Summary
In this exercise, you performed the following activities:
- Configure Dynamic Memory and Smart Paging
- Configure Guest Integration Services
- Create Generation 2 Virtual Machine