Southern New Hampshire University | SNHU-CYB210: Computer Networking
Configure and Verify NAT
Exercises
- Introduction
- Exercise 1 - Configuring Static and Dynamic NAT
- Exercise 2 - Configuring PAT for an ISP Connection
- Summary
Introduction
The Configure and Verify NAT module provide you with the instructions and Cisco hardware to develop your hands on skills in configuring NAT on Cisco routers. This module includes exercises that will cover the following topics:
- Configuring Static and Dynamic NAT
- Configuring Port Address Translation
- Examining troubleshooting methods for NAT and PAT
dc640c20-9434-45ea-b7c2-6d4d6a196bfc
Lab Diagram
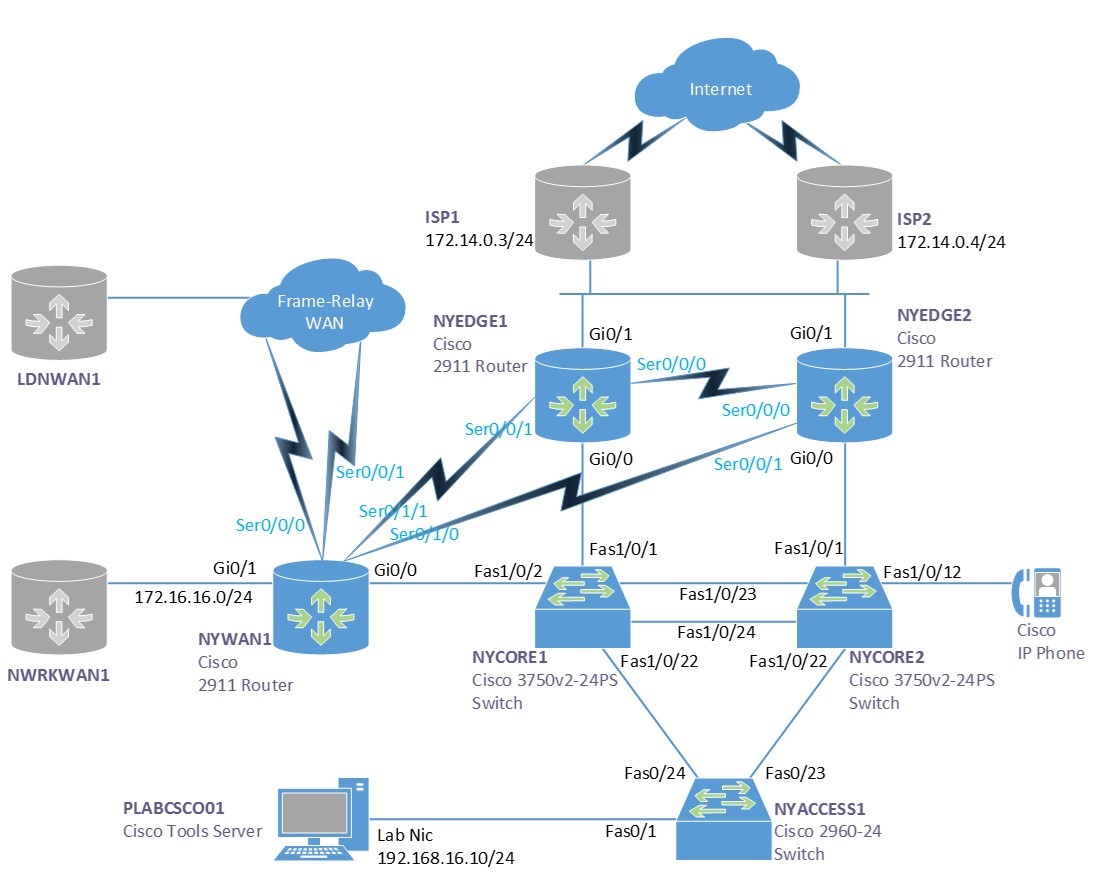
During your session, you will have access to the following lab configuration. Depending on the exercises you may or may not use all of the devices, but they are shown here in the layout to get an overall understanding of the topology of the lab.
Connecting to your Lab
In this module, you will be working on the following equipment to carry out the steps defined in each exercise.
- NYEDGE1
- NYEDGE2
- NYCORE1
- NYACCESS1
- PLABCSCO01
To start, simply choose a device and click Power on. In some cases, the devices may power on automatically.
For further information and technical support, please see our Help and Support page.
Copyright Notice
This document and its content is copyright of Practice-IT - © Practice-IT 2016. All rights reserved. Any redistribution or reproduction of part or all of the contents in any form is prohibited other than the following:
1. You may print or download to a local hard disk extracts for your personal and non-commercial use only.
2. You may copy the content to individual third parties for their personal use, but only if you acknowledge the website as the source of the material. You may not, except with our express written permission, distribute or commercially exploit the content. Nor may you transmit it or store it in any other website or other form of electronic retrieval system.
Exercise 1 - Configuring Static and Dynamic NAT
In this exercise, you will learn how to configure both dynamic and static network address translation (NAT). As you will have learned in your study material, NAT modifies either the source or destination (or both) IP address as a packet traverses a router’s interfaces. NAT can help resolve a number of different issues, the most commonly mentioned of which is the exhaustion of the IPv4 addressing space. It is most commonly used when connecting to the Internet.
Diagram
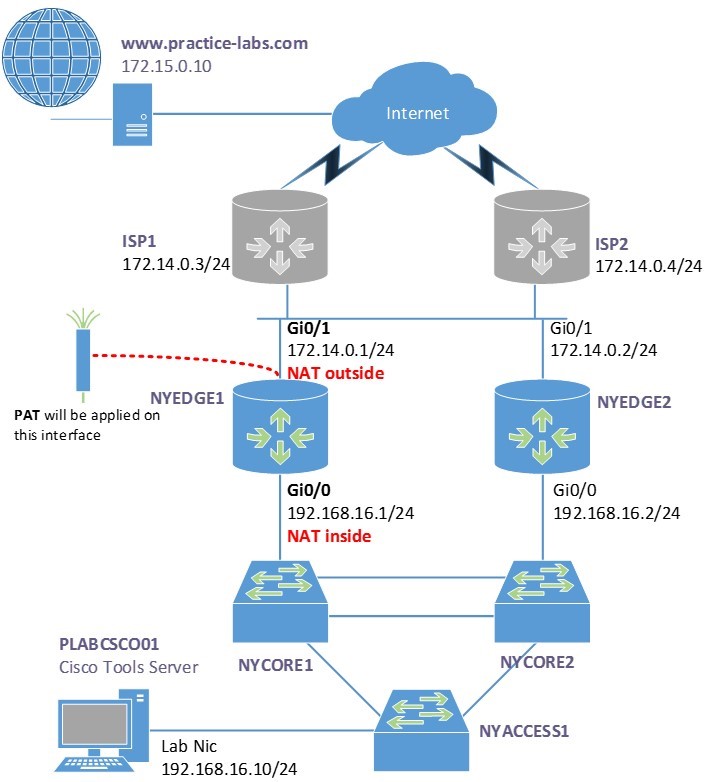
Use this diagram to help you understand the tasks in this exercise:
Task 1 - Configuring Static NAT
In this first section, you will configure static NAT. This is commonly used when you want a specific device to always have a specific external IP address when the NAT rule is matched. This is what is called a one-to-one mapping.
A good example of this is when you have a server that must be accessed via a NAT traversal. You are required to access the server via the same IP address every time. This could, for example, be a web server on the Internet.
Before you continue make sure that PLABCSCO01 is powered on.
Step 1
First you must enable NAT on the interfaces of the router. In most configurations the inside and outside interfaces must be defined. You will connect to the NYEDGE1 router and will configure the GigabitEthernet0/0 interface as the inside interface, and the Internet-facing GigabitEthernet 0/1 interface will be the outside interface:
NYEDGE1#configure terminal
Enter configuration commands, one per line.  End with CNTL/Z.
NYEDGE1(config)#interface gigabitethernet 0/0
NYEDGE1(config-if)#ip nat inside
Jul 22 09:11:52: %LINEPROTO-5-UPDOWN: Line protocol on Interface NVI0, changed state to up
NYEDGE1(config-if)#interface gigabitethernet 0/1
NYEDGE1(config-if)#ip nat outside
NYEDGE1(config-if)#exit
NYEDGE1(config)#
Note: Notice when configuring NAT, the first ip nat command takes a few seconds to apply, you then see a log message stating that NVI0 has come up. The NVI interface is the NAT Virtual Interface. Details concerning this virtual interface are beyond the scope of this lab. For more information, use your favorite search engine to research this topic further.
Step 2
Next, you must specify the static address rule. In this step you will translate the IP address on PLABCSCO01 to a specific outside address when communicating with the NYEDGE2 outside address of 172.14.0.2. Therefore the source address will be that of the PLABCSCO01 server which is 192.168.16.10 and the translated source address will appear as 172.14.0.10. To configure this, issue the following commands on NYEDGE1:
NYEDGE1(config)#ip nat inside source static 192.168.16.10 172.14.0.10
NYEDGE1(config)#
Note: When issuing such a NAT command, it is important that the outside address, which in this case is 172.14.0.10, be in the same subnet as the outside interface. The outside interface IP address is 172.14.0.1/24 so 172.14.0.10 is within the same subnet. Otherwise, NAT will not function correctly.
Step 3
Before testing the configuration, shutdown the inside interface on NYEDGE2, GigabitEthernet 0/0:
Note: This will ensure that any communication between PLABCSCO01 and NYEDGE2 will traverse the NYEDGE1 router and be subject to the NAT configuration.
NYEDGE2#configure terminal
Enter configuration commands, one per line.  End with CNTL/Z.
NYEDGE2(config)#interface gigabitethernet 0/0
NYEDGE2(config-if)#shutdown
NYEDGE2(config-if)#exit
NYEDGE2(config)#
*Sep 18 13:40:26: %LINK-5-CHANGED: Interface GigabitEthernet0/0, changed state to administratively down
*Sep 18 13:40:27: %LINEPROTO-5-UPDOWN: Line protocol on Interface GigabitEthernet0/0, changed state to down
NYEDGE2(config)#
You should see syslog messages that verify that the interface is down.
Step 4
Using PLABCSCO01 open a command prompt and ping the GigabitEthernet 0/1 interface on NYEDGE2 with an address of 172.14.0.2:
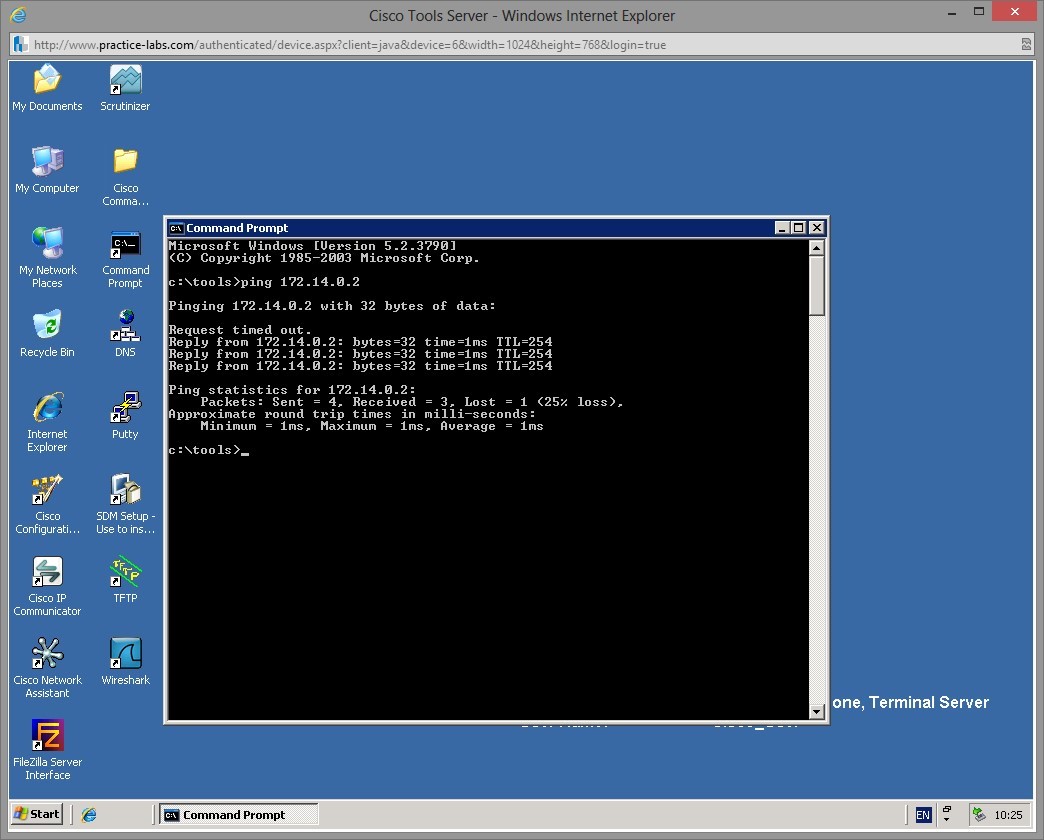 Figure 1.1 Configuring NAT: You can successfully ping the outside interface of the NYEDGE2 router
Step 5
Observe the NAT translation table on NYEDGE1 using the following command:
NYEDGE1#show ip nat translations
Pro Inside global      Inside local       Outside local      Outside global
icmp 172.14.0.10:512   192.168.16.10:512  172.14.0.2:512     172.14.0.2:512
--- 172.14.0.10        192.168.16.10      ---                ---
NYEDGE1#
In the output, we can see that the icmp or ping packet has been translated from an Inside local address of 192.168.16.10 to an Inside global address of 172.14.0.10.
You have successfully configured static NAT translation configuration. Leave your devices in their current states and continue on to the next section.
Task 2 - Configuring Dynamic Network Address Translation
Static network address translation (NAT) is very useful for devices that act like shared resources such as servers. However, there are cases where you don’t need this one-to-one nailed down mapping. You may still require connections to get their own IP addresses, for example when you have users who access a shared resource behind a router but you may require their connection to be logged or audited for some security purpose.
In this example, you will configure such a scenario by modifying the static NAT you configured in the previous section so that you are using a pool of addresses. This configuration is called Dynamic NAT.
Step 1
First, remove the static translation you have already created from the NYEDGE1 router:
NYEDGE1#configure terminal
Enter configuration commands, one per line.  End with CNTL/Z.
NYEDGE1(config)#no ip nat inside source static 192.168.16.10 172.14.0.10
Static entry in use, do you want to delete child entries? [no]:
If your NAT translations have not timed out yet from the previous steps, you will receive a message as shown above stating that there is already a child translation in place. You could choose yes, but enter no as this is an ideal opportunity to use the clear ip nat translation command instead:
Static entry in use, do you want to delete child entries? [no]: no
%: Error: static entry in use, cannot remove
NYEDGE1(config)#exit
NYEDGE1#clear ip nat translation *
Note: Note that the “*” indicates that you want all currently active translations to be removed. Alternatively, you could choose specific translations to remove. If didn’t get the previous error, try using the clear command anyway.
Step 2
View the translations once more:
NYEDGE1#show ip nat translations
NYEDGE1#
No translations are active any longer.
Step 3
Attempt once again to remove the static translation you have already created from the NYEDGE1 router if you have not been successful the first time:
NYEDGE1#configure terminal
Enter configuration commands, one per line.  End with CNTL/Z.
NYEDGE1(config)#no ip nat inside source static 192.168.16.10 172.14.0.10
NYEDGE1(config)#
The removal was successful.
Step 4
With the static NAT configuration removed, try the ping again from PLABCSCO01 to 172.14.0.2:
c:\tools>ping 172.14.0.2
Pinging 172.14.0.2 with 32 bytes of data:
Request timed out.
Request timed out.
Request timed out.
Request timed out.
Ping statistics for 172.14.0.2:
    Packets: Sent = 4, Received = 0, Lost = 4 (100% loss),
c:\tools>
You will notice that the ping fails.
Step 3
Configuring dynamic NAT requires an additional step to setup the pool of addresses that will be used for clients as they are translated when packets are routed through the router.
Configure a pool in the 172.14.0.0/24 range as follows:
NYEDGE1#configure terminal
Enter configuration commands, one per line.  End with CNTL/Z.
NYEDGE1(config)#ip nat pool mydynamicpool 172.14.0.20 172.14.0.100 netmask 255.255.255.0
NYEDGE1(config)#
The above command essentially creates a NAT pool with the following characteristics:
- Name mydynamicpool
- Start address 172.14.0.20
- End address 172.14.0.100
- Subnet mask 255.255.255.0
Note: Notice once again that the IP address of the outside interface of NYEDGE1 which is 172.14.0.1/24 is within the same subnet as the above IP address range. This is necessary for NAT to function.
Step 4
You must now create an access list which serves as the matching policy, that is, if a packet routing through the router matches the access list parameters, then the router will be instructed to apply its NAT policy. The access control list or ACL must match at least the internal PLABCSCO01 server, or anything destined to the remote subnet.
In this instance, you are going to configure an ACL that will require both source and destination addresses to match its parameters. For this you will use an extended access list:
NYEDGE1(config)#access-list 100 permit ip 192.168.16.0 0.0.0.255 172.14.0.0 0.0.0.255
NYEDGE1(config)#
Step 5
Finally, both the access list and the NAT pool will be associated together using the ip nat command. Keep in mind that you have already defined the inside and outside interfaces:
NYEDGE1(config)#ip nat inside source list 100 pool mydynamicpool
NYEDGE1(config)#exit
NYEDGE1#
The above command essentially configures the following:
Create a NAT rule where the inside addresses will use access list 100 as a source to match parameters and if those parameters match, they will be given an outside IP address from the pool named mydynamicpool.
Step 6
Verify that NAT is functioning correctly by using the server once more to ping the outside interface of NYEDGE2.
c:\tools>ping 172.14.0.2
Pinging 172.14.0.2 with 32 bytes of data:
Request timed out.
Reply from 172.14.0.2: bytes=32 time<1ms TTL=254
Reply from 172.14.0.2: bytes=32 time<1ms TTL=254
Reply from 172.14.0.2: bytes=32 time<1ms TTL=254
Ping statistics for 172.14.0.2:
    Packets: Sent = 4, Received = 3, Lost = 1 (25% loss),
Approximate round trip times in milli-seconds:
    Minimum = 0ms, Maximum = 0ms, Average = 0ms
c:\tools>
Your pings should be successful.
Step 7
Examine the NAT translation table on NYEDGE1. You should see something similar to the following:
NYEDGE1#show ip nat translation
Pro Inside global      Inside local       Outside local      Outside global
icmp 172.14.0.20:512   192.168.16.10:512  172.14.0.2:512     172.14.0.2:512
--- 172.14.0.20        192.168.16.10      ---                ---
NYEDGE1#
You can see that there is now a translation where 192.168.16.10, which is the server, is translated to 172.14.0.20 which is the first IP address in the pool you created.
Note: Depending on how fast you are, the ICMP translation above may or may not be in your output. If it is not, reissue the ping command and return to view the NAT translations.
Step 8
Before continuing to the next exercise, remove the dynamic address translation you have configured using the no form of the command, opting to clear the dynamic translations if any exist:
NYEDGE1#configure terminal
NYEDGE1(config)#no ip nat inside source list 100 pool mydynamicpool
use, do you want to delete all entries? [no]: yes
NYEDGE1(config)#exit
NYEDGE1#exit
Leave the devices in their current states and proceed to the next exercise.
Exercise 2 - Configuring PAT for an ISP Connection
In the previous exercise, you configured both static and dynamic NAT. Although both are very useful to know how to configure, PAT is by far the most commonly configured translation method. This is because if you are using IPv4 and you are connecting to the Internet, it is almost a requirement today to use PAT because of the lack of free routable IP addresses available.
In this exercise, you will configure Port Address Translation to allow users on the LAN to connect to the Internet.
Diagram
Use this diagram to help you understand the tasks in this exercise:

Task 1 - Configuring Port Address Translation
In this section, you will configure PAT so that you can connect to a web server outside of the lab. Without the correct configuration, you will not be able to connect. Successfully connecting to the web server will confirm that your PAT configuration is working.
Alert: Make sure you completed the last step in the previous exercise. Failure to do so may result in an undesired outcome in this exercise.
Step 1
To configure PAT, you require two things. You must first create an access list to match the traffic, and secondly, you must implement the PAT translation command. You will also require the inside and outside interfaces defined, but remember that you have already done this and defined the GigabitEthernet 0/0 and 0/1 interfaces as inside and outside respectively.
First, configure the access list. Use an extended access list with an id of 101:
NYEDGE1#configure terminal
Enter configuration commands, one per line.  End with CNTL/Z.
NYEDGE1(config)#access-list 101 permit ip 192.168.16.0 0.0.0.255 any
NYEDGE1(config)#
Note: Notice how the command uses the keyword any as the destination. If you were connecting to the Internet this is almost definitely what you want, but you may require this to be more restrictive in some cases, so make sure you understand your requirements when creating any NAT or PAT policies.
Step 2
Next, configure the NAT translation command so that the router performs Port Address Translation on its GigabitEthernet 0/1 interface. The remote web server you are testing against will only communicate with the subnet defined on this interface.
NYEDGE1(config)#ip nat inside source list 101 interface gigabitEthernet 0/1 overload
NYEDGE1(config)#exit
NYEDGE1#
Notice that the configuration of PAT doesn’t use the word PAT.
Note: What makes this command PAT and not NAT is the overload keyword which essentially means use the same outside IP address for many inside addresses. It provides a many-to-one mapping of internal to external IP addresses.
Step 3
Using PLABCSCO01, try to browse to www.practice-labs.com - you can use Microsoft Internet Explorer located on the desktop (note this is an internal website to the labs, not an actual external site):
 Figure 2.1 Configuring PAT: Browsing to the web server is successful, therefore PAT was configured successfully
Step 4
Examine the NAT translation table on NYEDGE1:
NYEDGE1#show ip nat translations
Pro Inside global      Inside local       Outside local      Outside global
tcp 172.14.0.1:1781    192.168.16.10:1781 172.15.0.10:80     172.15.0.10:80
NYEDGE1#
The translation has been configured successfully. The Outside global IP address of this communication is the address of the outside interface using port number 1781. If additional internal devices access the internet, their Inside global address will be the same, but with a different port number.
Note: Depending on your lab configuration you may have additional translations.
Leave your devices in their current states and continue on to the next section.
Debugging NAT
As a final task, take a look at what happens when you enable debugging for NAT.
Step 1
First clear the NAT translations on NYEDGE1:
NYEDGE1#clear ip nat translation *
NYEDGE1#
Step 2
Enable NAT debugging on the router:
Note: When using the debug command in a production environment, be careful when enabling debugging as it can quickly use up most of the system resources of a device.
NYEDGE1#debug ip nat detailed
IP NAT detailed debugging is on
NYEDGE1#
Step 3
On PLABCSCO01, refresh the browser if it is still open or open a new browser window and reconnect to www.practice-labs.com.
Step 4
Return to NYEDGE1 and turn all debugging off by issuing the following command. Don’t worry if you can’t see what you’re typing due to the debug information that is scrolling up on your terminal window. Just type the following:
NYEDGE1#undebug all
All possible debugging has been turned off
NYEDGE1#
Step 5
Examine the debugging output on NYEDGE1. Your output may differ slightly to the one below because of the timestamps, ports and other configurations:
*Sep 18 14:54:11.071: NAT: API parameters passed: src_addr:192.168.16.10, src_port:0 dest_addr:172.15.0.10, dest_port:0, proto:6 if_
input:GigabitEthernet0/0 pak:219C1728 get_translated:1
*Sep 18 14:54:11.071:  mapping pointer available mapping:0
*Sep 18 14:54:11.071: NAT: [0] Allocated Port for 192.168.16.10 -> 172.14.0.1: wanted 1882 got 1882
*Sep 18 14:54:11.071: NAT*: i: tcp (192.168.16.10, 1882) -> (172.15.0.10, 80) [8290]
*Sep 18 14:54:11.071: NAT*: s=192.168.16.10->172.14.0.1, d=172.15.0.10 [8290]
*Sep 18 14:54:11.075: NAT*: o: tcp (172.15.0.10, 80) -> (172.14.0.1, 1881) [16440]
*Sep 18 14:54:11.075: NAT*: s=172.15.0.10, d=172.14.0.1->192.168.16.10 [16440]
*Sep 18 14:54:11.075: NAT*: o: tcp (172.15.0.10, 80) -> (172.14.0.1, 1882) [16441]
*Sep 18 14:54:11.075: NAT*: s=172.15.0.10, d=172.14.0.1->192.168.16.10 [16441]
*Sep 18 14:54:11.075: NAT*: i: tcp (192.168.16.10, 1882) -> (172.15.0.10, 80) [8292]
*Sep 18 14:54:11.075: NAT*: s=192.168.16.10->172.14.0.1, d=172.15.0.10 [8292]
*Sep 18 14:54:11.075: NAT*: i: tcp (192.168.16.10, 1882) -> (172.15.0.10, 80) [8294]
*Sep 18 14:54:11.075: NAT*: s=192.168.16.10->172.14.0.1, d=172.15.0.10 [8294]
Here you can see that the router allocated a specific port for the TCP (HTTP) conversation to take place, in the above output. From the it was 1882. If you issue the show ip nat translation command quickly enough, you will be able to see that this matches up with the port shown in the NAT translation table on the router.
NYEDGE1#show ip nat translations
Pro Inside global      Inside local       Outside local      Outside global
tcp 172.14.0.1:1882    192.168.16.10:1882 172.15.0.10:80     172.15.0.10:80
NYEDGE1#
Following the packet flow is fairly simple, you can see PLABCSCO01 (192.168.16.10) makes a connection to 172.15.0.10 on port 80 (the webservers IP address), specified by the (i) in the output. The other side of the connection the (o) is sourced from 172.14.0.1 (the router interface) destined to the web server.
You have completed examining NAT troubleshooting methods as well as this lab.
Summary
In this module you achieved the following activities:
- You configured a static NAT and verified its operation
- You configured dynamic NAT using a specified pool of addresses and verified its operation
- You configured PAT to enable an Internet connection and proved its operation using show and debug commands on the router
- You have examined troubleshooting methods for solving network problems pertaining to NAT and PAT