Southern New Hampshire University | SNHU-CYB210: Computer Networking
Configure and Verify RIPv2 for IPv4
Exercises
- Introduction
- Exercise 1 - Configuring RIP v2
- Exercise 2 - Configuring Additional Parameters of RIP v2
- Summary
Introduction
The Configure and Verify RIPv2 for IPv4 module provides you with the instructions and Cisco hardware to develop your hands on skills in configuring the RIP routing protocol for Cisco routers. This module includes exercises that will cover the following topics:
- Enabling and configuring RIPv2
- Learn how to configure passive interfaces, adjust RIP timers, change auto-summarization configuration and redistribute a static route
dc640c20-9434-45ea-b7c2-6d4d6a196bfc
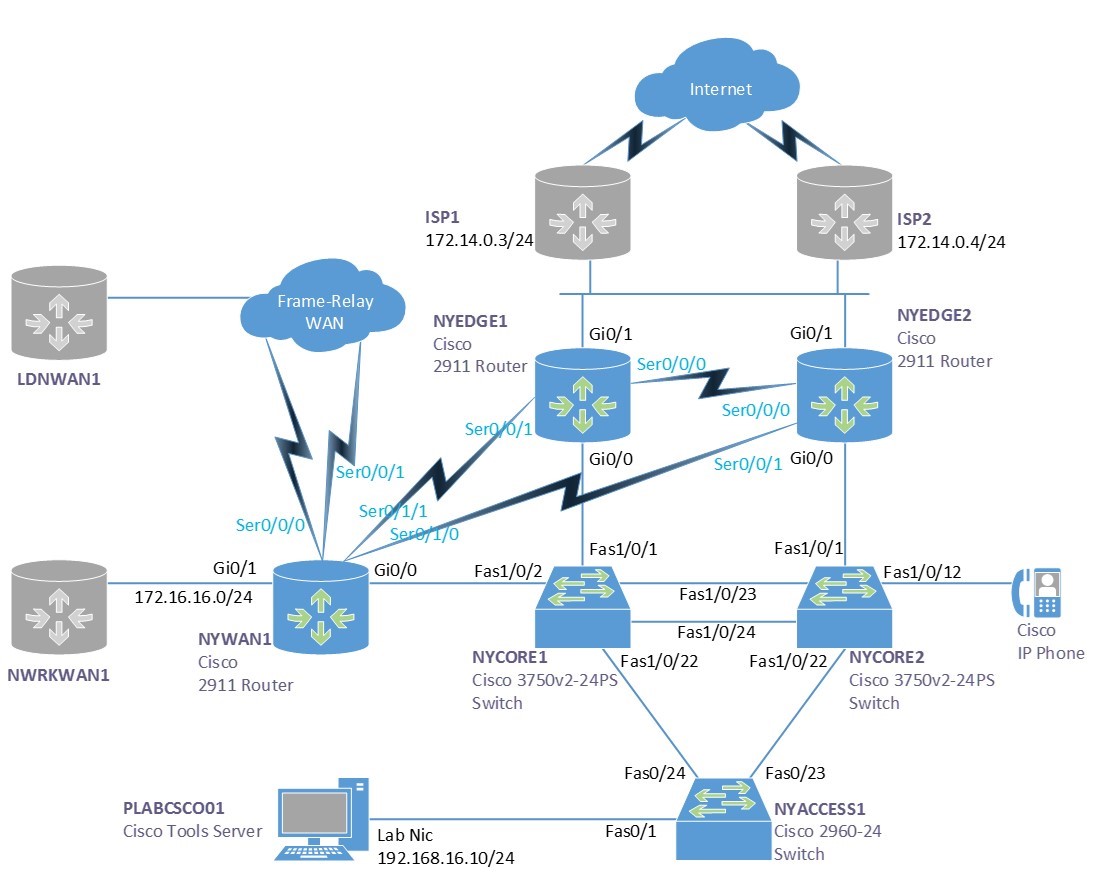
Lab Diagram
During your session, you will have access to the following lab configuration. Depending on the exercises you may or may not use all of the devices, but they are shown here in the layout to get an overall understanding of the topology of the lab.
Connecting to your Lab
In this module you will be working on the following equipment to carry out the steps defined in each exercise.
To start, simply choose a device and click Power on. In some cases, the devices may power on automatically.
For further information and technical support, please see our Help and Support page.
Copyright © Practice Labs 2007 - 2018. All rights reserved.
Exercise 1 - Configuring RIP v2
In this exercise, you will learn how to configure Routing Information Protocol or RIP v2. RIP is a distance vector routing protocol. The main difference between version 1 and version 2 is the ability to carry subnetting information, thus supporting Classless Inter-Domain Routing (CIDR).
This exercise begins in a similar manner to an exercise of the previous lab. However, it further explores the functionality of RIP. In any case, it is a good opportunity for review.
Task 1 - Implement Dynamic Routing
You will implement dynamic routing such that NYEDGE1 and NYEDGE2 will dynamically exchange routing information. You will use the Routing Information Protocol (RIP) when implementing dynamic routing.
Step 1
Before making any routing configurations on the routers, you will first activate a loopback interface that has been preconfigured on the NYEDGE1 router. This will allow additional networks to be advertised via RIP.
Note: Think of a looback interface as a virtual router interface. It is essentially just like any other router interface except that it has no physical counterpart. It has many purposes in the real world. However, its purpose for this lab is to allow for additional networks to exist on the router without the need for additional physical ports. For more information, use your favorite search engine to search for loopback interfaces.
The loopback 0 interface has an IP address of 172.18.0.1/24 and thus is in the 172.18.0.0/24 subnet.
Issue the following commands to activate the loopback 0 interface:
NYEDGE1#configure terminal
Enter configuration commands, one per line.  End with CNTL/Z.
NYEDGE1(config)#interface loopback 0
NYEDGE1(config-if)#no shutdown
NYEDGE1(config-if)#exit
Sep 11 23:59:23.339: %LINK-3-UPDOWN: Interface Loopback0, changed state to up
Sep 11 23:59:24.339: %LINEPROTO-5-UPDOWN: Line protocol on Interface Loopback0, changed state to up
NYEDGE1(config)#
Step 2
Next you will enable the RIP protocol with the following command:
NYEDGE1(config)#router rip
NYEDGE1(config-router)#
RIP has now been enabled on the NYEDGE1 router. Notice how the prompt changes to NYEDGE1(config-router)#. This is because you are now in the configuration mode in which you can configure all of the RIP parameters of the router.
Step 3
By default, the RIP version that is enabled is version 1. In order to change this, issue the following command:
NYEDGE1(config-router)#version 2
NYEDGE1(config-router)#
Step 4
At this point RIP is enabled. However, no routes are being advertised to other RIP routers. You must indicate to the router which directly connected networks will participate in the RIP process. To do this, you can use the network command as follows:
NYEDGE1(config-router)#network 172.14.0.0
NYEDGE1(config-router)#network 192.168.16.0
NYEDGE1(config-router)#network 172.18.0.0
NYEDGE1(config-router)#exit
NYEDGE1(config)#exit
Alert: Remember to include the 172.18.0.0 network which belongs to the loopback 0 interface.
The router has now begun advertising these three networks out of all its active interfaces. Notice that these are the networks to which the two active physical interfaces and the looback interface of the router are directly connected.
Note: Although you are using RIP v2, when issuing the network command, you are still using classful network addresses. This means that the subnet mask is assumed depending on the class of network. View your course material or use your favorite search engine to further research this topic.
Step 5
By advertising these networks, the router is essentially saying that any other router that wants to get to these network destinations should send their packets to it. At this point, however, there is no other router configured to listen to such advertisements. You will now configure the RIP protocol on the NYEDGE2 router as follows:
NYEDGE2#configure terminal
Enter configuration commands, one per line.  End with CNTL/Z.
NYEDGE2(config)#router rip
NYEDGE2(config-router)#
Step 6
Just as before, RIP is enabled, but no routes are being advertised. Indicate which directly connected networks will participate in the RIP process, again, by using the network command as follows:
NYEDGE2(config-router)#network 172.14.0.0
NYEDGE2(config-router)#network 192.168.16.0
NYEDGE2(config-router)#exit
NYEDGE2(config)#exit
NYEDGE2#
Notice once again that these are the networks to which the two active interfaces of the router are directly connected.
Step 7
Now take a look at the routing table of NYEDGE2:
NYEDGE2#show ip route | begin Gateway
Gateway of last resort is not set
      172.14.0.0/16 is variably subnetted, 2 subnets, 2 masks
C        172.14.0.0/24 is directly connected, GigabitEthernet0/1
L        172.14.0.2/32 is directly connected, GigabitEthernet0/1
R     172.18.0.0/16 [120/1] via 192.168.16.1, 00:00:28, GigabitEthernet0/0
      192.168.16.0/24 is variably subnetted, 2 subnets, 2 masks
C        192.168.16.0/24 is directly connected, GigabitEthernet0/0
L        192.168.16.2/32 is directly connected, GigabitEthernet0/0
NYEDGE2#
Alert: It may take some time for the RIP entry to appear.
A new entry in the routing table appears with the R code indicating that the route was learned via the RIP protocol. The entry shows that in order to reach this new network of 172.18.0.0, the next hop router is 192.168.16.1.
Note: Looking at the lab diagram you may see that there is a second path that can be taken, via the GigabitEthernet 0/1 interface of the NYEDGE2 router. This, however, is not shown in the routing table because the next hop interface, that is, GigabitEthernet 0/1 on the NYEDGE1 router is shut down.
Step 8
Test to make sure that this new route that was added is functioning correctly. Attempt to ping the loopback 0 interface of the NYEDGE1 router from the NYEDGE2 router and examine the results:
NYEDGE2#ping 172.18.0.1
Type escape sequence to abort.
Sending 5, 100-byte ICMP Echos to 172.18.0.1, timeout is 2 seconds:
!!!!!
Success rate is 100 percent (5/5), round-trip min/avg/max = 1/1/4 ms
NYEDGE2#
The ping should be successful.
Step 9
Verify your RIP configuration by using the following command on NYEDGE1:
NYEDGE1#show ip protocols
*** IP Routing is NSF aware ***
Routing Protocol is "rip"
  Outgoing update filter list for all interfaces is not set
  Incoming update filter list for all interfaces is not set
  Sending updates every 30 seconds, next due in 28 seconds
  Invalid after 180 seconds, hold down 180, flushed after 240
  Redistributing: rip
  Default version control: send version 2, receive version 2
    Interface             Send  Recv  Triggered RIP  Key-chain
    GigabitEthernet0/0    2     2
    Loopback0             2     2
  Automatic network summarization is not in effect
  Maximum path: 4
  Routing for Networks:
    172.14.0.0
    172.18.0.0
    192.168.16.0
  Routing Information Sources:
    Gateway         Distance      Last Update
    192.168.16.2         120      00:00:20
  Distance: (default is 120)
NYEDGE1#
Much important information about RIP is displayed in this output including:
- RIP Timers
- Version indicators
- Networks being routed
- Interfaces participating in RIP
- Information about other RIP enabled routers
You will use much of this information later on in this lab.
You have successfully configured dynamic routing between the NYEDGE1 and NYEDGE2 routers.
Leave the devices in their current states and continue on to the next exercise.
Exercise 2 - Configuring Additional Parameters of RIP v2
There are many parameters of RIP that you can change in order to accommodate your network implementation. Some of these will be examined in this exercise.
Task 1 - Passive Interfaces
RIP v2 updates are sent out of all RIP enabled interfaces by default. There may be an interface that you know does not connect to another router. Any RIP updates that are sent on this interface would be useless. It is possible to deactivate these updates for such interfaces thus reducing unnecessary traffic on segments of your network.
Imagine that the Loopback 0 interface on NYEDGE1 connects to a user LAN where there are no additional routers. In this section, you will configure Loopback 0 as a passive interface on the NYEDGE1 router that will not send RIP updates.
Step 1
The passive interface configuration is not implemented on the interface itself, as may be expected, but under the router configuration. Connect to the NYEDGE1 router and issue the following commands to configure the passive interface:
NYEDGE1#configure terminal
Enter configuration commands, one per line.  End with CNTL/Z.
NYEDGE1(config)#router rip
NYEDGE1(config-router)#passive-interface Loopback 0
NYEDGE1(config-router)#exit
NYEDGE1(config)#exit
NYEDGE1#
Step 2
Next, verify that the configuration has been implemented successfully:
NYEDGE1#show ip protocols
*** IP Routing is NSF aware ***
Routing Protocol is "rip"
  Outgoing update filter list for all interfaces is not set
  Incoming update filter list for all interfaces is not set
  Sending updates every 30 seconds, next due in 16 seconds
  Invalid after 180 seconds, hold down 180, flushed after 240
  Redistributing: rip
  Default version control: send version 2, receive version 2
    Interface             Send  Recv  Triggered RIP  Key-chain
    GigabitEthernet0/0    2     2
  Automatic network summarization is not in effect
  Maximum path: 4
  Routing for Networks:
    172.14.0.0
    172.18.0.0
    192.168.16.0
  Passive Interface(s):
    Loopback0
  Routing Information Sources:
    Gateway         Distance      Last Update
    192.168.16.2         120      00:00:21
  Distance: (default is 120)
NYEDGE1#
Notice that there is now a section that says Passive Interface(s): and that Loopback 0 is listed there.
Note: It is important to note that the passive interface configuration does not exempt the network on that interface from participating in RIP. The network is advertised to other RIP routers. However, the interface itself does not send update packets.
You have successfully configured a passive interface. Continue on to the next section.
Task 2 - RIP Timers
As mentioned before, RIP sends out updates periodically based on a set of timers. These timers can be adjusted to accommodate your network needs.
Note: In a production network, it is rare to adjust the default values of routing protocol timers. However, there are cases where it is necessary.
In this section, you will learn about these timers and how to adjust them.
Step 1
Connect to NYEDGE1 and examine the current values for the timers:
NYEDGE1#show ip protocols
*** IP Routing is NSF aware ***
Routing Protocol is "rip"
  Outgoing update filter list for all interfaces is not set
  Incoming update filter list for all interfaces is not set
  Sending updates every 30 seconds, next due in 16 seconds
  Invalid after 180 seconds, hold down 180, flushed after 240
  Redistributing: rip
  Default version control: send version 2, receive version 2
    Interface             Send  Recv  Triggered RIP  Key-chain
    GigabitEthernet0/0    2     2
  Automatic network summarization is not in effect
  Maximum path: 4
  Routing for Networks:
    172.14.0.0
    172.18.0.0
    192.168.16.0
  Passive Interface(s):
    Loopback0
  Routing Information Sources:
    Gateway         Distance      Last Update
    192.168.16.2         120      00:00:21
  Distance: (default is 120)
NYEDGE1#
From the above output you can determine that the timer values are as follows:
- Update: 30 seconds
- Invalid: 180 seconds
- Holddown: 180 seconds
- Flush: 240 seconds
Note: To find out more about what each timer is used for, review your course material or refer to your favorite search engine.
These are the default values of the timers for RIP.
Step 2
In this step, you will configure these timers on NYEDGE1 as follows:
- Update: 15 seconds
- Invalid: 90 seconds
- Holddown: 90 seconds
- Flush: 120 seconds
To do so, issue the following commands:
NYEDGE1#configure terminal
Enter configuration commands, one per line.  End with CNTL/Z.
NYEDGE1(config)#router rip
NYEDGE1(config-router)#timers basic 15 90 90 120
NYEDGE1(config-router)#exit
NYEDGE1(config)#exit
NYEDGE1#
The order of the timer values should be Update, Invalid, Holddown, Flush. You can use the “?” to confirm this as you input them. The timers have been changed.
Step 3
In this step, you will view the result of the timer change in the output of the routing table of NYEDGE2. Connect to NYEDGE2 and repeatedly issue the command show ip route rip | begin Gateway. This command will show only the RIP learned route and will include a timer that shows how many seconds have passed since the last update. Use the up arrow to quickly repeat the command. An excerpt of the kind of output you should see can be seen below:
NYEDGE2#show ip route rip | begin Gateway
Gateway of last resort is not set
      172.18.0.0/24 is subnetted, 1 subnets
R        172.18.0.0 [120/1] via 192.168.16.1, 00:00:12, GigabitEthernet0/0
NYEDGE2#show ip route rip | begin Gateway
Gateway of last resort is not set
      172.18.0.0/24 is subnetted, 1 subnets
R        172.18.0.0 [120/1] via 192.168.16.1, 00:00:13, GigabitEthernet0/0
NYEDGE2#show ip route rip | begin Gateway
Gateway of last resort is not set
      172.18.0.0/24 is subnetted, 1 subnets
R        172.18.0.0 [120/1] via 192.168.16.1, 00:00:14, GigabitEthernet0/0
NYEDGE2#show ip route rip | begin Gateway
Gateway of last resort is not set
      172.18.0.0/24 is subnetted, 1 subnets
R        172.18.0.0 [120/1] via 192.168.16.1, 00:00:01, GigabitEthernet0/0
NYEDGE2#
Remember that the update timer you configured has been changed from 30 to 15 seconds. You can see above that the elapsed time since the last update that the value never exceeds 15 seconds which is to be expected.
Step 4
It is important to note here that the RIP functionality is currently not guaranteed. Although routes are still being advertised, the difference in timers between routers could cause routing loops or routing disruptions. In order for RIP to function correctly, the timers must be the same for all of the routers participating in RIP.
In this step you will configure the timers of NYEDGE2 to match those of NYEDGE1:
NYEDGE2#configure terminal
Enter configuration commands, one per line.  End with CNTL/Z.
NYEDGE2(config)#router rip
NYEDGE2(config-router)#timers basic 15 90 90 120
NYEDGE2(config-router)#exit
NYEDGE2(config)#exit
NYEDGE2#
You have successfully adjusted the RIP timers on NYEDGE1 and NYEDGE2.
Continue on to the next section.
Task 3 - Configuring Auto-Summarization
RIP v2 by default does not automatically summarize routes. Each network is advertised separately. It is possible to enable auto-summarization so that many subnets can be included in one routing entry in the routing table.
Auto-summarization summarizes networks according to their classful subnet mask. So, for example, if you have 172.18.0.0/24 as an advertised network, it would be auto-summarized to 172.18.0.0/16 and would include additional subnets such as 172.18.1.0, 172.18.2.0, 172.18.3.0 and so on. This is of great benefit because it makes routing tables as well as routing updates smaller in size especially if you have tens or even hundreds of routing entries.
In this section, you will examine how auto-summarization functions affect routing tables and their updates.
Step 1
To begin, create the Loopback 1 interface on NYEDGE1, assign it an IP address of 172.18.1.1/24 and include it in the RIP configuration. To do this, issue the following commands:
NYEDGE1#configure terminal
Enter configuration commands, one per line.  End with CNTL/Z.
NYEDGE1(config)#interface Loopback 1
Sep 18 16:01:59.191: %LINEPROTO-5-UPDOWN: Line protocol on Interface Loopback1, changed state to up
NYEDGE1(config-if)#ip address 172.18.1.1 255.255.255.0
NYEDGE1(config-if)#exit
NYEDGE1(config-if)#
Note: Notice that loopback interfaces are active by default, so the no shutdown command is not necessary.
Now for the RIP configuration:
NYEDGE1(config)#router rip
NYEDGE1(config-router)#network 172.18.1.0
NYEDGE1(config-router)#exit
NYEDGE1(config)#exit
NYEDGE1#
Step 2
Take a look at the running configuration and specifically, at the RIP configuration. Type the following command to do so:
NYEDGE1#show running-config | begin router rip
router rip
 version 2
 timers basic 15 90 90 120
 passive-interface Loopback0
 network 172.14.0.0
 network 172.18.0.0
 network 192.168.16.0
!
ip forward-protocol nd
!
no ip http server
no ip http secure-server
!<-- Output Omitted -->
NYEDGE1#
You will notice that your command of network 172.18.1.0 is not in the configuration. This is because the network commands for RIP are still classful, that is, the default subnet mask for that class of network is implicitly configured. So in this case, 172.18.0.0 is a class B address, so it has a subnet mask of 255.255.0.0 or a /16 network in slash notation. As a result 172.18.0.0/16, which covers a range of addresses from 172.18.0.0 to 172.18.255.255 includes the 172.18.1.0/24 subnet.
Step 3
Now take a look at the routing table of NYEDGE2 and see what the updates from NYEDGE1 have added to it:
NYEDGE2#show ip route | begin Gateway
Gateway of last resort is not set
      172.14.0.0/16 is variably subnetted, 2 subnets, 2 masks
C        172.14.0.0/24 is directly connected, GigabitEthernet0/1
L        172.14.0.2/32 is directly connected, GigabitEthernet0/1
R     172.18.0.0/16 [120/1] via 192.168.16.1, 00:00:06, GigabitEthernet0/0
      192.168.16.0/24 is variably subnetted, 2 subnets, 2 masks
C        192.168.16.0/24 is directly connected, GigabitEthernet0/0
L        192.168.16.2/32 is directly connected, GigabitEthernet0/0
NYEDGE2#
You will notice that nothing has changed. This is because the 172.18.0.0/16 network in the above routing table includes the 172.18.1.0/24 subnet. Actually, it includes a whole range of addresses from 172.18.0.0 to 172.18.255.255. This means that you can add tens or hundreds of networks to NYEDGE1 such as 172.18.X.0/24 where X could be anything from 0 to 255 and this would still not add any more entries into the routing table. This is one of the major advantages of auto summarization, keeping the updates and the routing table small.
Step 4
Connect to NYEDGE1 and disable auto-summarization:
NYEDGE1#configure terminal
Enter configuration commands, one per line.  End with CNTL/Z.
NYEDGE1(config)#router rip
NYEDGE1(config-router)#auto
NYEDGE1(config-router)#no auto-summary
NYEDGE1(config-router)#exit
NYEDGE1(config)#exit
NYEDGE1#
Step 5
Now connect to NYEDGE2 and view the routing table. If you do it fast enough, you may see something like this:
NYEDGE2#show ip route | begin Gateway
Gateway of last resort is not set
      172.14.0.0/16 is variably subnetted, 2 subnets, 2 masks
C        172.14.0.0/24 is directly connected, GigabitEthernet0/1
L        172.14.0.2/32 is directly connected, GigabitEthernet0/1
      172.18.0.0/16 is variably subnetted, 3 subnets, 2 masks
R        172.18.0.0/16 [120/1] via 192.168.16.1, 00:01:13, GigabitEthernet0/0
R        172.18.0.0/24 [120/1] via 192.168.16.1, 00:00:02, GigabitEthernet0/0
R        172.18.1.0/24 [120/1] via 192.168.16.1, 00:00:02, GigabitEthernet0/0
      192.168.16.0/24 is variably subnetted, 2 subnets, 2 masks
C        192.168.16.0/24 is directly connected, GigabitEthernet0/0
L        192.168.16.2/32 is directly connected, GigabitEthernet0/0
NYEDGE2#
You will see three routes learned via RIP. Here they are again:
R        172.18.0.0/16 [120/1] via 192.168.16.1, 00:01:13, GigabitEthernet0/0
R        172.18.0.0/24 [120/1] via 192.168.16.1, 00:00:02, GigabitEthernet0/0
R        172.18.1.0/24 [120/1] via 192.168.16.1, 00:00:02, GigabitEthernet0/0
Notice the timers. The two new routes have been learned just 2 seconds ago. You will also notice that these routes have a /24 designation. These are the two networks connected to NYEDGE1 that have been advertised individually.
The first route is an older route. You can see the timer indicates this route was learned well over a minute ago. This means that new updates that have been received do not include this routes, because updates are received every 15 seconds based on the timer you had configured in a previous section. This route is being timed out. Once the flush timer has elapsed, 120 seconds as you configured it, this route will be flushed out of the routing table.
Step 6
Wait a little longer and then view the routing table of NYEDGE2 once again:
NYEDGE2#show ip route | begin Gateway
Gateway of last resort is not set
      172.14.0.0/16 is variably subnetted, 2 subnets, 2 masks
C        172.14.0.0/24 is directly connected, GigabitEthernet0/1
L        172.14.0.2/32 is directly connected, GigabitEthernet0/1
      172.18.0.0/16 is variably subnetted, 2 subnets, 1 masks
R        172.18.0.0/24 [120/1] via 192.168.16.1, 00:00:06, GigabitEthernet0/0
R        172.18.1.0/24 [120/1] via 192.168.16.1, 00:00:06, GigabitEthernet0/0      192.168.16.0/24 is variably subnetted, 2 subnets, 2 masks
C        192.168.16.0/24 is directly connected, GigabitEthernet0/0
L        192.168.16.2/32 is directly connected, GigabitEthernet0/0
NYEDGE2#
Note: In your routing table output, if your timing is appropriate, you may also see a message similar to the following: 172.18.0.0/16 is possibly down. This message will show up for a little while and will then be removed.
You will see that the other route has been timed out and the two RIP routes are explicitly defined in the routing table.
You have successfully completed this section on auto-summarization. Continue on to the next section.
Task 2 - Redistribution of a Default Route
There are times when you will add a static route to a router, and you will want that route to be advertised to other RIP routers as well. This is especially desirable if you configure a default route to the Internet, and you want all your routers to be informed of this.
In this section, you will create a default route on NYEDGE1 and have it propagated via RIP to NYEDGE2.
Step 1
Begin by activating interface GigabitEthernet 0/1 on the NYEDGE1 router and assigning it an IP address of 172.15.0.1/24:
NYEDGE1#configure terminal
Enter configuration commands, one per line.  End with CNTL/Z.
NYEDGE1(config)#interface GigabitEthernet 0/1
NYEDGE1(config-if)#ip address 172.15.0.1 255.255.255.0
NYEDGE1(config-if)#no shut
NYEDGE1(config-if)#exit
NYEDGE1(config)#
Sep 18 21:25:17.250: %LINK-3-UPDOWN: Interface GigabitEthernet0/1, changed state to down
Sep 18 21:25:20.534: %LINK-3-UPDOWN: Interface GigabitEthernet0/1, changed state to up
Sep 18 21:25:21.534: %LINEPROTO-5-UPDOWN: Line protocol on Interface GigabitEthernet0/1, changed state to up
NYEDGE1(config)#
The syslog messages verify that the interface has indeed come up.
Step 2
Next you will create a default route on NYEDGE1. This route will have a next hop address of 172.15.0.2. So the default route exit the GigabitEthernet 0/1 interface since this next hop IP is on the same subnet as this interface. To do so, issue the following commands:
NYEDGE1(config)#ip route 0.0.0.0 0.0.0.0 172.15.0.2
NYEDGE1(config)#exit
NYEDGE1#
Step 3
Verify that this has indeed been installed as the default route by examining the routing table of NYEDGE1:
NYEDGE1#show ip route | begin Gateway
Gateway of last resort is 172.15.0.2 to network 0.0.0.0
S*    0.0.0.0/0 [1/0] via 172.15.0.2
R     172.14.0.0/16 [120/1] via 192.168.16.2, 00:00:08, GigabitEthernet0/0
      172.15.0.0/16 is variably subnetted, 2 subnets, 2 masks
C        172.15.0.0/24 is directly connected, GigabitEthernet0/1
L        172.15.0.1/32 is directly connected, GigabitEthernet0/1
      172.18.0.0/16 is variably subnetted, 4 subnets, 2 masks
C        172.18.0.0/24 is directly connected, Loopback0
L        172.18.0.1/32 is directly connected, Loopback0
C        172.18.1.0/24 is directly connected, Loopback1
L        172.18.1.1/32 is directly connected, Loopback1
      192.168.16.0/24 is variably subnetted, 2 subnets, 2 masks
C        192.168.16.0/24 is directly connected, GigabitEthernet0/0
L        192.168.16.1/32 is directly connected, GigabitEthernet0/0
NYEDGE1#
The Gateway of last resort has indeed been configured.
Step 4
Now by default, RIP does not advertise any type of static route. In order for this default route to be advertised to NYEDGE2, you must configure RIP to do so. Specifically, you issue the following commands:
NYEDGE1#configure terminal
Enter configuration commands, one per line.  End with CNTL/Z.
NYEDGE1(config)#router rip
NYEDGE1(config-router)#default-information originate
NYEDGE1(config-router)#exit
NYEDGE1(config)#
Step 5
Now connect to NYEDGE2 and examine the routing table:
NYEDGE2#show ip route
Codes: L - local, C - connected, S - static, R - RIP, M - mobile, B - BGP
       D - EIGRP, EX - EIGRP external, O - OSPF, IA - OSPF inter area
       N1 - OSPF NSSA external type 1, N2 - OSPF NSSA external type 2
       E1 - OSPF external type 1, E2 - OSPF external type 2
       i - IS-IS, su - IS-IS summary, L1 - IS-IS level-1, L2 - IS-IS level-2
       ia - IS-IS inter area, * - candidate default, U - per-user static route
       o - ODR, P - periodic downloaded static route, H - NHRP, l - LISP
       + - replicated route, % - next hop override
Gateway of last resort is 192.168.16.1 to network 0.0.0.0
R*    0.0.0.0/0 [120/1] via 192.168.16.1, 00:00:05, GigabitEthernet0/0
      172.14.0.0/16 is variably subnetted, 2 subnets, 2 masks
C        172.14.0.0/24 is directly connected, GigabitEthernet0/1
L        172.14.0.2/32 is directly connected, GigabitEthernet0/1
      172.18.0.0/24 is subnetted, 2 subnets
R        172.18.0.0 [120/1] via 192.168.16.1, 00:00:05, GigabitEthernet0/0
R        172.18.1.0 [120/1] via 192.168.16.1, 00:00:05, GigabitEthernet0/0
      192.168.16.0/24 is variably subnetted, 2 subnets, 2 masks
C        192.168.16.0/24 is directly connected, GigabitEthernet0/0
L        192.168.16.2/32 is directly connected, GigabitEthernet0/0
NYEDGE2#
You should notice two things from the above output. First, a new RIP route has been added with an “*” beside it. Looking at the Codes you can see that an “*” signifies a candidate default route. Secondly, you can see that this candidate default route has become the default route because of the Gateway of last resort is statement. So all traffic that does not match any of the entries in the routing table will be automatically routed to this default route.
You have successfully redistributed a default route and completed this lab.
Summary
In this module you achieved the following activities:
- You configured RIPv2 such that NYEDGE1 and NYEDGE2 shared their routing information
- You examined how the routing table is updated with routing information that has originated from the RIP protocol
- You configured a passive interface
- You adjusted the RIP timers
- You changed the configuration of the auto-summarization feature
- You redistributed a static route